- Network
- A
Traffic Generator Cisco TRex. Review
Considering the current market situation and the decrease in availability of ready-made solutions for network testing, it becomes relevant to consider any available alternatives. One of the most accessible and worthy options is the Open Source solution TRex from Cisco. I use this traffic generator in my current work and would like to share my experience with its usage. Its features, capabilities, and how to use it will be discussed in this article.
Given the current situation on the market and the decreasing availability of ready-made solutions for network testing, it becomes relevant to consider any available alternatives. One of the most affordable and worthy options is the open-source solution TRex from Cisco. I use this traffic generator in my current work and decided to share my experience with it. Its features, capabilities, and how to use it are what I would like to discuss in this article.
I think this material may be useful for network engineers and network equipment developers who are involved in network performance testing.
I invite everyone interested to read more!
What is Cisco TRex?
Cisco TRex is a software suite for generating Stateful and Stateless traffic flows based on several key technologies:
DPDK (Data Plane Development Kit): TRex uses DPDK for direct access to network cards (NICs), bypassing the Linux kernel. This eliminates overhead from system calls and buffer copying.
Poll-Mode Drivers (PMD): DPDK drivers operate in polling mode instead of interrupts, reducing latency and providing deterministic performance.
Huge Pages: Huge memory pages (2MB/1GB) are used to reduce TLB misses and speed up access to packet buffers.
It supports traffic generation for L3-L7 and provides most of the features implemented in expensive commercial products, among which the following can be highlighted:
emulation of a huge variety of client protocols such as ARP, IPv6, ND, MLD, IGMP, ICMP, DOT1X, DCHPv4, DHCPv6, DNS, and many others;
emulation of RIP, BGP, OSPF using BIRD;
traffic generation up to 200 Gbps and up to 10-30 Mpps per CPU core;
support for multiple threads;
ability to generate arbitrary packets;
generation of extended statistics for flows, ports, groups, latencies, and jitter;
Note. At this stage, it is important to note that the availability of certain declared features, including performance, will strongly depend on the hardware used.
Among the main competitive advantages of TRex, I would highlight the following:
The traffic generator is free and is an open-source product;
The traffic generation volume can be easily scaled by increasing the performance of the server running TRex;
It is easy to create test programs because traffic patterns are formed in the form of code;
It is a very flexible tool that can be customized as needed;
The tool can be used in virtualized environments;
Of course, such a product cannot compare with hardware solutions like Ixia (IxLoad, IxNetwork), Spirent, Xinertel, since it is a software solution. But in the absence of a better option, this product will meet the minimum requirements for a traffic generator and allow for the most basic network equipment and infrastructure testing.
TRex has several modes of operation:
Stateless Mode (STL) - that is, the generation of simple network packets without state tracking;
Advanced Stateful Mode (ASTF) - emulation of complex protocol traffic (TCP, HTTP, IPSec), supporting millions of sessions with state tracking (for example, TCP handshake);
Emulation Server (EMU);
Let's consider each of them separately and highlight the main features of these modes and what they are used for.
Stateless Mode (STL)
Here are the main features and characteristics of this operating mode:
TRex supports generating about 10-30 million packets per second (Mpps) per core and easily scales by increasing the number of CPU cores in the server;
Multithreading is supported up to 10 thousand parallel streams;
Each of these streams can be configured using a network packet template with Scapy, including the generation of malformed packets.
Generation of MPLS, IPv4, IPv6, GRE, VxLAN, NSH, etc. is supported;
Any field in the packet can be changed;
Packet size can be changed;
Continuous, Burst, Multi-burst traffic sending modes are possible;
You can specify the amount of generated traffic both in speed (bps) and in the number of packets per second (pps);
One stream can trigger the launch of another stream in a chain;
Support for interactive operation via GUI application or console;
Flexible statistics by streams and interfaces, supporting both software and hardware counters;
Statistics on delays and jitter;
Automation support through Python API use;
Ability to capture traffic using BPF filters and without Wireshark;
Ability to capture traffic and redirect it for analysis in Wireshark;
Support for sending PCAP files up to 1TB as test traffic, for example, for DPI system tests;
Support for using TRex by multiple users;
Advanced Stateful Mode (ASTF)
The second operating mode of Cisco TRex is the generation and emulation of traffic with connection establishment. The main features and capabilities can be listed as follows:
Support for establishing TCP connections;
Ability to work both as a server and as a client. Allows you to use multiple distributed TRex servers;
High traffic generation performance:
Allows generating traffic up to 200 Gbps;
High speed of network connection generation;
Scales to several million active connections;
Support for emulation of changing delay, jitter, and packet drops parameters;
Support for L7-application emulation, including using TLS through OpenSSL;
Support for modifying packet contents, for example, HTTP User-Agent;
Detailed statistics for TCP/UDP/Application;
IP/TCP/UDP checksum verification;
Support for both IPv4 and IPv6;
Support for packet fragmentation;
Accurate delay for TCP streams with histogram output for SYN/SYN ACK and REQ/RES;
Emulation Server (EMU)
This functionality allows you to generate a wide variety of client protocols. For example, it supports generating ARP, IPv6 ND, MLD, IGMP protocols at the L3 level. Additionally, it's worth mentioning:
Very fast creation/deletion of client applications, around 3,000 operations per second per CPU thread;
The number of active clients/namespaces is limited only by the server’s RAM capacity;
High packet generation rate: 3-5 Mpps per core;
Supported plugins and protocols in EMU mode:
ARP plugin. Implements RFC 826 support;
CDP (Cisco Discovery Protocol) plugin;
DHCPv4 plugin with RFC 2131 Client & Server support;
DHCPv6 plugin with RFC 8415 Client support;
DNS plugin with RFC 1034/1035 support;
DOT1X plugin with AP-MD5/EAP-MSCHAPv2 RFC 3748/2759, IEEE 802.1X-2001 support;
ICMP plugin with RFC 777 support;
IGMP plugin with IGMP v3/v2/v1 RFC 3376 support;
IPv6 plugin with IPv6 ND, RFC 4443, RFC 4861, RFC 4862 and MLD and MLDv2 RFC 3810 support;
LLDP plugin with IEEE 802.1AB support;
mDNS plugin with Multicast DNS, RFC 6762 support;
Netflow plugin, with Netflow v9, RFC 3954 and Netflow v10 (IPFix), RFC 7011 support;
Transport plugin, with userspace TCP and UDP applications support;
Cisco Telemetry TDL plugin, with network device emulation support;
A full overview of all features would require more than one article. We’ll cover the most commonly used features in a series of articles, but for now, let’s look at the minimum requirements to start using Trex.
Minimum System Requirements
TRex is a simple userspace application that interacts with Linux kernel modules, so this traffic generator only works on Linux systems. Supported OS list:
Fedora 18–20 and higher, 64-bit kernel (not 32-bit);
CentOS/RHEL 7.6, 64-bit kernel (not 32-bit);
Ubuntu 14.04.1 LTS and higher, 64-bit kernel (not 32-bit);
For other OSes, manual compilation is possible;
Intel DPDK is used for network processing, recommended for bypassing the Linux network stack for traffic processing, but kernel processing can be used as well with a significant performance limitation up to 1 Mpps.
Additionally, TRex can be launched with server configuration parameters on low-performance, low-memory systems. In cases where native DPDK support isn’t available in the OS, you can configure the traffic generator in virtualization systems such as VirtualBox, Docker, and similar.
Minimum hardware platform requirements:
Dual-core Intel CPU @ 2.0 GHz; for 10 Gbps generation, a CPU with 4 cores or more is needed, preferably Intel with Hyper-Threading support;
No real RAM constraint, but a memory size of 32 GB or more is recommended;
A network adapter supporting Intel DPDK is required. The list is here and here;
Documentation
The official documentation is located at https://trex-tgn.cisco.com/trex/doc/. I also recommend checking out this link on Github.
Judging by the last update date of many documents, the project appears abandoned and is barely developing. Many links to materials are unavailable and look very scattered.
I’ve put together the most useful official TRex links in a list:
Preparatory Actions
Let's move to the practical side of the discussion and prepare the server for operation. First, we need to check the bitness of the Linux kernel being used. The easiest way to do this is:
megalloid@trex:~$ uname -m
x86_64
Next, let's check which network interfaces are available. In my case, the first two ports are used for the Management server, while the X710 network card with 4 SFP+ ports will be used as traffic generator ports:
megalloid@trex:~$ lspci | grep Ethernet
1c:00.0 Ethernet controller: Intel Corporation Ethernet Connection X722 for 10GBASE-T (rev 09)
1c:00.1 Ethernet controller: Intel Corporation Ethernet Connection X722 for 10GBASE-T (rev 09)
af:00.0 Ethernet controller: Intel Corporation Ethernet Controller X710 for 10GbE SFP+ (rev 02)
af:00.1 Ethernet controller: Intel Corporation Ethernet Controller X710 for 10GbE SFP+ (rev 02)
af:00.2 Ethernet controller: Intel Corporation Ethernet Controller X710 for 10GbE SFP+ (rev 02)
af:00.3 Ethernet controller: Intel Corporation Ethernet Controller X710 for 10GbE SFP+ (rev 02)
To avoid performance issues on multiprocessor platforms, it is necessary to use different NUMA nodes for different network cards. To see how network interfaces are distributed across NUMA nodes, install the hwloc program and display the information:
megalloid@trex:~$ sudo apt install hwloc
megalloid@trex:~$ lstopo
If you are running on a remote machine, the result will be displayed in the terminal; if not, a GUI application will be launched.
Next, we need to check if HugePages are available on the OS. To do this, check the output when running the following command:
megalloid@trex:~$ grep Huge /proc/meminfo
AnonHugePages:         0 kB
ShmemHugePages:  1044480 kB
FileHugePages:         0 kB
HugePages_Total:       0
HugePages_Free:        0
HugePages_Rsvd:        0
HugePages_Surp:        0
Hugepagesize:       2048 kB
Hugetlb:               0 kB
Then, set the number of HugePages through sysctl:
megalloid@trex:~$ sudo sysctl -w vm.nr_hugepages=1024
vm.nr_hugepages = 1024
megalloid@trex:~$ cat /sys/devices/system/node/node1/hugepages/hugepages-2048kB/nr_hugepages
1024
megalloid@trex:~$ cat /sys/devices/system/node/node0/hugepages/hugepages-2048kB/nr_hugepages
1024
Alternatively, you can do the following with sudo (if the utilities for working with DPDK are installed):
megalloid@trex:~$ sudo dpdk-hugepages.py --setup 2GInstallation and Launch of Cisco TRex in Native OS
To launch TRex, only a few steps are required. I will describe each of them.
First, create the TRex working directory, download the latest release image (as of this writing, version 3.06), and extract it:
megalloid@trex:~$ sudo mkdir -p /opt/trex
megalloid@trex:~$ sudo chmod 0777 /opt/trex
megalloid@trex:~$ cd /opt/trex
megalloid@trex:~$ wget --no-cache https://trex-tgn.cisco.com/trex/release/v3.06.tar.gz --no-check-certificate
megalloid@trex:~$ tar -xzvf v3.06.tar.gz
Before using TRex in production, it is strongly recommended to perform direct traffic generation from port to port through a simple loopback connection.
First, let's check if our network card with test ports is present in the list of network interfaces. Since none of the ports have been assigned to DPDK yet, you can see that all ports are initialized with the i40e driver in the Linux kernel:
megalloid@trex:/opt/trex/v3.06$ sudo ./dpdk_setup_ports.py -s

Network devices using DPDK-compatible driver
============================================


Network devices using kernel driver
===================================
0000:1c:00.0 'Ethernet Connection X722 for 10GBASE-T' if=eno1 drv=i40e unused=igb_uio,vfio-pci,uio_pci_generic
0000:1c:00.1 'Ethernet Connection X722 for 10GBASE-T' if=eno2 drv=i40e unused=igb_uio,vfio-pci,uio_pci_generic
0000:af:00.0 'Ethernet Controller X710 for 10GbE SFP+' if=ens1f0 drv=i40e unused=igb_uio,vfio-pci,uio_pci_generic
0000:af:00.1 'Ethernet Controller X710 for 10GbE SFP+' if=ens1f1 drv=i40e unused=igb_uio,vfio-pci,uio_pci_generic
0000:af:00.2 'Ethernet Controller X710 for 10GbE SFP+' if=ens1f2 drv=i40e unused=igb_uio,vfio-pci,uio_pci_generic
0000:af:00.3 'Ethernet Controller X710 for 10GbE SFP+' if=ens1f3 drv=i40e unused=igb_uio,vfio-pci,uio_pci_generic

Other network devices
=====================
To assign ports to DPDK, you need to run the following command:
megalloid@trex:/opt/trex/v3.06$ sudo modprobe vfio-pci enable_unsafe_noiommu_mode=1
megalloid@trex:/opt/trex/v3.06$ sudo /bin/sh -c 'echo 1 > /sys/module/vfio/parameters/enable_unsafe_noiommu_mode'
Next, I recommend using external DPDK configuration tools:
megalloid@trex:/opt/trex/v3.06$ wget https://raw.githubusercontent.com/DPDK/dpdk/main/usertools/dpdk-devbind.py
megalloid@trex:/opt/trex/v3.06$ sudo ./dpdk_nic_bind.py -b vfio-pci 0000:af:00.0
megalloid@trex:/opt/trex/v3.06$ sudo ./dpdk_nic_bind.py -b vfio-pci 0000:af:00.1
megalloid@trex:/opt/trex/v3.06$ sudo ./dpdk_nic_bind.py -b vfio-pci 0000:af:00.2
megalloid@trex:/opt/trex/v3.06$ sudo ./dpdk_nic_bind.py -b vfio-pci 0000:af:00.3
Let's see if the ports have been bound to DPDK:
megalloid@trex:/opt/trex/v3.06$ sudo ./dpdk_setup_ports.py -s

Network devices using DPDK-compatible driver
============================================
0000:af:00.0 'Ethernet Controller X710 for 10GbE SFP+' drv=vfio-pci unused=i40e,igb_uio,uio_pci_generic
0000:af:00.1 'Ethernet Controller X710 for 10GbE SFP+' drv=vfio-pci unused=i40e,igb_uio,uio_pci_generic
0000:af:00.2 'Ethernet Controller X710 for 10GbE SFP+' drv=vfio-pci unused=i40e,igb_uio,uio_pci_generic
0000:af:00.3 'Ethernet Controller X710 for 10GbE SFP+' drv=vfio-pci unused=i40e,igb_uio,uio_pci_generic

Network devices using kernel driver
===================================
0000:1c:00.0 'Ethernet Connection X722 for 10GBASE-T' if=eno1 drv=i40e unused=igb_uio,vfio-pci,uio_pci_generic
0000:1c:00.1 'Ethernet Connection X722 for 10GBASE-T' if=eno2 drv=i40e unused=igb_uio,vfio-pci,uio_pci_generic

Other network devices
=====================
Or you can display the port status as follows:
megalloid@trex:/opt/trex/v3.06$ sudo ./dpdk_setup_ports.py -t
+----+------+---------+-------------------+-----------------------------------------+----------+----------+--------+
| ID | NUMA |   PCI   |        MAC        |                  Name                   |  Driver  | Linux IF | Active |
+====+======+=========+===================+=========================================+==========+==========+========+
| 0  | 0    | 1c:00.0 | 3c:ec:ef:5f:78:74 | Ethernet Connection X722 for 10GBASE-T  | i40e     | eno1     |        |
+----+------+---------+-------------------+-----------------------------------------+----------+----------+--------+
| 1  | 0    | 1c:00.1 | 3c:ec:ef:5f:78:75 | Ethernet Connection X722 for 10GBASE-T  | i40e     | eno2     |        |
+----+------+---------+-------------------+-----------------------------------------+----------+----------+--------+
| 2  | 1    | af:00.0 | 6c:b3:11:68:05:38 | Ethernet Controller X710 for 10GbE SFP+ | vfio-pci |          |        |
+----+------+---------+-------------------+-----------------------------------------+----------+----------+--------+
| 3  | 1    | af:00.1 | 6c:b3:11:68:05:3a | Ethernet Controller X710 for 10GbE SFP+ | vfio-pci |          |        |
+----+------+---------+-------------------+-----------------------------------------+----------+----------+--------+
| 4  | 1    | af:00.2 | 6c:b3:11:68:05:3c | Ethernet Controller X710 for 10GbE SFP+ | vfio-pci |          |        |
+----+------+---------+-------------------+-----------------------------------------+----------+----------+--------+
| 5  | 1    | af:00.3 | 6c:b3:11:68:05:3e | Ethernet Controller X710 for 10GbE SFP+ | vfio-pci |          |        |
+----+------+---------+-------------------+-----------------------------------------+----------+----------+--------+
The binding of the ports to DPDK and the vfio-pci driver was successful, so let's move on.
The next step is to prepare the configuration file for the TRex server. The minimal configuration file is located in the cfg/simple.cfg.yaml directory. In my case, since 4 ports are used, I created this configuration and copied it to /etc/trex_cfg.yaml:
- port_limit      : 4
  version         : 2
  interfaces      : ["0000:af:00.0","0000:af:00.1","0000:af:00.2","0000:af:00.3"]
The port_limit field specifies the number of ports that TRex will interact with. Then, the interfaces parameter should be specified as a list of PCI addresses for these interfaces.
It is possible to set network parameters for the upcoming test, but I do not recommend specifying them as each separate test will require restarting the server with new parameters.
If the number of cores allows, it is possible to configure a setup that provides higher performance. In my case, with a 32-core processor, I can distribute threads of separate TRex subprocesses across different threads:
- port_limit         : 4
  version            : 3
  interfaces         : ["0000:af:00.0","0000:af:00.1","0000:af:00.2","0000:af:00.3"]
  port_bandwidth_gb  : 10
  c                  : 8
  platform :
    master_thread_id  : 0
    latency_thread_id : 25
    dual_if:
      - socket : 1
        threads : [17,18,19,20,21,22,23,24]
      - socket : 1
        threads : [9,10,11,12,13,14,15,16]
For more information about configuration fields, you can read here.
Now, you can check if the TRex server is running:
TRex server startup log
megalloid@trex:/opt/trex/v3.06$ sudo ./t-rex-64 -i --cfg /etc/trex_cfg.yaml --arp-refresh-period 30 -v 8

Starting Scapy server.... Scapy server is started
The ports are bound/configured.
Starting  TRex v3.06 please wait  ...
Using configuration file /etc/trex_cfg.yaml
 port limit     :  4
 port_bandwidth_gb    :  10
 port_speed           :  0
 port_mtu             :  0
 if_mask        : None
 is low-end : 0
 stack type :
 thread_per_dual_if      : 1
 if        :  0000:af:00.0, 0000:af:00.1, 0000:af:00.2, 0000:af:00.3,
 enable_zmq_pub :  1
 zmq_pub_port   :  4500
 m_zmq_rpc_port    :  4501
 src     : 6c:b3:11:68:05:38
 dest    : 00:0a:35:00:00:83
 src     : 6c:b3:11:68:05:3a
 dest    : 00:0a:35:00:00:84
 src     : 6c:b3:11:68:05:3c
 dest    : 00:0a:35:00:00:85
 src     : 6c:b3:11:68:05:3e
 dest    : 00:0a:35:00:00:86
 memory per 2x10G ports
 MBUF_64                                   : 16380
 MBUF_128                                  : 8190
 MBUF_256                                  : 8190
 MBUF_512                                  : 8190
 MBUF_1024                                 : 8190
 MBUF_2048                                 : 4095
 MBUF_4096                                 : 128
 MBUF_9K                                   : 512
 TRAFFIC_MBUF_64                           : 65520
 TRAFFIC_MBUF_128                          : 32760
 TRAFFIC_MBUF_256                          : 8190
 TRAFFIC_MBUF_512                          : 8190
 TRAFFIC_MBUF_1024                         : 8190
 TRAFFIC_MBUF_2048                         : 32760
 TRAFFIC_MBUF_4096                         : 128
 TRAFFIC_MBUF_9K                           : 512
 MBUF_DP_FLOWS                             : 524288
 MBUF_GLOBAL_FLOWS                         : 5120
 no platform info
CTimerWheelYamlInfo does not exist
 set driver name net_i40e
 driver capability  : TCP_UDP_OFFLOAD  TSO  SLRO
 set dpdk queues mode to DROP_QUE_FILTER
 Number of ports found: 4
Loading DDP profile (0) Profile is already loaded
Loading DDP profile (1) Profile is already loaded
Loading DDP profile (2) Profile is already loaded
Loading DDP profile (3) Profile is already loaded
zmq publisher at: tcp://*:4500
 A workaround is applied for issue #508
 A workaround is applied for issue #508
 A workaround is applied for issue #508
 A workaround is applied for issue #508
 wait 1 sec .
port : 0
------------
link         :  link : Link Up - speed 10000 Mbps - full-duplex
promiscuous  : 0
port : 1
------------
link         :  link : Link Up - speed 10000 Mbps - full-duplex
promiscuous  : 0
port : 2
------------
link         :  link : Link Up - speed 10000 Mbps - full-duplex
promiscuous  : 0
port : 3
------------
link         :  link : Link Up - speed 10000 Mbps - full-duplex
promiscuous  : 0
 number of ports         : 4
 max cores for 2 ports   : 1
 tx queues per port      : 3
 -------------------------------
RX core uses TX queue number 1 on all ports
 core, c-port, c-queue, s-port, s-queue, lat-queue
 ------------------------------------------
 1        0      0       1       0      2
 2        2      0       3       0      2
 -------------------------------
After the startup, statistics for the interfaces will be displayed:
Output of the running TRex server:
-Per port stats table
      ports |               0 |               1 |               2 |               3
 -----------------------------------------------------------------------------------------
   opackets |               0 |               0 |               0 |               0
     obytes |               0 |               0 |               0 |               0
   ipackets |               0 |               0 |               0 |               0
     ibytes |               0 |               0 |               0 |               0
    ierrors |               0 |               0 |               0 |               0
    oerrors |               0 |               0 |               0 |               0
      Tx Bw |       0.00  bps |       0.00  bps |       0.00  bps |       0.00  bps

-Global stats enabled
 Cpu Utilization : 0.0  %
 Platform_factor : 1.0
 Total-Tx        :       0.00  bps
 Total-Rx        :       0.00  bps
 Total-PPS       :       0.00  pps
 Total-CPS       :       0.00  cps

 Expected-PPS    :       0.00  pps
 Expected-CPS    :       0.00  cps
 Expected-BPS    :       0.00  bps

 Active-flows    :        0  Clients :        0   Socket-util : 0.0000 %
 Open-flows      :        0  Servers :        0   Socket :        0 Socket/Clients :  -nan
 drop-rate       :       0.00  bps
 current time    : 68.1 sec
 test duration   : 0.0 sec
After this, the server is ready to work, so let's check the traffic generator functionality. The idea is that we launch the server in one terminal window, and use another terminal for the control console to send the commands we need.
Since the server is already running, we just need to launch the interactive TRex console in another terminal:
megalloid@trex:/opt/trex/v3.06$ ./trex-console -fThe TRex console will open:
Using 'python3' as Python interpeter

Connecting to RPC server on localhost:4501                   [SUCCESS]

Connecting to publisher server on localhost:4500             [SUCCESS]

Force acquiring ports [0, 1, 2, 3]:                          [SUCCESS]

Server Info:

Server version:   v3.06 @ STL
Server mode:      Stateless
Server CPU:       2 x Intel(R) Xeon(R) Gold 6226R CPU @ 2.90GHz
Ports count:      4 x 10Gbps @ Ethernet Controller X710 for 10GbE SFP+

-=TRex Console v3.0=-

Type 'help' or '?' for supported actions

trex>
Connect ports 0 and 1 together to run the test traffic. Then start the traffic with the following command:
trex> start -f stl/imix.py -m 10kpps --port 2After launching, the counters in the statistics menu will start increasing. To view the current status of the ports, run the tui command in the TRex console:
trex> tuiThe following statistics page will be displayed:
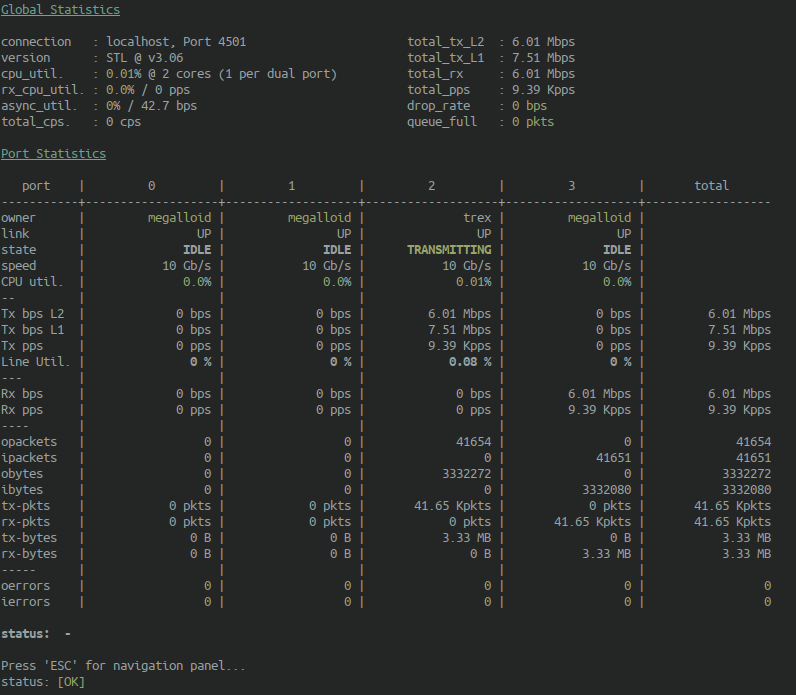
I launched traffic from port 2 to port 3 at 10 kpps, and you can see that end-to-end transmission is happening and everything is working as it should.
Solution to the TRex 3.06 issue with Python 3.12 and Ubuntu 24.04
At the time of publishing this article, TRex version 3.06 is not compatible with Python 3.12, which is the default Python in Ubuntu 24.04. To resolve this, use Python 3.11 in a virtual environment:
megalloid@trex:~$ sudo add-apt-repository ppa:deadsnakes/ppa
megalloid@trex:~$ sudo apt update && sudo apt install python3.11 python3.11-venv
megalloid@trex:~$ cd v3.06   # wherever you untarred trex 3.06
megalloid@trex:~$ python3.11 -m venv venv
megalloid@trex:~$ source ./venv/bin/activate
megalloid@trex:~$ venv/bin/python venv/bin/pip install cffi
You will need to make sure you re-run source ./venv/bin/activate every time you return to the system to launch TRex, otherwise you'll revert to Python 3.12 and get a bunch of amusing errors.
TRex 3.06 comes with a copy of libstdc++.so.6 which is incompatible with Ubuntu 24.04. You can safely remove it:
megalloid@trex:~$ rm v3.06/so/x86_64/libstdc++.so.6 Installing Cisco TRex in Docker
The second launch option is inside a Docker container. To do this, install Docker:
megalloid@trex:~$ sudo apt-get update
megalloid@trex:~$ sudo apt-get install curl
megalloid@trex:~$ curl -fsSL https://get.docker.com -o get-docker.sh
megalloid@trex:~$ sudo sh get-docker.sh
After this, you need to download the prepared Docker image from the repository. Unfortunately, the image hasn't been updated for a long time, and the repository contains an old version of TRex 2.41, which is not recommended for use.
megalloid@trex:~$ sudo docker pull trexcisco/trexStart the first terminal of this Docker container to launch the server:
megalloid@trex:~$ sudo docker run --rm -it --privileged --cap-add=ALL trexcisco/trex
sudo docker run --rm -it --privileged --cap-add=ALL trexcisco/trex

[root@6d519c9fbd08 v2.41]# ./t-rex-64 -i
Starting Scapy server.... Scapy server is started
The ports are bound/configured.
Starting  TRex v2.41 please wait  ...
EAL: Started without hugepages support, physical addresses not available
 set driver name net_af_packet
 driver capability  :
 Number of ports found: 2
zmq publisher at: tcp://*:4500
 wait 1 sec .
port : 0
------------
link         :  link : Link Up - speed 10000 Mbps - full-duplex
promiscuous  : 0
port : 1
------------
link         :  link : Link Up - speed 10000 Mbps - full-duplex
promiscuous  : 0
 number of ports         : 2
 max cores for 2 ports   : 1
 max queue per port      : 3
 -------------------------------
RX core uses TX queue number 0 on all ports
 core, c-port, c-queue, s-port, s-queue, lat-queue
 ------------------------------------------
 1        0      0       1       0      0
 -------------------------------
The server will start with statistics updating every second:
Log of the running Cisco TRex server in the Docker container
-Per port stats table
      ports |               0 |               1
 -----------------------------------------------------------------------------------------
   opackets |               0 |               0
     obytes |               0 |               0
   ipackets |               0 |               0
     ibytes |               0 |               0
    ierrors |               0 |               0
    oerrors |               0 |               0
      Tx Bw |       0.00  bps |       0.00  bps

-Global stats enabled
 Cpu Utilization : 0.0  %  0.0 Gb/core
 Platform_factor : 1.0
 Total-Tx        :       0.00  bps
 Total-Rx        :       0.00  bps
 Total-PPS       :       0.00  pps
 Total-CPS       :       0.00  cps

 Expected-PPS    :       0.00  pps
 Expected-CPS    :       0.00  cps
 Expected-BPS    :       0.00  bps

 Active-flows    :        0  Clients :        0   Socket-util : 0.0000 %
 Open-flows      :        0  Servers :        0   Socket :        0 Socket/Clients :  -nan
 drop-rate       :       0.00  bps
 current time    : 1.6 sec
 test duration   : 0.0 sec
In another terminal, you can launch the TRex server management console:
megalloid@trex:~$ sudo docker ps
CONTAINER ID   IMAGE            COMMAND       CREATED          STATUS          PORTS     NAMES
8baf64fc16c7   trexcisco/trex   "/bin/bash"   15 seconds ago   Up 15 seconds             intelligent_mcnulty

megalloid@trex:~$ sudo docker exec -it 8baf64fc16c7 bash
[root@8baf64fc16c7 v2.41]# ./trex-console

Using 'python' as Python interpeter

Connecting to RPC server on localhost:4501                   [SUCCESS]

Connecting to publisher server on localhost:4500             [SUCCESS]

Acquiring ports [0, 1]:                                      [SUCCESS]

Server Info:

Server version:   v2.41 @ STL
Server mode:      Stateless
Server CPU:       1 x 12th Gen Intel(R) Core(TM) i7-1255U
Ports count:      2 x 10Gbps @ Unknown

-=TRex Console v2.0=-

Type 'help' or '?' for supported actions

trex>
You can start traffic and watch the statistics numbers change:
trex> start -f stl/imix.py -m 10kpps --port 0
trex> tui

Global Statistics

connection   : localhost, Port 4501                  total_tx_L2  : 28.25 Mb/sec
version      : v2.41                                 total_tx_L1  : 29.82 Mb/sec
cpu_util.    : 0.14% @ 1 cores (1 per port)          total_rx     : 28.25 Mb/sec
rx_cpu_util. : 0.0% / 9.76 Kpkt/sec                  total_pps    : 9.76 Kpkt/sec
async_util.  : 0.17% / 1.32 KB/sec                   drop_rate    : 0.00 b/sec
                                                     queue_full   : 0 pkts

Port Statistics

   port    |         0         |         1         |       total
----------------------------------------------------------------------
owner      |              root |              root |
link       |                UP |                UP |
state      |      TRANSMITTING |              IDLE |
speed      |           10 Gb/s |           10 Gb/s |
CPU util.  |             0.14% |              0.0% |
--         |                   |                   |
Tx bps L2  |        28.25 Mbps |          0.00 bps |        28.25 Mbps
Tx bps L1  |        29.82 Mbps |             0 bps |        29.82 Mbps
Tx pps     |         9.76 Kpps |          0.00 pps |         9.76 Kpps
Line Util. |            0.30 % |            0.00 % |
---        |                   |                   |
Rx bps     |          0.00 bps |        28.25 Mbps |        28.25 Mbps
Rx pps     |          0.00 pps |         9.76 Kpps |         9.76 Kpps
----       |                   |                   |
opackets   |            167053 |                 0 |            167053
ipackets   |                 2 |            167044 |            167046
obytes     |          60446500 |                 0 |          60446500
ibytes     |               148 |          60442370 |          60442518
opackets   |      167.05 Kpkts |            0 pkts |      167.05 Kpkts
ipackets   |            2 pkts |      167.04 Kpkts |      167.05 Kpkts
obytes     |          60.45 MB |               0 B |          60.45 MB
ibytes     |             148 B |          60.44 MB |          60.44 MB
-----      |                   |                   |
oerrors    |                 0 |                 0 |                 0
ierrors    |                 0 |                 0 |                 0

status:  -

Press 'ESC' for navigation panel...
status: [OK]
Conclusion
Cisco TRex has proven to be a powerful free tool for testing network infrastructure, combining a decent level of performance with an open ecosystem. Its open source nature, support for the modern technology stack and protocols, and the ability to adapt to any scenarios (from data centers to telecom networks) make it an excellent tool for engineers, testers, and architects.
In the next articles, I want to take a closer look at several important topics that could deepen the understanding of how to use this tool at a qualitatively new level. Among these topics, I would highlight the following:
stateless traffic generation with your own traffic profile, with a real-life testing scenario;
stateful traffic generation, with connection establishment, suitable for firewall, network filter, and other device testing;
detailed dissection of the inner workings and architecture of Cisco TRex, its built-in utilities;
test automation using the Python API and how I use TRex in my work;
See you in upcoming articles! =)


Write comment