- AI
- A
How we revived DPED: An AI project to enhance mobile photos to DSLR-quality images
Hello, tekkix! The team of the regional scientific and educational center "Artificial Intelligence and Big Data Analysis" at NSTU named after R. E. Alekseev is here.
Today, almost every major smartphone manufacturer has its own photo enhancement systems based on artificial intelligence. In addition, there are many similar open models of neural networks. The question arises: why did we decide to revive
About the project
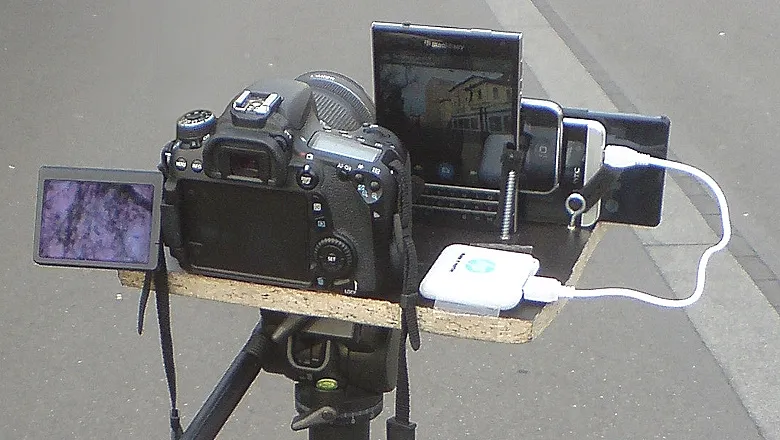
Let's start with a bit more detail about the project. One day, a group of AI enthusiasts had an idea: what if we train artificial intelligence to enhance smartphone photos to professional quality using paired images? The idea was well-received. For the dataset, they selected popular devices of the time: Sony Xperia Z, iPhone 3GS, BlackBerry Passport, and the Canon EOS 70D digital SLR as the reference. The model was trained to enhance photos taken on smartphones according to the corresponding images from the camera. The project was realized, and the source code was published on GitHub, with a detailed description available on arXiv.org. But what is interesting about it now, almost ten years later?
DPED doesn’t just apply cosmetic filters. The dataset is capable of significantly enhancing photos at the level of image structure, detail, dynamic range, and color reproduction, bringing the result closer to that of a professional DSLR camera rather than simply “improving” the photo.
The open-source nature and accessibility of the DPED dataset make it easy to adapt, modify, and refine the model. This offers great opportunities for the research community and mobile application developers. The flexibility and clarity of the architecture make DPED a strong candidate for further experiments and improvements.
Finally, despite its age, DPED still delivers competitive results. We were curious to assess how much these results could be improved by adapting the project for modern libraries and hardware, as well as comparing it with contemporary solutions using a new, current dataset.
But let’s not get ahead of ourselves—this is a topic for future articles, and for now, we’ll focus on bringing DPED back to life.
Preparation for Launch
First, it’s necessary to launch the project’s source code. At the time of our work, DPED was already seven years old. For machine learning and computer vision, that’s a long time, and we expected difficulties at various stages.
Our expectations were justified: when we tried to test the model on prepared data, we encountered errors. These were caused by new library versions, where some modules were relocated, code was rewritten, functions had their names changed, and many other modifications occurred.
Next, we’ll explain how to launch the project and fix errors on relatively recent library versions compatible with Python 3.11. To start, clone the project using the command:
git clone https://github.com/aiff22/DPEDThe directory structure will look approximately as follows:
└── DPED
	├── dped
	├── load_dataset.py
	├── models
	├── models_orig
	│   ├── blackberry_orig.data-00000-of-00001
	│   ├── blackberry_orig.index
	│   ├── iphone_orig.data-00000-of-00001
	│   ├── iphone_orig.index
	│   ├── sony_orig.data-00000-of-00001
	│   └── sony_orig.index
	├── models.py
	├── README.md
	├── results
	├── ssim.py
	├── test_model.py
	├── train_model.py
	├── utils.py
	├── vgg_pretrained
	├── vgg.py
	└── visual_results
5 directories, 14 files
You need to download the pre-trained VGG-19 model, which can classify images into a thousand object categories, and transfer it to the vgg_pretrained folder.
Next, you need the dataset of patches on which this model was trained.
Patches are small, often square fragments of the original image, extracted from full-size photographs for training neural networks. For example, from a 4000×3000 pixel photo, dozens of patches measuring 100×100 pixels can be cut. The patches come in pairs: one from a mobile device, the other from a professional camera, taken from the same angle. The model learns to restore missing details, improve sharpness, colors, etc. If entire photos were used for training, it would increase memory usage and process complexity.
The archive of full-size dataset photos, totaling 54 GB, can be downloaded from OpenDataLab (mirror). We tried downloading them via http, but after a few days the download was interrupted. We recommend downloading not directly through the browser, but via git lfs. However, note that lfs makes a copy of the downloaded objects: in our case, a total of 134 GB of free space was required to download, but we were able to do it in an hour.
Git lfs can be installed on Linux via the command git lfs install, and on Windows — from the official website. Then, you need to initialize git lfs using git lfs install --skip-smudge; this command will simply clone the repository and create links to the files. After that, you can download the archive of original photos via the command git pull —include “original_images.gz” if you are interested in how the dataset was formed. In our run, we do not use these photos.
After downloading, the archive with patches needs to be extracted into the dped folder, after which three folders will appear in it: sony, iphone, and blackberry. Now everything is ready to run the code. The final project structure:
.
├── dped
│   ├── blackberry
│   │   ├── test_data
│   │   │   ├── full_size_test_images
│   │   │   └── patches
│   │   │   	├── blackberry
│   │   │   	└── canon
│   │   └── training_data
│   │   	├── blackberry
│   │   	└── canon
│   ├── iphone
│   │   ├── test_data
│   │   │   ├── full_size_test_images
│   │   │   └── patches
│   │   │   	├── canon
│   │   │   	└── iphone
│   │   └── training_data
│   │   	├── canon
│   │   	└── iphone
│   └── sony
│   	├── test_data
│   	│   ├── full_size_test_images
│   	│   └── patches
│   	│   	├── canon
│   	│   	└── sony
│   	└── training_data
│       	├── canon
│       	└── sony
├── models
├── models_orig
├── results
├── vgg_pretrained
└── visual_results
33 directories
The DPED project provides for two main operating scenarios:
running a pre-trained model on prepared data (with already assigned weights),
training your own model on the original DPED dataset (from scratch, or fine-tuning)
Running the pre-trained DPED model on prepared data
The first scenario will allow us to quickly make sure that the code runs correctly and get a visible result without the costs of training.
When launching test_model.py, we encountered an issue with saving images: newer versions of Pillow do not support saving RGB images in float32 format, which is exactly the format in which the model returned arrays. Previously, this worked, but with newer versions of Pillow, it is necessary to convert the image to uint8 type.
We limited the pixel values to the [0, 1] range and scaled to [0, 255] converting to uint8. This is a standard step to prepare an image for saving in JPG/PNG formats, and it does not affect the final quality, as all calculations inside the model are still done in float32. File test_model.py:

After this, the improved photos started to be saved like this:
The reason for the errors is that even though we limited pixel values to the [0, 1] range and scaled them to [0, 255] with conversion to uint8, during image generation the values can go beyond these limits (for example, –0.03 or 1.07). This leads to incorrect saving, especially when converting to uint8. To guarantee that all values stay within the allowed range before scaling, we used the .clip(0, 1) method in test_model.py:

As a result, we were able to save the output images and move on to the second scenario.
Training your own model on the DPED dataset
Here, we are interested in testing how the model will perform with new hardware and new versions of libraries, as well as comparing the quality of the images produced by our model with the original results from 2017. This experience can be used in the future to train an updated version of the model on photos taken with modern smartphones.
The original DPED repository already contains pre-trained models for three smartphones (Sony, iPhone, BlackBerry), created by the authors of the study. We tested them, but then retrained the model ourselves using the same dataset, but with an updated environment (new versions of TensorFlow, Python, etc.) and taking hardware limitations into account. Now, let's go through everything step by step.
When launching model training on the dataset provided by the paper's authors, an error occurs: scipy.misc.imread. This module is deprecated and was removed in scipy version 1.12.0. To use it, you need to download version 1.11.0.
For this, the Python version must be newer than 3.8 and earlier than 3.9, which can lead to even more import errors and library version mismatches. So, we simply replaced the imread method from scipy with imread from pillow or imageio. After this, we had no more issues during training. The file load_dataset.py:
from imageio import imread
misc.imread = imread
Training is demanding in terms of video memory, and this is mentioned on the project's GitHub page in the "possible errors" section. If video memory is insufficient, the batch size—the number of examples processed in one step—will need to be reduced. By default, the parameter is set to 50, and if resources for training are insufficient, a log message will indicate a lack of video memory. In our case, this happened with the Nvidia RTX 3060 Ti (8 GB VRAM), so we had to experiment with the batch_size parameter.
Reducing the batch size is a common measure when video memory is limited, and it does not go unnoticed. The main consequences:
Decreased gradient stability and convergence. Larger batches provide a more accurate estimate of gradients, making training more stable. Smaller batches, on the other hand, introduce more "noise," which can lead to less stable convergence, especially in the early stages of training.
Fluctuations in the loss function. With a small batch size, the loss function may fluctuate more sharply from step to step, requiring fine-tuning of the learning rate and other hyperparameters.
Final model quality. This depends on the task, but in general, a smaller batch size can slightly reduce the model’s generalization ability, especially if other parameters (learning rate, number of epochs, etc.) have not been adjusted accordingly.
Impact on image quality metrics SSIM (structural similarity index) and PSNR (peak signal-to-noise ratio). For example, SSIM may be slightly lower if the model was not trained stably enough. The difference is usually insignificant if the model has been properly fine-tuned using a slightly higher number of epochs or adaptation of the learning rate.
For the Nvidia RTX 3060 Ti (8 GB VRAM), we lowered the batch_size from 50 to 35. As a result, the model trained without errors, and the quality metrics remained at the level or above the original 2017 results. Additionally, for training, we used the Nvidia RTX 2080 Ti (11 GB RAM), and it was possible to run it with the parameters used by the project authors.
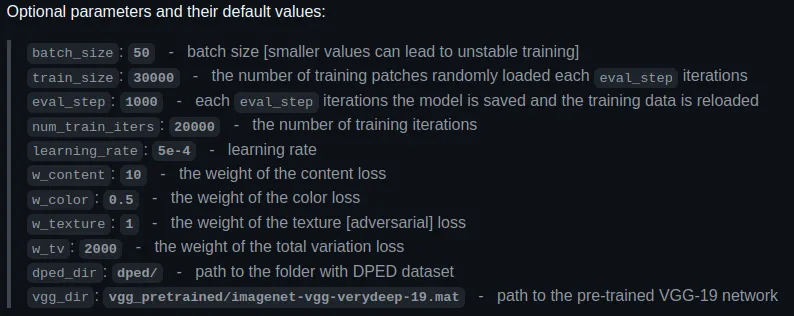
For training, we used two configurations: with Nvidia RTX 2080 Ti 11 GB and Nvidia RTX 3060 Ti 8 GB. In the first configuration, we used the default hyperparameters, which were also used by the model's authors for training. Explanations for these are provided in the screenshot:
We calculated the image quality metrics SSIM (structural similarity index) and PSNR (peak signal-to-noise ratio) and compared them with those presented in the article. The Nvidia Titan X section shows the results of testing the pre-trained model from the original project repository. The RTX sections show the results of testing the model trained on more modern hardware in a more modern environment (Python, TensorFlow). The horizontal axis shows specific datasets for different phone models:

As can be seen, the metrics were improved for almost all models when running on our configurations.
At the time of writing this article, we made all the necessary changes to the local copy of the DPED project, including:
compatibility with Python 3.11,
replacement of scipy.misc.imread with imageio.imread,
updating image saving from float32 to uint8,
updating dependencies and adapting to new library versions (NumPy, Pillow, TensorFlow, etc.),
fixes related to video memory limitations (for example, batch_size).
We plan to upload a separate branch of the project on GitHub, where:
All changes will be presented as a pull request.
A list of modified files and explanations for them will be provided.
An installation guide through requirements.txt and/or Conda will be added.
Improving Photos
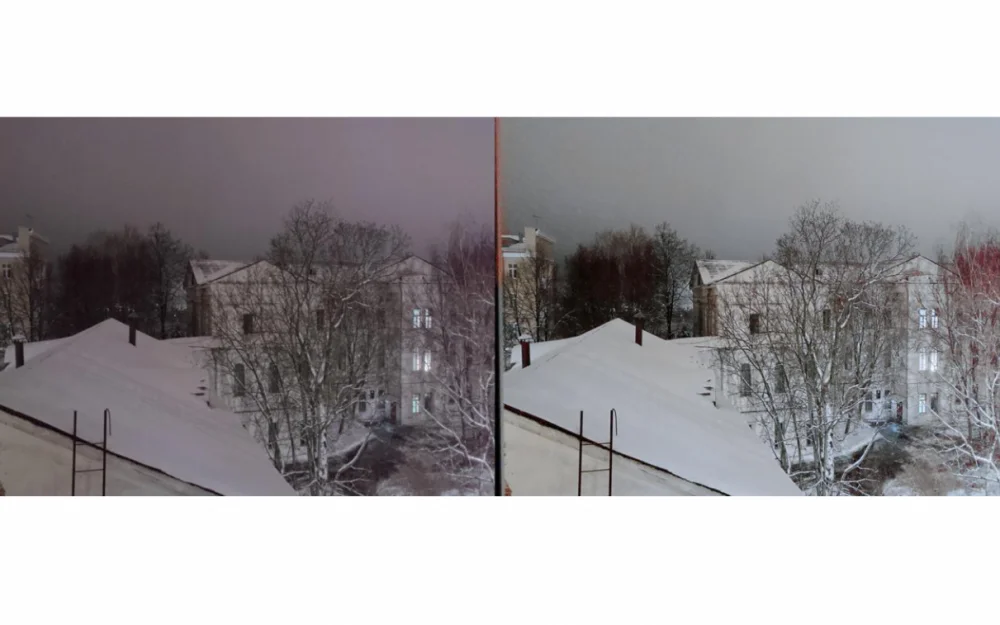
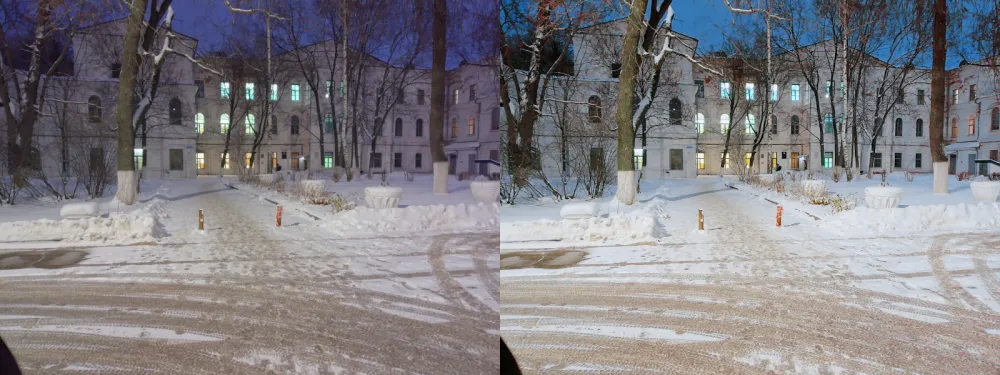
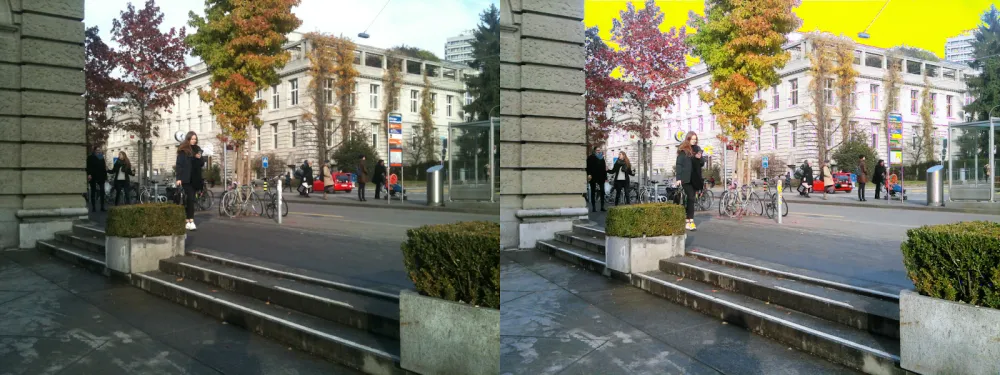
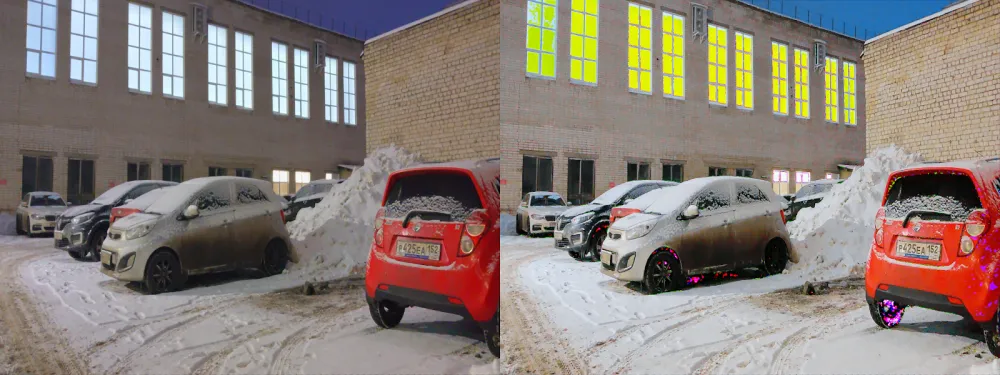
It's time to give DPED a real task. For testing, we took photos taken with the YADRO KVADRA_T tablet. At the time of testing, it was at hand, so we were able to quickly conduct the "real-world" experiment while checking the functionality of the project after the updates. On the left are the originals, on the right are the processing results:

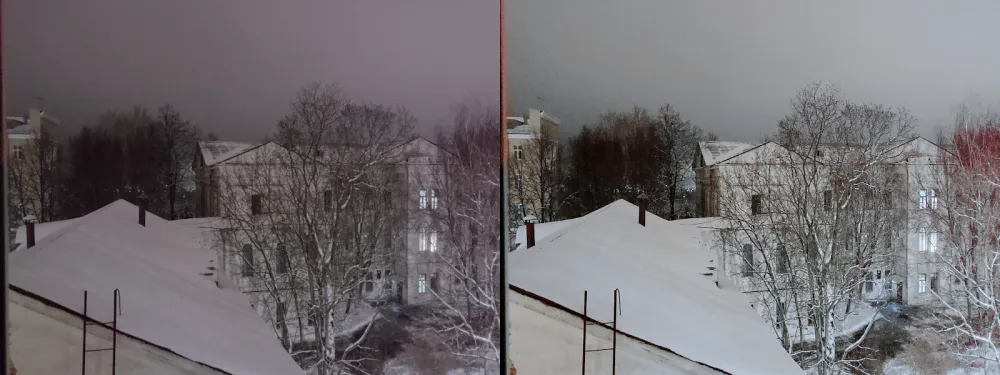
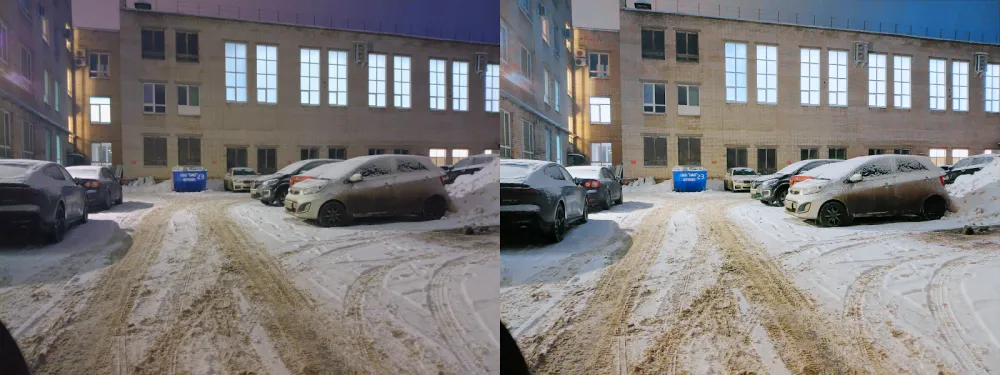
In the next article, we will provide quality metrics for these images, but for now, we invite you to visually assess the progress.
The Value of DPED Today
At the time of its publication in 2017, the DPED project was a significant achievement in mobile photography post-processing through deep learning. DPED is not just a model—it is a clear and open architecture that allows us to precisely track how the quality of mobile photos has evolved over the years. The comparison between the "old but updated" model and the offerings of leading smartphone manufacturers and current open solutions is particularly interesting.
We can fully control the progress of all our experiments with DPED and our own datasets, verifying exactly how various model components and data influence the final result.
Our team will continue working on this project. The next steps include collecting our own dataset following the example of the developers, updating the codebase to current libraries, training our model based on their architecture, and comparing the obtained results. In the next article, we will share our achievements and conclusions.
What do you think about using DPED nowadays? Does it make sense to revive this technology, or should it fade into obscurity?


Write comment