
- DIY
- A
Vaultwarden: How I Set Up My Password Manager and Stopped Worrying?
Hello, tekkix!
The story is as old as time: first you have one pet project, then another, then freelance work... and suddenly you’re drowning in a sea of dozens of passwords. Logins, API keys, database accesses — all of this starts to live its own life in notes, text files, and, horror of horrors, in your memory.
At some point, I realized that my "zoo" of passwords had become unmanageable. And the thought that all this digital treasure was sitting on the servers of yet another "free" corporation started to make me a little uneasy. No, I’m not paranoid, but the idea of having full control over my most sensitive data seemed incredibly appealing.
Thus began my journey to create my own "fortress" for passwords. A journey where I, of course, stepped on a few painful "rakes." This article is a summary of my experience so you can build your fortress right the first time.
The hero of our time: Bitwarden or Vaultwarden?
First, I looked at Bitwarden. It’s open-source, has great clients for all platforms, and you can host it on your own server. Perfect? Almost. When I opened the installation manual for the official server, I was a little disappointed. It’s written in .NET and drags along a whole series of containers and MSSQL. For my modest VPS, which runs pet projects, this was definitely overkill.

And here comes Vaultwarden (formerly known as bitwarden_rs). This is an unofficial implementation of the Bitwarden server, written in Rust. And this, my friends, is pure magic.
It’s lightweight. Seriously, it runs in a tiny Docker container and consumes just 10-15 MB of RAM at idle.
It’s simple. Installation takes literally 5 minutes.
It’s generous. This is the key advantage: Vaultwarden gives away features that the official Bitwarden version charges for. These include:
Organizations with collections and groups for password sharing.
Advanced 2FA options, including YubiKey, FIDO2 WebAuthn, and Duo.
Emergency access and much more.
For beginner sysadmins and developers with home servers, the choice is clear. We don’t want to waste our server’s resources on a heavyweight monster; we need a fast and efficient workhorse.
Raising the fortress: How not to step on mines in the config
Initially, I copied the simplest config from the internet. It worked, but as I later realized, it contained two time bombs. At tekkix, such things are rightly burned. Let’s do it right from the start.
Mine #1: The latest tag. My first config contained the line image: vaultwarden/server:latest. This is the biggest mistake. latest today and latest tomorrow are two completely different images. An update could come at any time and break everything. (Yes, I realize this might be a controversial decision - keep reading till the end!)

Mine #2: Disabling registration via the config. The idea of "run, register, then fix the config" is terrible. This is a classic human factor. Forget and your server will turn into a revolving door. The right way: Use the admin panel.
Correct docker-compose.yml for your fortress
Here’s the config that takes all the rakes and best practices into account.
The main life hack: We won't use the standard port 8080. Let's choose a less popular one, like 8833. It's like settling not on the central square but in a quiet alley nearby — calmer and more secure.
# Create a folder for the project
mkdir ~/vaultwarden && cd ~/vaultwarden
# Create a docker-compose.yml file
touch docker-compose.yml
# Enter the editing mode
docker-compose.yml
Copy this into docker-compose.yml and make sure to change vault.your-domain.com and the ADMIN_TOKEN value.
# /home/user/vaultwarden/docker-compose.yml
version: '3'

services:
  vaultwarden:
    # MINE DISARMED: Fix the version strictly!
    # As of July 12, 2025, the relevant version is 1.34.1
    image: vaultwarden/server:1.34.1
    container_name: vaultwarden
    restart: unless-stopped
    volumes:
      - ./data:/data
    ports:
      # MINE #3 DISARMED: Use a non-conflicting port!
      # The internal container port (80) is linked to port 8833 on the host.
      # Nginx will access exactly 8833.
      - 127.0.0.1:8833:80
    environment:
      DOMAIN: "https://vault.your-domain.com"
      # MINE DISARMED: Set the token for admin access.
      ADMIN_TOKEN: 'your_super_secret_admin_token_here'
Life hack: To generate a good token right in the console, use the command: openssl rand -base64 48.
Example of a generated string: Pxs5M1ojgVo1DTK2Z/zQ4X45fFgmjuPPy71xB15B+2R6QdVtM10VKnv/TRWasjO1
Set the guard: HTTPS is a must-have
I set up HTTPS, got the coveted green lock in the browser, and initially relaxed. But as it turned out, I just locked the front door, leaving all the windows wide open.
Nginx: "Door locked, windows wide open"

Nginx: The foundation for the fortress
First, we will build the "foundation" for our guard Nginx — a minimal configuration enough for Let's Encrypt to verify that the domain is really ours.
To start, create and open the Nginx configuration file:
sudo nano /etc/nginx/sites-available/vault.your-domain.comPaste this temporary, minimal config into it. Don't forget to replace vault.your-domain.com with your domain.
server {
    listen 80;
    server_name vault.your-domain.com;

    # Specify the default folder where certbot will place the verification file
    root /var/www/html;
}
Now "enable" our site and check that there are no errors in the config:
# Create a symbolic link so that Nginx "sees" our config
sudo ln -s /etc/nginx/sites-available/vault.your-domain.com /etc/nginx/sites-enabled/

# Check Nginx syntax
sudo nginx -t

# If the check is successful (we see "syntax is ok" and "test is successful"), reload Nginx
sudo systemctl reload nginx
Get the SSL certificate with Certbot
Now that the foundation is ready, let's run the "builder" — certbot. It will automatically get the SSL certificate and, most importantly, rewrite our config, adding everything necessary for HTTPS to work.
# Install certbot and the plugin for Nginx (for Debian/Ubuntu)
sudo apt update && sudo apt install certbot python3-certbot-nginx -y

# Run certbot for our domain
sudo certbot --nginx -d vault.your-domain.com
Certbot will ask a couple of questions, including your email for notifications and agreeing to the terms. At the end, it will ask whether to make the automatic redirect from HTTP to HTTPS — make sure to choose option 2 (Redirect).
Build the walls: add security headers
Here we are at the key point where I made a mistake before. Certbot did a great job setting up SSL, but it has no idea that we want to redirect traffic to Vaultwarden. It just took our "foundation" and added SSL to it.
Therefore, now we will take on the role of an engineer, who brings the automation work to perfection.
Step 1: Open what Certbot generated for us
sudo nano /etc/nginx/sites-available/vault.your-domain.comStep 2: Obtain the certificate (in a secure way)
Now run Certbot in certonly mode. It will not touch our configs.
Install Certbot (if not already installed):
sudo apt update && sudo apt install certbot -yRun the certificate obtaining command, specifying the folder for validation:
sudo certbot certonly --webroot -w /var/www/html -d vault.your-domain.comCertbot will ask a couple of questions (email, consent). Answer them. If everything goes well, it will inform you that the certificates are saved.
Step 3: Build the final Fortress (Nuke & Pave)
Here it is, the key step. We will not edit anything. We will completely replace our temporary config with the final, working one.
Open your config file again. Erase everything in it until the last line.
sudo nano /etc/nginx/sites-available/vault.your-domain.comNow insert this complete, final, only correct config into it.
### BEGIN HTTPS BLOCK (PORT 443) ###
server {
    listen 443 ssl http2;
    server_name vault.your-domain.com; # <-- REPLACE WITH YOUR DOMAIN

    ### PATHS TO CERTIFICATES WE JUST OBTAINED ###
    ssl_certificate /etc/letsencrypt/live/vault.your-domain.com/fullchain.pem; # <-- REPLACE
    ssl_certificate_key /etc/letsencrypt/live/vault.your-domain.com/privkey.pem; # <-- REPLACE
    include /etc/letsencrypt/options-ssl-nginx.conf; # These files are created by Certbot
    ssl_dhparam /etc/letsencrypt/ssl-dhparams.pem;  # This one too

    ### OUR "BRIDGE" TO VAULTWARDEN ###
    location / {
        # ATTENTION: port 8833 is the one we specified in docker-compose!
        proxy_pass http://127.0.0.1:8833;
        proxy_set_header Host $host;
        proxy_set_header X-Real-IP $remote_addr;
        proxy_set_header X-Forwarded-For $proxy_add_x_forwarded_for;
        proxy_set_header X-Forwarded-Proto $scheme;
    }
}
### END HTTPS BLOCK ###

### BEGIN HTTP BLOCK (PORT 80) - ONLY NEEDED FOR REDIRECT ###
server {
    listen 80;
    server_name vault.your-domain.com; # <-- REPLACE WITH YOUR DOMAIN
    # Just redirect all traffic to the secure version
    return 301 https://$host$request_uri;
}
### END HTTP BLOCK ###
Step 4: Final check
Save the file and run the final command:
sudo nginx -t && sudo systemctl reload nginxWhy is this method better? Because it's predictable. You are not editing something unclear, but completely replacing the temporary file with the final, known-working config. No accidental brackets or missing directives.
Closing the gates: configuration through the admin panel
Now that we have the correct config, the sequence of actions is simple and safe.
Run the container: docker-compose up
Register your account at https://vault.your-domain.com.
Immediately close registration for everyone else!
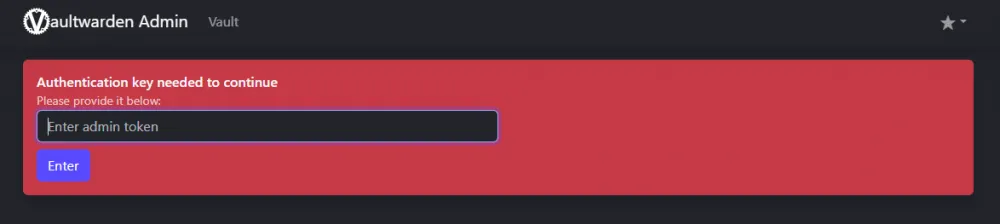
Open the admin panel: https://vault.your-domain.com/admin.
Enter our ADMIN_TOKEN.

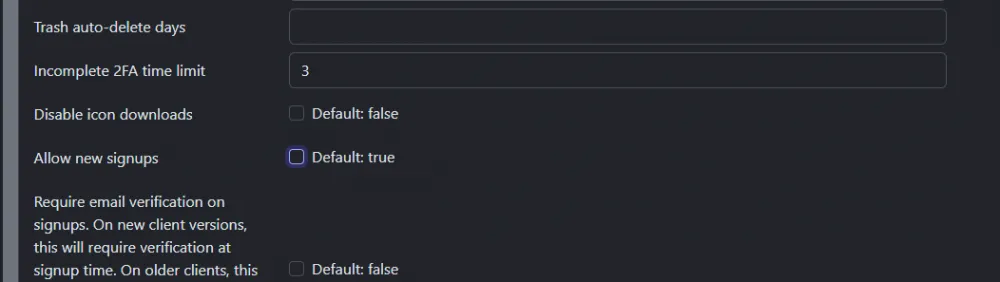
Go to the "General settings" tab and uncheck the "Allow new signups" box.
Click "Save".
Rule of fair compromise: now with conscious updates
Self-hosting is cool, but it's also a responsibility.
You are responsible for backups. If you lose data from your disk, you lose your passwords. Make a backup, or one day you will regret it. The easiest way is to stop the container and archive your entire ~/vaultwarden folder.
You are responsible for updates. Life hack: Every month or two, visit the Vaultwarden release page on GitHub, read the changelog for new versions, and if everything is fine, change the version number in docker-compose.yml and run docker-compose up -d --force-recreate. This is conscious updating.
Where to go if something breaks? Remember: client issues (Android, iOS, browser) go to Bitwarden. Server issues go to Vaultwarden.
I’ve walked this path and stepped on the most obvious mines so that you won’t make the same mistakes. Now you can build not just a working, but a truly reliable and secure fortress for your passwords. This not only provides security but also a pleasant sense of confidence in your abilities.
Now a question to you, community: How do you approach updates for your self-hosted services? Do you pin versions like paranoids (like me), use the latest and hope for the best, or do you have automated systems for testing and rolling out updates? Share your strategies in the comments.


Write comment