- Network
- A
Deployment of Asterisk using Ansible
Ansible is a configuration management system written in the Python programming language. It is used to automate the setup and deployment of software. It is usually used to manage Linux nodes, but there is a large collection of plugins for connecting to other devices and OS. Along with Chef, Puppet, and SaltStack, it is considered one of the most popular configuration management systems for Linux. The main difference between Ansible and its counterparts is that no agent/client installation is required on the target systems. With Ansible, you can deploy, remove, or configure any software on remote servers.
This article will discuss the process of creating a role for installing and configuring Asterisk.
Setting up Ansible parameters for connecting to servers
First, let's create a configuration file ansible.cfg. Below is a list of directories where it can be located, from most to least prioritized:
Directory defined by the environment variable $ANSIBLE_CONFIG
Current directory
User's home directory
Global/common file in the /etc/ansible directory
You can check the file location with the command:
$ ansible --versionI placed it in the ansible directory in the user's home directory.
File contents:
[defaults]
inventory = /home/kstrakhov/ansible/hosts
host_key_checking = false
With the inventory parameter, we specify the file with the list of hosts and groups on which our tasks can be performed.
The host_key_checking parameter allows you to disable server key checking when connecting via ssh.
Now let's create an inventory file that will list the target servers:
[asterisk_group]
asterisk1    ansible_host=192.168.30.12
asterisk2    ansible_host=192.168.30.13
In square brackets, we specify the group name, later, when running the playbook, we can refer to this name. These names can only contain letters, numbers, and underscores. By default, all servers are part of the all group, those that do not belong to any group are part of the ungrouped group. Groups can be combined into groups:
[asterisk_all_group:children]
asterisk_group1
asterisk_group2
In the list of hosts, we specify an alias and the variable ansible_host, which indicates the IP address of the host. You can specify the FQDN, or you can specify the FQDN without an alias. You can also use variables to set other connection parameters, for example:
SSH port - ansible_port
Username - ansible_user
Path to the SSH key - ansible_ssh_private_key_file
User password
For further convenience when using the hosts file, some parameters can be moved to a separate file. To do this, create a group_vars directory in the directory with the hosts file and inside create a file with the name of the group. Add variables to this file, using a colon instead of an equals sign:
ansible_user : root
ansible_ssh_private_key_file : /home/kstrakhov/.ssh/id_rsa
Now Ansible will use these variables to connect to the servers that are in the asterisk_group group.
You can see which variables are applied to the hosts with the command:
$ ansible-inventory --graph --varsCreating a role
Now that the connection is set up, let's proceed to create a role:
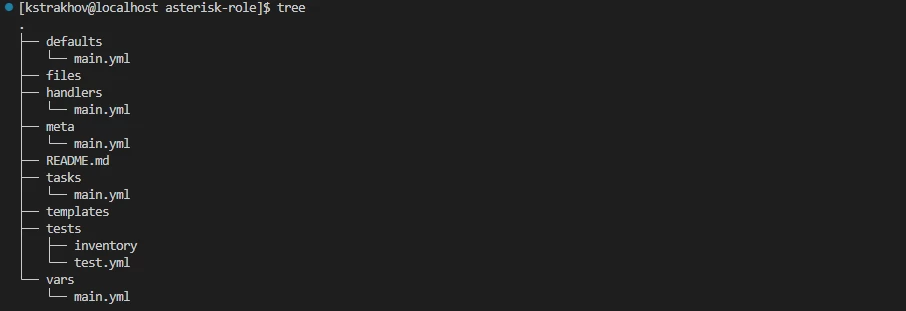
$ ansible-galaxy init asterisk-roleThe asterisk-role directory has appeared in the current directory.
By default, Ansible will look for the main.yml file in the role directories and, depending on the purpose of the file, which is determined by its location, perform certain actions.
defaults/main.yml- default variables for the role. They can be overridden in the inventory file (hosts) or using the –e (--extra-vars key=value) parameter when running the playbook.
files- files that can be copied during the deployment of asterisk.
handlers/main.yml- handler file, used in the role to perform actions under certain conditions or specific events.
meta/main.yml- role metadata.
tasks/main.yml- the main list of tasks that the role performs.
templates/ - templates deployed by the role, have the extension j2 (jinja2) and are used, for example, to generate configuration files. Their advantage is that they can contain variables and/or facts.
tests/ – this directory contains a test inventory file and a test playbook (test.yml), used for testing.
vars/main.yml – here are stored variables that are not overridden by the inventory file, but can be overridden using the -e (--extra-vars) parameter when running the playbook.
First, let's add variables to the vars/main.yml file
---
SIP_MODULE: load
RTP_PORT_START: 22000
RTP_PORT_END: 23000
SOURCE_DIR: /usr/local/src/
ASTERISK_PACKAGE: "https://downloads.asterisk.org/pub/telephony/asterisk/asterisk-18-current.tar.gz"
ASTERISK_USER: asterisk
ASTERISK_GROUP: asterisk
Next, let's create the first playbook update_system.yml in the tasks directory (which will update the system):
- name: Install epel repo
  yum:
    name: epel-release
    state: present

- name: Update system
  yum:
    name: "*"
    state: latest
  register: allupdate

- name: Reboot machine after update and wait reconnect
  reboot:
    reboot_timeout: 300
  when: allupdate.changed
In the first two tasks, we add the epel repository and update the system. Using the state parameter, you can specify to the yum module what to do with the packages:
present and installed - ensures that the required package is installed.
latest - updates the specified package if it is not the latest available version.
absent and removed - removes the specified package.
Using the register parameter, we place the result of the command execution into the allupdate variable. In the third task, using the when operator, we check the value of the changed section in the allupdate variable, and if there were changes, we reboot the server.
In the next playbook, there will be tasks that will install Asterisk from source and configure the system for its launch:
- name: Check if Asterisk is installed
  shell: asterisk -V | grep -wo Asterisk
  ignore_errors: true
  changed_when: false
  register: check_asterisk

- name: Create Asterisk User Group
  group:
    name: "{{ ASTERISK_GROUP }}"
    state: present

- name: Create Asterisk User
  user:
    name: "{{ ASTERISK_USER }}"
    shell: /sbin/nologin
    group: "{{ ASTERISK_GROUP }}"
    create_home: no

- name: Install Asterisk Process
  block:
  - name: Set SELinux to Permissive mode
    command: "{{ item }}"
    with_items:
      - setenforce permissive
      - sed -i 's/^SELINUX=.*/SELINUX=permissive/g' /etc/selinux/config

  - name: Download and Extract Asterisk
    unarchive:
      src: "{{ ASTERISK_PACKAGE }}"
      dest: "{{ SOURCE_DIR }}"
      remote_src: yes
      list_files: yes
    register: asterisk_archive_contents

  - debug:
      msg: "Asterisk directory path is {{ SOURCE_DIR }}{{ asterisk_archive_contents.files[0] }}"

  - name: Install Asterisk Packages
    command: "{{ item }}"
    with_items:
        - contrib/scripts/install_prereq install
        - ./configure --libdir=/usr/lib64 --without-pjproject-bundled --with-jansson-bundled
        - make menuselect.makeopts
        - menuselect/menuselect --disable-category MENUSELECT_CORE_SOUNDS --enable CORE-SOUNDS-RU-WAV --enable CORE-SOUNDS-RU-ALAW
        - make
        - make install
        - make samples
        - make config
    args:
      chdir: "{{ SOURCE_DIR }}{{ asterisk_archive_contents.files[0] }}"

  - name: Set All Asterisk directory owner to asterisk user
    file:
      path: "{{ item }}"
      owner: "{{ ASTERISK_USER }}"
      group: "{{ ASTERISK_GROUP }}"
      state: directory
      recurse: yes
      mode: 0750
    with_items:
      - /var/lib/asterisk
      - /var/spool/asterisk
      - /var/run/asterisk
      - /var/log/asterisk

  when:
    - check_asterisk.rc != 0
    - check_asterisk.stdout != 'Asterisk'

  notify:
     - start asterisk service
В первой задаче с помощью модуля shell, мы проверяем установлен ли Asterisk на сервере и указываем ему не выводить сообщения об изменениях (changed_when: false) и игнорировать сообщения об ошибках (ignore_errors: true), чтобы плэйбук выполнялся дальше. С помощью параметра register сохраняем результат в переменную check_asterisk.
Далее в задачах Create Asterisk User Group и Create Asterisk User мы создаем группу и пользователя, от которого будет запускаться Asterisk, и запрещаем ему вход в систему.
Далее приступаем к установке Asterisk. Задача “Install Asterisk Process” содержит в себе блок, который будет запускаться, если выполняются условия определенные оператором when (должен располагаться строго под блоком):
check_asterisk.rc != 0 - return code в переменной check_asterisk не равен нулю, если он равен нулю, значит команда была выполнена без ошибок.
check_asterisk.stdout != 'Asterisk' - stdout не содержит в себе «Asterisk», если содержит, значит он уже установлен на сервере.
The first task in the block is to switch SELinux to permissive mode.
Next, we download and unpack the Asterisk sources using the unarchive module. The src parameter in conjunction with remote_src, if src contains ://, instructs the remote server to download the file from the URL, then unpack it and return the list of unpacked files (list_files: yes). The result of this command is placed in the asterisk_archive_contents variable.
In the next task, we run the debug module, which will display the full path to the Asterisk sources. Using [0] we instruct the module to use the first element in the list (array) of the files field ([1] - second, [2] - third, etc.).
In the "Install Asterisk Packages" task, we use the command module to start the Asterisk installation process by sequentially executing commands from the source directory (chdir - instructs the module to change to the directory before executing the commands). If you want to run commands with pipes, escape characters, or other special characters, it is better to use the shell module.
In the next task, using the file module and the with_items loop, we set permissions and change the owner of the Asterisk working directories.
The last action in this playbook will be to start the "start asterisk service" event handler (which we will place in the handlers/main.yml file) if changes were made in the previous task block.
Let's move on to creating Asterisk configuration files. To do this, we will create the third playbook configure_asterisk:
- name: Create asterisk.conf
  ini_file:
    path: "/etc/asterisk/asterisk.conf"
    owner: "{{ ASTERISK_USER }}"
    group: "{{ ASTERISK_GROUP }}"
    mode: 0640
    section: "{{ item.section }}"
    option: "{{ item.option }}"
    value: "{{ item.value }}"
  with_items:
    - { section: "files", option: "astctlpermissions", value: "0775" }
    - { section: "files", option: "astctlowner", value: "{{ ASTERISK_USER }}" }
    - { section: "files", option: "astctlgroup", value: "{{ ASTERISK_GROUP }}" }
    - { section: "files", option: "astctl", value: "asterisk.ctl" }
    - { section: "options", option: "runuser", value: "{{ ASTERISK_USER }}" }
    - { section: "options", option: "rungroup", value: "{{ ASTERISK_GROUP }}" }
    - { section: "options", option: "defaultlanguage", value: "ru" }
  notify: restart asterisk service

- name: Create modules.conf and rtp.conf from templates
  template:
    src: "config/{{ item }}.conf"
    dest: "/etc/asterisk/{{ item }}.conf"
    owner: "{{ ASTERISK_USER }}"
    group: "{{ ASTERISK_GROUP }}"
    mode: 0640
  loop:
    - modules
    - rtp
  notify: restart asterisk service

- name: Copy extensions.conf sip.conf iax.conf
  copy:
    src: "{{ item }}"
    dest: /etc/asterisk/
    owner: "{{ ASTERISK_USER }}"
    group: "{{ ASTERISK_GROUP }}"
    mode: 0640
  with_fileglob: "{{ inventory_hostname }}/*"
  notify:
    - restart asterisk service
In the first task, we create the asterisk.conf configuration file. The ini_file module is part of the community.general collection. To check if it is installed, run:
$ ansible-galaxy collection list To install it, use:
$ ansible-galaxy collection install community.general The ini_file module allows you to add, remove, or modify individual parameters and sections in INI format configuration files. Here, using variables, we specify to the module: the file path (path), the owner (owner), the owner's group (group), the file permissions (mode), the section (section), the parameter (option), its value (value), and list the last three in the with_items loop. Finally, we restart Asterisk if changes were made (restart asterisk service).
In the next task, we create the configuration files modules.conf and rtp.conf using Jinja2 templates located in the templates/config directory. Here everything is similar to the previous task, except for the loop used - loop, which appeared in ansible 2.5 and is more preferable for use in playbooks. Templates can use variables and facts (facts are collected when playbooks are run), for example, we can create a template for a configuration file, then deploy this file on several servers and provide the necessary data in each environment (IP address, hostname, etc.). The templates/config/rtp.conf template contains two variables RTP_PORT_START and RTP_PORT_END.
The templates/config/modules.conf template contains one variable SIP_MODULE, which we use to tell Asterisk whether or not to load the chan_sip.so channel driver, depending on whether Asterisk was built with or without pjsip support.
In the last task of our role, we tell Ansible to copy all files from the directories files/asterisk1 and files/asterisk2 to the asterisk1 and asterisk2 servers respectively.
Now let's add event handlers to the handlers/main.yml file
---
# handlers file for asterisk-role

- name: start asterisk service
  systemd:
    name: asterisk
    state: started
    enabled: yes

- name: restart asterisk service
  systemd:
    name: asterisk
    state: restarted
    enabled: yes
Here, using the systemd module, Asterisk is started or restarted and added to autostart at the same time.
The last thing left to do is to add the created playbooks to the tasks/main.yml file
---
# tasks file for asterisk-role
- name: Update system
  import_tasks: update_system.yml

- name: Install Asterisk
  import_tasks: install_asterisk.yml

- name: Configure Asterisk
  import_tasks: configure_asterisk.yml
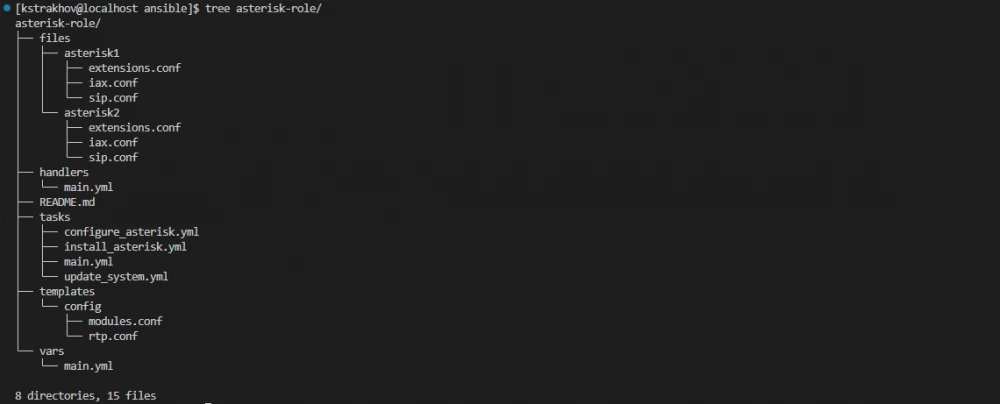
As a result, we got the following file structure (unnecessary directories and files can be deleted):
Running the role
Now we create a playbook that will run our role and run it:
---
- name: Deploy Asterisk
  hosts: asterisk_group
  become: true

  roles:
    - asterisk-role
The become:true parameter allows tasks to be executed with root user privileges, in the hosts parameter we specify on which servers the Asterisk installation will run.
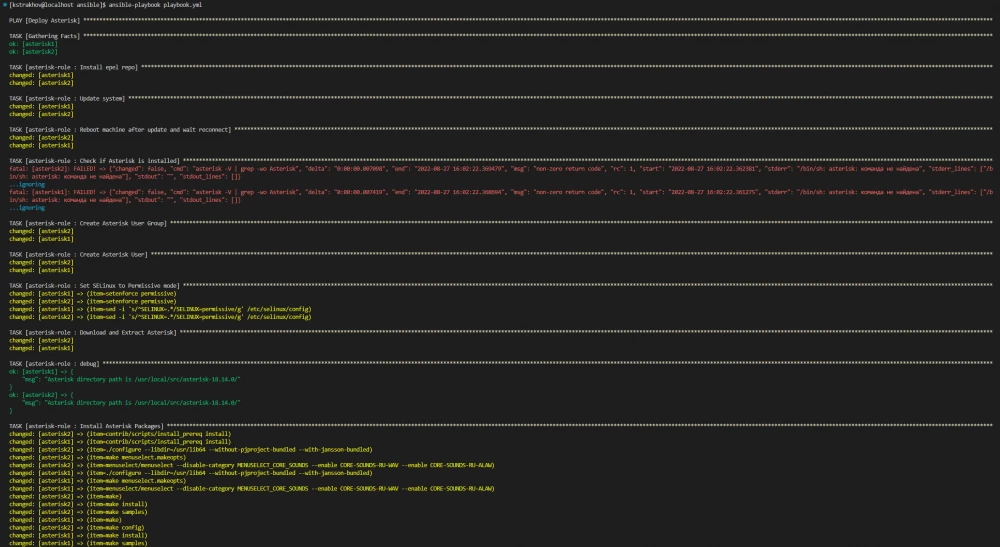
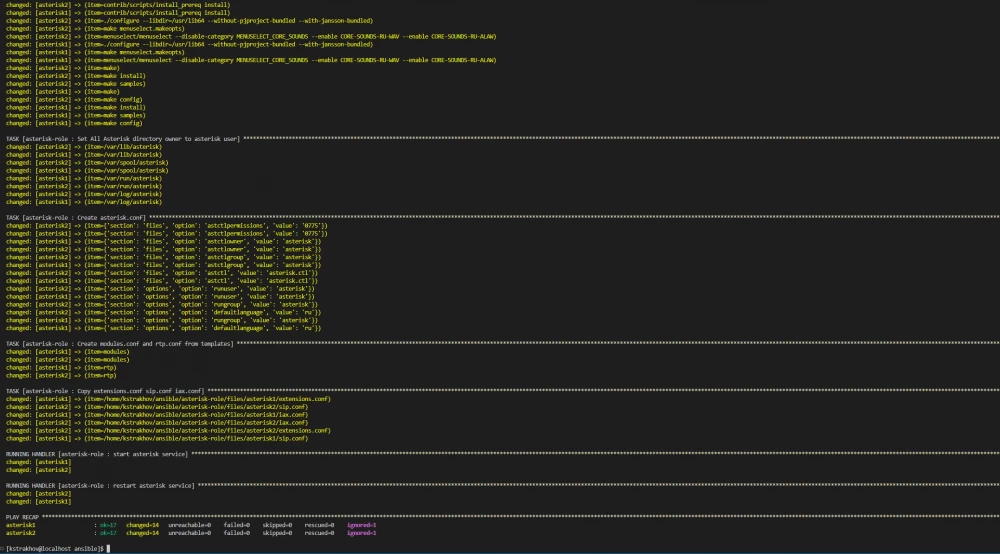
The images below show the Asterisk installation process.
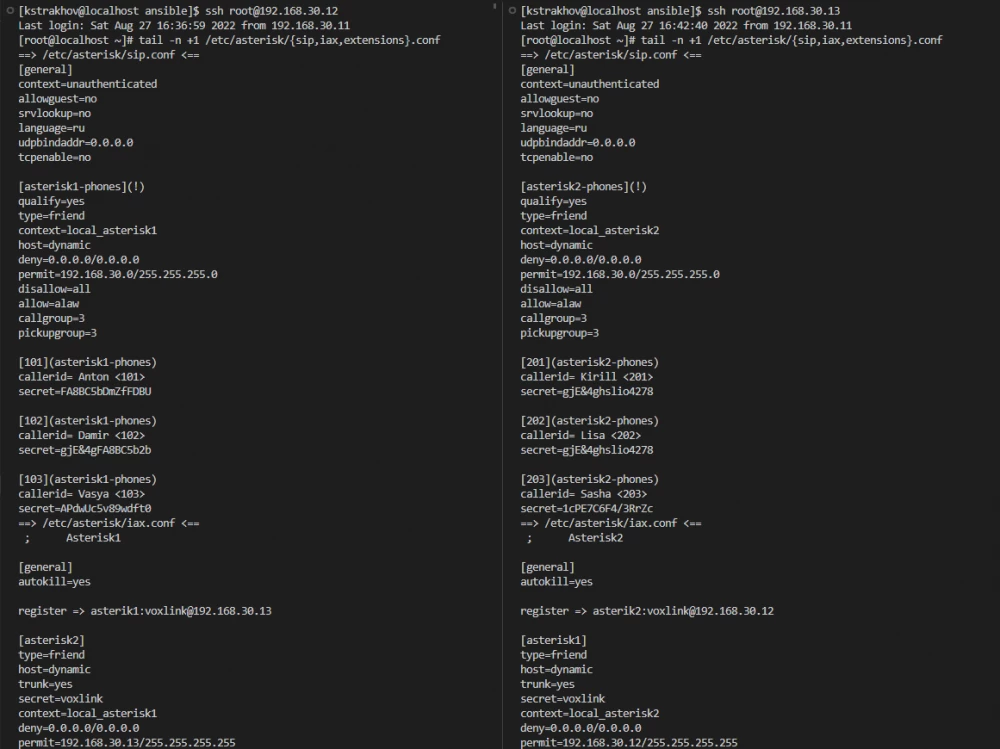
Let's check the contents of the Asterisk configuration files:
The deployment of Asterisk using Ansible is now complete.






Write comment