- Software
- A
Enabling the CBPolicyD web interface in Carbonio
Previously, we talked about how to configure various mail policies in the CBPolicyD module built into Carbonio by editing tables in the SQLite3 database. Such policies allow you to set various restrictions for users, prohibiting them from receiving or sending more than the number of emails specified by the administrator, limiting the circle of senders who can send emails to recipients on the server, and so on. In this article, we will tell you how to configure the CBPolicyD web interface to make the configuration process simpler and more visual.
Earlier, we talked about how to configure various mail policies in the built-in Carbonio CBPolicyD module by editing tables in the SQLite3 database. Such policies allow you to set various restrictions for users, prohibiting them from receiving or sending more than the number of emails specified by the administrator, limiting the circle of senders who can send emails to recipients on the server, and so on. In this article, we will tell you how to configure the CBPolicyD web interface to make the configuration process simpler and more visual.
To enable the CBPolicyD web interface, enable the corresponding services in Carbonio
su - zextras
zmprov ms $(zmhostname) +zimbraServiceInstalled cbpolicyd +zimbraServiceEnabled cbpolicyd
zmcontrol restart
Open the file /opt/zextras/common/share/webui/includes/config.php and specify the database address in it $DB_DSN="sqlite:/opt/zextras/data/cbpolicyd/db/cbpolicyd.sqlitedb"; bringing the file to the following form:
Install Apache2 and the necessary libraries
apt install apache2 libapache2-mod-php php-sqlite3
Open the file /etc/apache2/ports.conf and specify any four-digit port in the Listen parameter (for example, 7780 or, in our case, 1080)
Add the CBPolicyD web interface files to the Apache web server we created
ln -s /opt/zextras/common/share/webui /var/www/html/
Change the permissions on the database files
cd /opt/zextras/data/cbpolicyd
chmod -R 777 db/
And restart the Apache web server
systemctl restart apache2
After all these actions, the CBPolicyD web interface will be available over an unencrypted connection on the port specified in /etc/apache2/ports.conf.
In our case, this is http://email.carbonio.loc:1080/webui/
At the moment, access to the CBPolicyD web interface is open to everyone. You can restrict it with a firewall by limiting the number of networks from which access to the corresponding port will be available, or with a password.
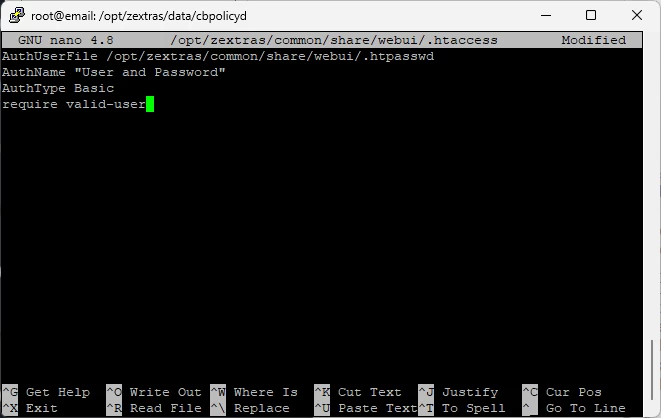
To set a password, create a file /opt/zextras/common/share/webui/.htaccess and enter the following settings into it
AuthUserFile /opt/zextras/common/share/webui/.htpasswd
AuthName "User and Password"
AuthType Basic
require valid-user
Add a user-password pair
cd /opt/zextras/common/share/webui/
htpasswd -cb .htpasswd admin qwerty123
If there is a need to provide access to multiple users, you can create additional user-password pairs by appending them to the corresponding file
htpasswd -nb admin2 qwerty456 >> /opt/zextras/common/share/webui/.htpasswd
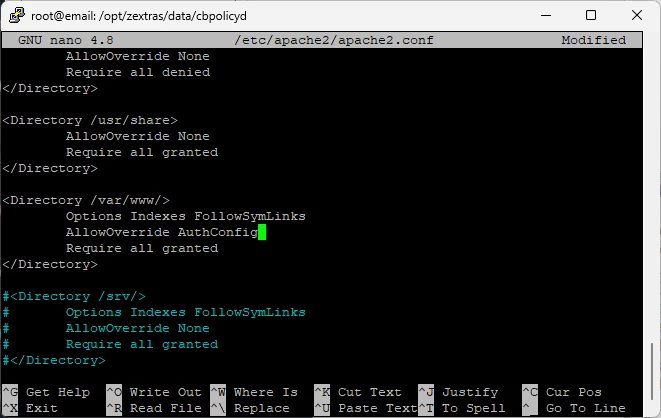
To enable authentication, open the file /etc/apache2/apache2.conf and change the value of the parameter AllowOverride to AuthConfig
Restart the Apache2 service
systemctl restart apache2
After that, when logging into the CBPolicyD web interface, a username and password will be requested
Note that if your infrastructure has multiple MTA nodes with CBPolicyD installed on them, similar actions will need to be performed on each of them because in the configuration we are considering, CBPolicyD uses a local database for operation. Accordingly, policies configured on one MTA in such a configuration should also be manually duplicated on other MTA nodes.







Write comment