- DIY
- A
Extreme optimization of Raspberry Pi boot speed
Some time ago, the SolarCamPi project was created - a solar-powered autonomous camera with Wi-Fi.
In this project, the Raspberry Pi Zero 2 W boots into Linux, takes a picture, connects to Wi‑Fi, and then shuts down (to save energy). The cycle repeats every few minutes to constantly send up-to-date images to the cloud service.
Every second of Pi Zero's operation consumes valuable electricity — a resource that is constantly in short supply for solar-powered devices (at least in winter in Western Europe). The user software (connecting to the server, uploading images, etc.) has already been optimized to the maximum. The electronics were also specially designed for minimal power consumption in sleep mode.
There are two possible ways to further reduce overall power consumption:
Reduce power/current consumption.
Reduce operating time.
However, in some situations, it is necessary to find a balance between these two methods. For example, turning off the CPU boost to reduce power consumption may increase operating time, which negates the impact on power consumption.
Equipment Preparation
A short cycle of making and checking changes is critical when optimizing the boot processes of embedded systems. Replacing SD cards, working with card readers, and power sources during operation is distracting and annoying.
To facilitate this process, there are several useful tools:
Nordic Power Profiler Kit II
USB‑SD‑Mux Fast
USB‑UART Converter
Power Profiler Kit
Power Profiler Kit II (PPK) can power the Device Under Test (DUT) and accurately measure its power consumption. You can turn the DUT on and off, monitor power consumption at any time, and see the status of 8 digital inputs. We will connect one of the digital inputs to a GPIO pin on the Raspberry Pi.
Thus, the first action of our application (i.e., the finish line) will be to toggle the GPIO pin. We will then only need to measure the time between power-on and GPIO toggle.
USB-SD-Mux
USB‑SD‑Mux is a very useful tool for hardware developers. It is an adapter between a microSD card and the Device Under Test (DUT) with a USB‑C interface. The computer can "take" the microSD card from the DUT, rewrite its contents, and then reconnect the card back to the DUT without touching the device.
This greatly simplifies and speeds up the process of testing changes, eliminating the need to remove the card, insert it into a card reader, flash it, and then reconnect the card to the DUT, etc. Additionally, it can be used to automate the reset or power-on of the DUT using built-in GPIO.
USB-UART Adapter
We will also need some kind of UART interface. The changes we make may at some point disrupt system boot, WiFi connection, etc., and without a UART console, we will be working blindly. Standard adapters such as CP2102, FTDI, etc., are perfect for this task.
Test Preparation
A clean Debian 12 Lite image for arm64, the only change is the addition of the init=/init.sh parameter to the /boot/firmware/cmdline.txt file, so that the /init.sh script is run by the kernel first (before systemd or anything else).
The init.sh script might look something like this:
#!/bin/bash

gpioset 0 4=0
sleep 1
gpioset 0 4=1
sleep 1
gpioset 0 4=0

exec /sbin/init
The script toggles GPIO4 and continues normal boot by running /sbin/init (i.e., systemd).
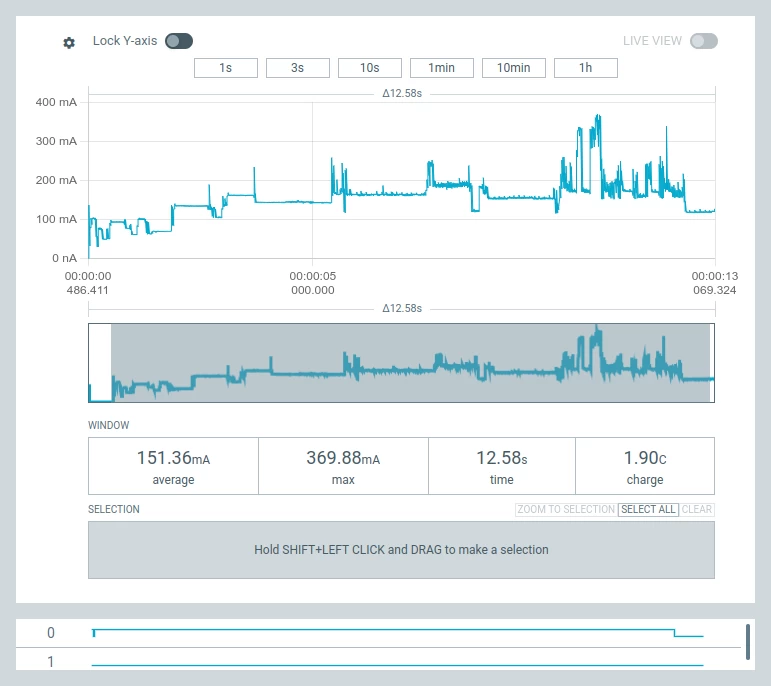
This screenshot from Nordic's Power Profiler shows the current consumption of the Raspberry Pi (at 5V) during boot. About 12 seconds in, the voltage on digital input 0 changes to low, indicating the completion of the init.sh script.
A total of 1.90 coulombs (coulomb and ampere-second are equivalent) was spent. The calculation 1.9 A·s * 5.0 V gives 9.5 W·s of energy used during the boot process.
For reference: a single alkaline AA battery can provide about 13,500 W·s of energy.
Reducing current consumption
Let's tackle the simplest part and try to reduce current consumption as much as possible.
Disabling HDMI
We can completely disable the HDMI encoder. Disabling the GPU is not possible as it is used for decoding camera data. If your software does not require the GPU, you can try disabling it. This will reduce current consumption from 136.7 mA to 122.6 mA (more than 10%).
The corresponding parameters in config.txt:
# disable HDMI (saves power)
dtoverlay=vc4-kms-v3d,nohdmi
max_framebuffers=1
disable_fw_kms_setup=1
disable_overscan=1

# disable composite video output
enable_tvout=0
Disabling the activity indicator
Simply disabling the activity indicator can save us 2 mA (from 122.6 mA to 120.6 mA).
dtparam=act_led_trigger=none
dtparam=act_led_activelow=on
Disabling the camera indicator
We will do the same for the camera indicator (if present). This will also reduce the likelihood of the indicator light reflecting in the image.
disable_camera_led=1CPU boost configuration
As mentioned earlier, the power savings from disabling the CPU boost may be offset by the potential increase in startup time.
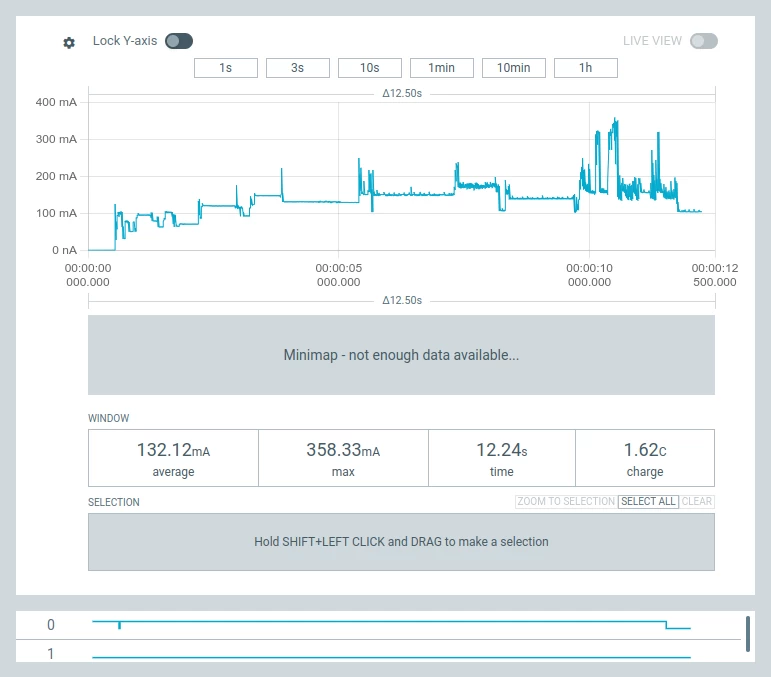
With the above changes and the CPU boost enabled, the Pi boots up consuming 1.62 A·s.
force_turbo=0
initial_turbo=10
arm_boost=0
If the CPU boost is disabled, the consumption decreases to 1.58 A·s:
For unknown reasons, disabling the CPU boost also changes the initial state of GPIO4 (so I changed the polarity in init.sh).
Reducing boot time
Reducing current consumption by ~13% is, of course, good, but still far from ideal.
The Pi takes 8 seconds (consuming about 1 A) before the first line of Linux output appears on the console. Fortunately, there are several ways to get more information about these 8 seconds.
Boot debugging
During the boot process, the Raspberry Pi first initializes the GPU. It accesses the SD card and looks for the bootcode.bin file (for Pi 4 and newer, EEPROM is used).
We can modify bootcode.bin to enable detailed UART logging.
sed -i -e "s/BOOT_UART=0/BOOT_UART=1/" /boot/firmware/bootcode.binMake a backup of the original bootcode.bin file, as changes to it may disrupt the bootloader.
Rebooting with BOOT_UART enabled will give us a lot of useful information:
Raspberry Pi Bootcode

Found SD card, config.txt = 1, start.elf = 1, recovery.elf = 0, timeout = 0
Read File: config.txt, 1322 (bytes)

Raspberry Pi Bootcode
Read File: config.txt, 1322
Read File: start.elf, 2981376 (bytes)
Read File: fixup.dat, 7303 (bytes)
MESS:00:00:01.295242:0: brfs: File read: /mfs/sd/config.txt
MESS:00:00:01.300131:0: brfs: File read: 1322 bytes
MESS:00:00:01.335680:0: HDMI0:EDID error reading EDID block 0 attempt 0
[..]
MESS:00:00:01.392537:0: HDMI0:EDID error reading EDID block 0 attempt 9
MESS:00:00:01.398632:0: HDMI0:EDID giving up on reading EDID block 0
MESS:00:00:01.406335:0: brfs: File read: /mfs/sd/config.txt
MESS:00:00:01.411272:0: gpioman: gpioman_get_pin_num: pin LEDS_PWR_OK not defined
MESS:00:00:01.918176:0: gpioman: gpioman_get_pin_num: pin LEDS_PWR_OK not defined
MESS:00:00:01.923999:0: *** Restart logging
MESS:00:00:01.927872:0: brfs: File read: 1322 bytes
MESS:00:00:01.933328:0: hdmi: HDMI0:EDID error reading EDID block 0 attempt 0
[..]
MESS:00:00:01.995436:0: hdmi: HDMI0:EDID error reading EDID block 0 attempt 9
MESS:00:00:02.002052:0: hdmi: HDMI0:EDID giving up on reading EDID block 0
MESS:00:00:02.007955:0: hdmi: HDMI0:EDID error reading EDID block 0 attempt 0
[..]
MESS:00:00:02.070610:0: hdmi: HDMI0:EDID error reading EDID block 0 attempt 9
MESS:00:00:02.077225:0: hdmi: HDMI0:EDID giving up on reading EDID block 0
MESS:00:00:02.082840:0: hdmi: HDMI:hdmi_get_state is deprecated, use hdmi_get_display_state instead
MESS:00:00:02.091586:0: HDMI0: hdmi_pixel_encoding: 162000000
MESS:00:00:02.799203:0: brfs: File read: /mfs/sd/initramfs8
MESS:00:00:02.803082:0: Loaded 'initramfs8' to 0x0 size 0xb0898e
MESS:00:00:02.821799:0: initramfs loaded to 0x1b4e7000 (size 0xb0898e)
MESS:00:00:02.836318:0: dtb_file 'bcm2710-rpi-zero-2-w.dtb'
MESS:00:00:02.840194:0: brfs: File read: 11569550 bytes
MESS:00:00:02.849171:0: brfs: File read: /mfs/sd/bcm2710-rpi-zero-2-w.dtb
MESS:00:00:02.854262:0: Loaded 'bcm2710-rpi-zero-2-w.dtb' to 0x100 size 0x8258
MESS:00:00:02.876038:0: brfs: File read: 33368 bytes
MESS:00:00:02.892755:0: brfs: File read: /mfs/sd/overlays/overlay_map.dtb
MESS:00:00:02.927145:0: brfs: File read: 5255 bytes
MESS:00:00:02.933541:0: brfs: File read: /mfs/sd/config.txt
MESS:00:00:02.937568:0: dtparam: audio=on
MESS:00:00:02.948005:0: brfs: File read: 1322 bytes
MESS:00:00:02.971952:0: brfs: File read: /mfs/sd/overlays/vc4-kms-v3d.dtbo
MESS:00:00:03.023016:0: Loaded overlay 'vc4-kms-v3d'
MESS:00:00:03.026278:0: dtparam: nohdmi=true
MESS:00:00:03.031105:0: dtparam: act_led_trigger=none
MESS:00:00:03.048180:0: dtparam: act_led_activelow=on
MESS:00:00:03.149316:0: brfs: File read: 2760 bytes
MESS:00:00:03.154502:0: brfs: File read: /mfs/sd/cmdline.txt
MESS:00:00:03.158504:0: Read command line from file 'cmdline.txt':
MESS:00:00:03.164369:0: 'console=serial0,115200 console=tty1 root=PARTUUID=26bbce6b-02 rootfstype=ext4 fsck.repair=yes rootwait cfg80211.ieee80211_regdom=DE init=/init.sh'
MESS:00:00:03.195926:0: gpioman: gpioman_get_pin_num: pin EMMC_ENABLE not defined
MESS:00:00:03.269361:0: brfs: File read: 146 bytes
MESS:00:00:03.812401:0: brfs: File read: /mfs/sd/kernel8.img
MESS:00:00:03.816343:0: Loaded 'kernel8.img' to 0x200000 size 0x8d8bd7
MESS:00:00:05.364579:0: Device tree loaded to 0x1b4de900 (size 0x8605)
MESS:00:00:05.370571:0: uart: Set PL011 baud rate to 103448.300000 Hz
MESS:00:00:05.377080:0: uart: Baud rate change done...
MESS:00:00:05.380495:0: uart: Baud rate[    0.000000] Booting Linux on physical CPU 0x0000000000 [0x410fd034]
Disabling HDMI Detection
The bootloader spends a lot of time trying to auto-detect video parameters for a possibly connected HDMI monitor. We don't have HDMI (it's already disabled, remember?), so there's no point in waiting for an I2C response with EDID information (resolution, refresh rate, etc.).
By hardcoding the EDID, we can disable device detection:
# don't try to read HDMI eeprom
hdmi_blanking=2
hdmi_ignore_edid=0xa5000080
hdmi_ignore_cec_init=1
hdmi_ignore_cec=1
Disabling HAT, PoE, and LCD detection
The boot process will also attempt to detect EEPROM on HAT devices, determine PoE (which requires a fan), and so on. We can safely disable these features:
# all these options cause a wait for an I2C bus response, we don't need any of them, so let's disable them.
force_eeprom_read=0
disable_poe_fan=1
ignore_lcd=1
disable_touchscreen=1
disable_fw_kms_setup=1
Disabling camera and display detection
Detecting a connected MIPI camera or display also takes some time. We know which camera is connected (HQ Camera, IMX477), so let's just hardcode it:
# no autodetection for anything (will wait for I2C answers)
camera_auto_detect=0
display_auto_detect=0

# load HQ camera IMX477 sensor manually
dtoverlay=imx477
Disabling initramfs
The changes made reduced the (self-reported) boot time from 5.38 seconds to 4.75 seconds. We can completely disable initramfs by removing the auto_initramfs=1 parameter.
The savings depend on the size of initramfs; in our case, it reduced the time to 4.47 seconds.
Tested but does not affect boot speed
It is often recommended online to overclock the SD peripheral to 100 MHz, but in our case, it did not provide any improvement in boot speed.
# not recommended! data corruption risk!
dtoverlay=sdtweak,overclock_50=100
Working with SD peripherals at such high speeds also carries the risk of data corruption (during write operations), which is highly undesirable for remote IoT devices.
Kernel loading
At this stage, one of the slowest operations is loading the kernel:
MESS:00:00:03.816343:0: Loaded 'kernel8.img' to 0x200000 size 0x8d8bd7
MESS:00:00:05.364579:0: Device tree loaded to 0x1b4de900 (size 0x8605)
Loading 9,276,375 bytes takes about 1.54 seconds, which corresponds to a transfer rate of about 6 MiB/s. This loading is performed by the GPU (!) using the built-in proprietary VideoCore IV processor. Perhaps the bootloader code is simply inefficient and slow or uses very conservative settings. Unfortunately, we do not know how it is structured and cannot change its parameters by interacting with registers or in any other way.
I have not yet found a good way to optimize the loading, so it will be necessary to reduce the kernel itself.
Theoretically, you can overclock the GPU core by setting the parameters:
# Overclock GPU VideoCore IV processor (not recommended!)
core_freq_min=500
core_freq=550
This reduces the kernel loading time by 20%, but the side effects (reliability, etc.) of this are unknown.
Buildroot and custom kernel
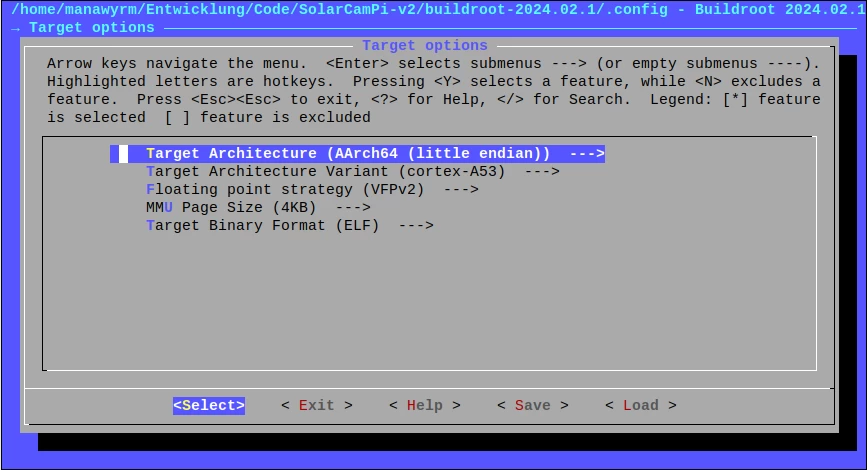
It's time to switch from Raspbian/Debian to your own Buildroot build (primarily to build a custom kernel). Using Buildroot 2024.02.1, a very simplified system was configured:
Native aarch64 toolchain
Full glibc
Raspberry Pi tools (e.g., camera utilities)
The kernel was configured:
Without sound support
Without most block device and file system drivers (excluding SD/MMC and ext4)
Without RAID support
Without USB support
Without HID support
Without DVB support
Without video and framebuffer support (HDMI is still disabled)
Without advanced network features (tunnels, bridges, firewalls, etc.)
Without compression
Modules are not compressed
Tests have shown that using an uncompressed kernel and modules has a positive effect on power consumption (even if more time is spent loading the GPU kernel). Gzip decompression requires a lot of energy (and adds another relocation step).
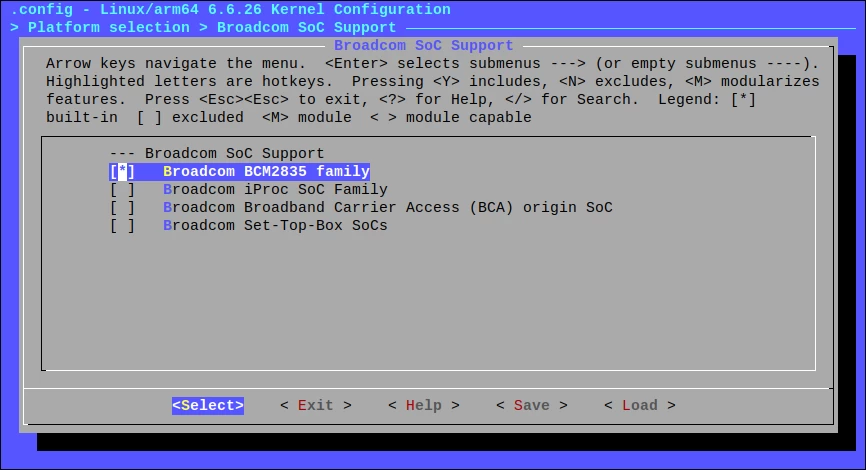
A security feature called KASLR was also disabled. KASLR randomly changes the kernel's load address in memory, making it harder to write exploit code (since the kernel's location in memory is unknown). This requires relocating the kernel after it is loaded by the GPU.
In our case, the network attack surface is very limited, so KASLR can be disabled (all applications still run as root). Protection against speculative execution vulnerabilities such as Spectre is also disabled.
The resulting kernel is 8.5 MiB in size (uncompressed), 4.1 MiB after Gzip compression (which is not used here, provided for comparison only).
The original Raspbian kernel was 25 MiB (uncompressed), 8.9 MiB after Gzip compression.
Final result
Now we can boot into the Linux user-space program in less than 3.5 seconds! Approximately 400 ms is spent in the Linux kernel (the difference between pin 0 and pin 1).
Total power consumption is 0.364 As * 5.0 V = 1.82 W·s. We have reduced power consumption by 5 times (compared to standard Debian, where it was 9.5 W·s to user-space).
Reducing input voltage
After publishing this article, Graham Sutherland / Polynomial noted that the power regulators on the Pi Zero are not very efficient at an input voltage of 5.0 V. This will not always be a suitable solution, but in our test scenario and also in the finished product, we can simply reduce the input voltage to 4.0 V.
At 5.0 V:
Note the units used. MilliCoulombs (mC) increase when switching to 4.0 V (due to higher current), but power consumption decreases significantly!
350.94 mAs * 5.0 V = 1.754 W·s
At 4.0 V:
390.77 mAs * 4.0 V = 1.563 W·s
Let's try to reduce the voltage even further:
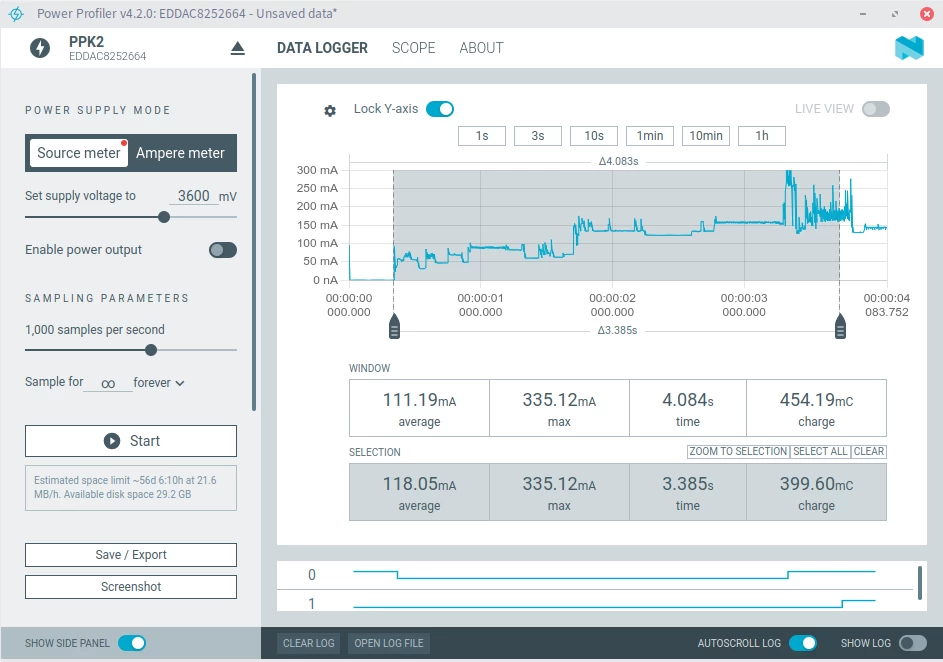
At 3.6 V:
399.60 mAs * 3.6 V = 1.438 W·s
We have just reduced power consumption by another 20%, simply by adjusting the switching voltage regulators! Of course, this requires further testing for stability and reliability (as this is technically out of spec), but the result is very impressive.






Write comment