- DIY
- A
Goodbye, ChromeOS: a long journey to Linux with a homemade Suzy-Q cable and BIOS firmware
Hello, tekkix! This is Kirill from MTS Digital. After I managed to teach the Chromebook to boot from a flash drive, which I talked about in the post "Chromebook: life after EOS", it seemed that there was no point in flashing to alternative firmware. But after another attempt to install Linux, I noticed an interesting point: the inxi utility showed just numbers from 0 to 9 instead of a serial number.
There are also a few more technical nuances: some Linux distributions refused to correctly determine the screen resolution, and Gentoo hung when booting from the minimal image. I assumed that most likely BIOS/UEFI might interfere with the normal use of alternative operating systems. And as it turned out later, this is indeed the case. So I decided to deal with the firmware. It would seem an elementary thing - there is a special script and guides on the Internet. What could go wrong? I talked about this under the cut.
Attempt to Find a Simple Solution to the Problem
First, I decided to study the experience of other people: read forums and watch videos on YouTube. From them, a general picture emerged. BIOS/UEFI in such devices is divided into two parts. The first one can be easily flashed to anything, which I have already done. But the second part has write protection, which can be implemented in different ways — from unscrewing a special bolt to purchasing a Suzy-Q debug cable: it allowed access to the debug console and disable the protection programmatically from there.
When I disassembled the Chromebook, I carefully examined the motherboard — I did not find any bolts to remove the protection. So, the protection is implemented differently. On the MrChromeBox.tech website, there is a section of supported devices. Next to my model, there were two checkmarks, which means support for flashing — both partially and completely. And the method of removing the protection was indicated as Cr50 (battery). On the same resource, there is a section that describes in detail the sequence of steps to disable the protection:
Turn off the Chromebook.
Disconnect it from the power supply.
Remove the bottom cover.
Disconnect the battery.
Put the cover back on.
Connect to the power supply — at least 45W.
After the firmware update process using the script is completed, do everything in reverse order, returning the battery to its place and assembling the Chromebook. It seems elementary, but as soon as I disconnected the battery and put everything back together, the Chromebook simply did not respond to the power button. After reading various forums, I realized that there are models that are not designed to work only from the power adapter. From my memory, my old MacBook Air behaved this way, and I had to buy a battery for it: without it, it simply would not turn on.
To be honest, I also suspected the power adapter. The original one had long gone to the trash, and instead, I use a 65W GaN from Xiaomi. There is plenty of power, but I assumed that the original power adapter somehow communicates with the controller inside the Chromebook and allows (or does not allow) it to start without a battery. Okay, I go to Amazon and order the original power adapter, fortunately, this thing is inexpensive and will be delivered quickly. But while it is on the way, I decided to look for an alternative method.
Suzy-Q
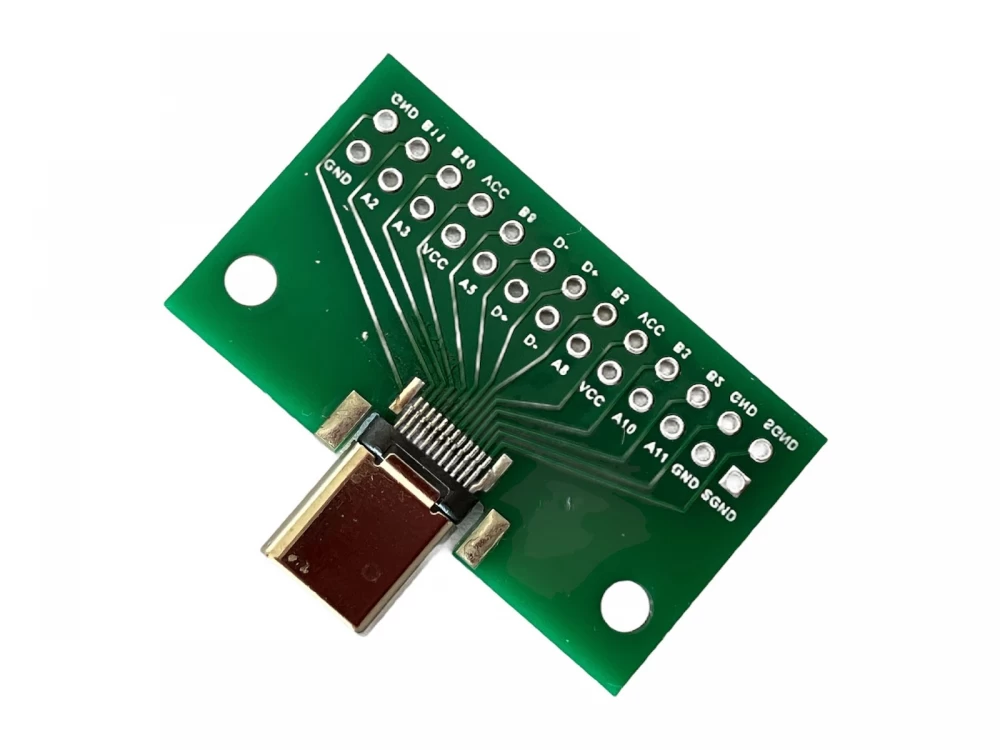
The most promising seemed to be to purchase or assemble a Suzy-Q (Suzy-Qable) cable. But it turned out that SparkFun stopped producing them in 2021, and the rare remaining ones on sale are unreasonably expensive. There is a second option — to assemble it yourself, using a USB Type-C module, where each line is separated for easy soldering:
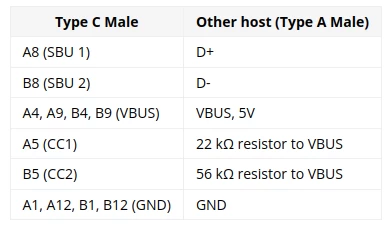
I ordered such modules on Aliexpress a long time ago, and all this time they were waiting for their moment. It remains to find the scheme, but, as it turned out, Google itself posted it for everyone:
The first version of the cable I soldered literally on my knee, but since I didn't have resistors of the required rating, I had to use a series connection of several. I checked with a multimeter, it seemed to match. Note that this cable only works in one USB-C port (on my model, the left one) and only in one position. If you turn the cable over, nothing will work.
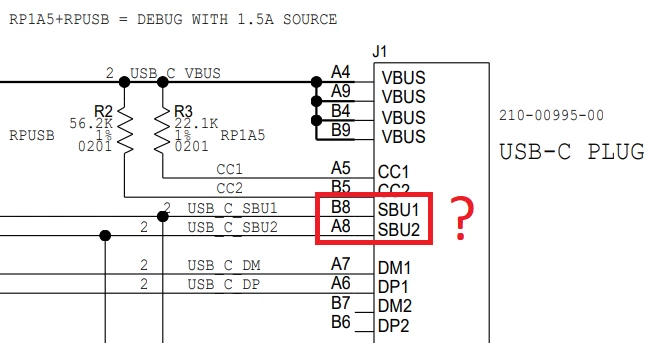
Okay, I tried, assembled, connected. In one position, zero emotions. But when I plugged it in the other way around, I got an unexpected effect: the Chromebook just froze and restarted. It became clear that I made a mistake somewhere, and the USB port was saved from a short circuit by protection. Just in case, I decided to get resistors of the required rating and went to the local radio store. I took another module, but before soldering, I decided to make sure that the circuit was correct. And immediately came across a thread where participants were discussing exactly this issue:
It turned out that on my board these two contacts are reversed, more precisely, the contact markings are made not for USB-C Male, but for USB-C Female. One of the participants wrote that he solved the problem, and with an even simpler pinout:
A5: D+;
B5: D-;
A8: 22K resistor to VCC;
B8: 56K resistor to VCC.
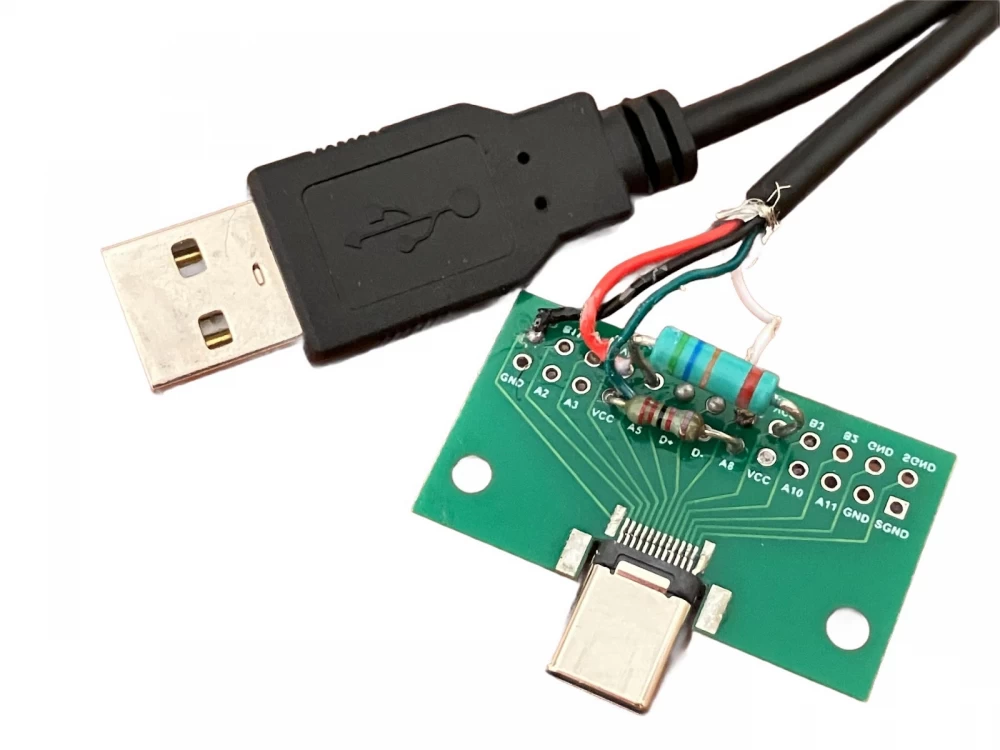
On his device, it was not even necessary to connect the VBUS and GND points. Well, okay, I do the same, flipping A8 and B8. Please don't hit me for the quality of the soldering, it was soldered with what was at hand:
Connecting — nothing reloads anymore, but nothing happens either. I remember that the plug will only work in one position, I turn it over... and again silence. The dmesg logs had errors that it was impossible to correctly recognize the connected device. So, I will have to create a complete circuit again. But I only had one module left, and I decided to put this idea aside for now. A little later, I still soldered the final version, but again the same errors about the inability to determine the type of USB device. Again a dead end.
In fact, if the Suzy-Qable worked correctly, it would give me access to the CCD (Closed-Case Debug) console and with one command I could remove the protection. But alas, I again came back to the idea that the protection should be removed by disconnecting the battery. Then the original power supply arrived, and I disassembled the Chromebook again the same day. Disconnecting the battery, I tried to start it as stated in the guide. But I was disappointed: the laptop did not start without the battery.
Extreme method
Then I started to consider options. You can try to make the Suzy-Q cable again just on a breadboard, but at that moment I did not have the right length of "comb". Then the thought came to my mind: what if I disconnect the battery directly while the power supply is connected. Logically, if something happens to the battery controller during operation, the charging circuit should go into failure mode. But at the same time continue to work, allowing the user to save the results of the work and turn off the device in the usual way. After that, of course, the device will no longer turn on.
Yes, the idea is dangerous, but this is my device, and I was mentally prepared for it to completely fail. Therefore, after removing the back cover and connecting the power supply, I pulled the battery out of the connector with one precise movement. The charging indicator, as I expected, blinked orange, indicating a battery failure, and the power choke buzzed unpleasantly at the edge of audibility. The Chromebook continued to work, and without wasting a minute, I launched the reflash script.
A couple of seconds later, I saw that the trick worked and the protection was disabled. The script warned a couple of times that I would not be able to return to ChromeOS after this procedure, just in case, it forced me to connect a flash drive and made a backup dump on it. After that, the reflash began, and the system reported that I could reboot. Of course, after turning off, the Chromebook simply went out and waited for me to reconnect the battery.
After returning the battery to its place, I connected the power supply — and, oh miracle, now instead of the white ChromeOS bootloader screen, there was a rabbit, the LinuxBIOS aka coreboot logo:
In addition to having full access to the BIOS, I tried to run the Gentoo installation disk, and it started up calmly. Other distributions, such as Debian 12 and Ubuntu 22.04, began to correctly determine the screen resolution at startup. All problems were solved at this point. Only a couple of questions remained that bothered me — what is this Cr50?
What is Cr50
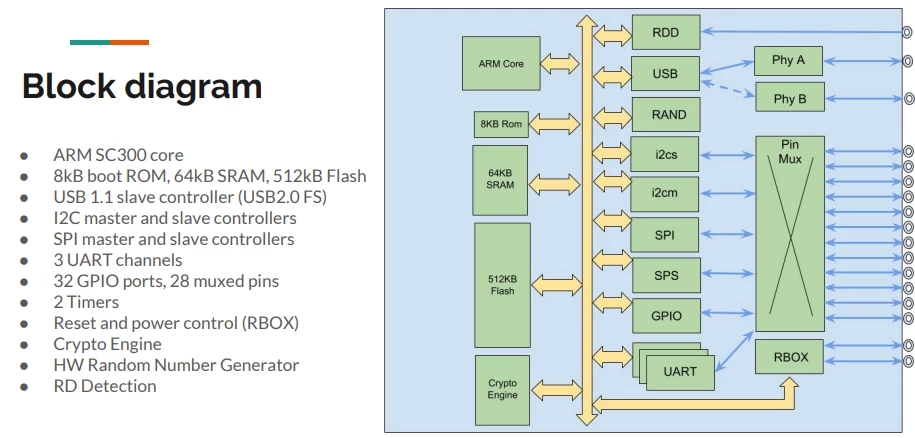
It can be easily googled. Cr50 is the name of the firmware for the СrOS EC (Embedded Controller). But what kind of controller it is was unclear until I came across a PDF presentation of the Google Security Chip H1. The document itself was deleted back in 2021, but thanks to the Internet Archive, it can still be viewed through the Wayback Machine.
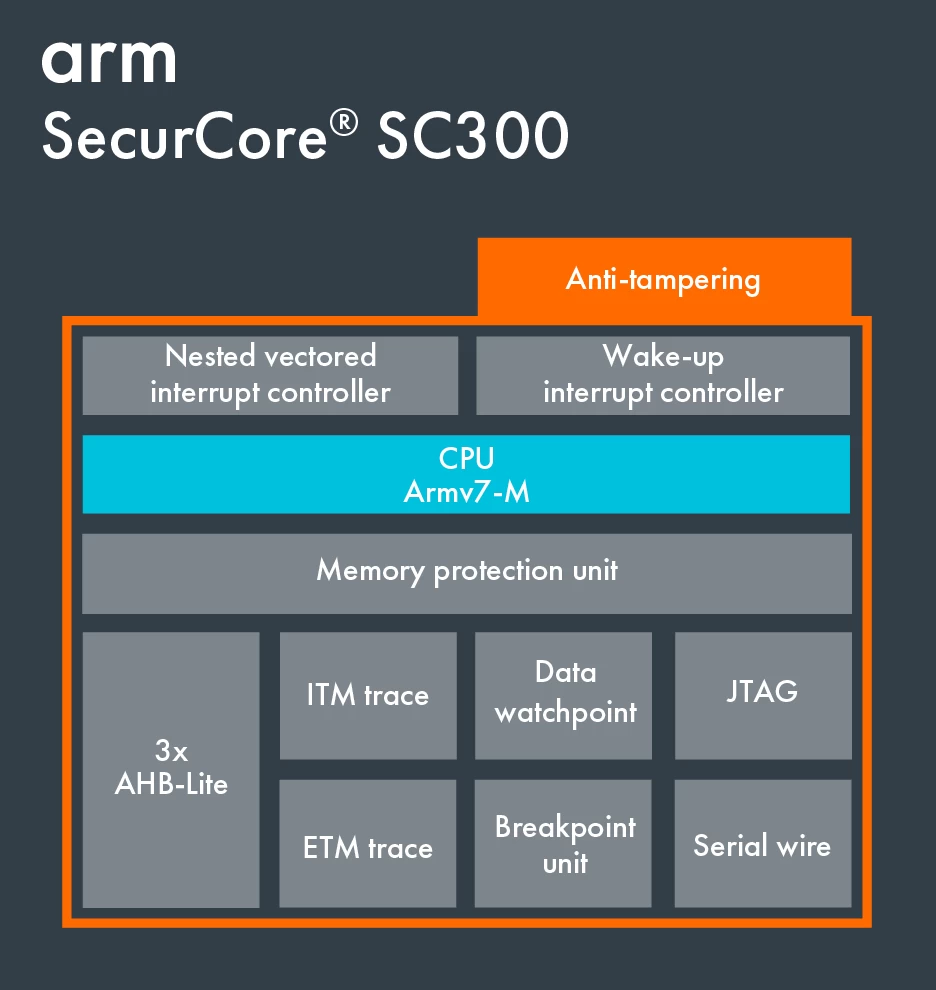
It turned out that inside the Chromebook there is actually another computer based on the ARM SecurCore SC300:
In terms of speed, this thing is quite slow. In Chromebooks, its clock frequency is only 24 MHz, but a lot is tied to it. Judge for yourself:
Firstly, it ensures the operation of the verified OS boot mechanism, acting as a TPM. Secondly, the operation of the debug console, the very CCD, is tied to it. Thirdly, it can, if necessary, send a signal to disconnect the battery, as well as guarantee a complete reboot of all Chromebook systems. And of course, it is this thing that protects the SPI flash BIOS/UEFI from being overwritten.
Moreover, the implementation of the Google Security Chip H1 provides that it can work as a hardware key for U2F protection, that is, be used for two-factor authentication. In short, this remarkable chip completely controls the system, living its unnoticed life inside ChromeOS-based devices. Its only weak point is its dependence on the connected battery. That is why, as soon as the battery was disconnected, the chip could no longer ensure protection against overwriting the SPI flash. This made it possible to flash third-party firmware there without hindrance.
Instead of a conclusion
Someone might say that pulling out the battery "live" is a kind of abuse of technology. Perhaps, it was possible to continue attempts to disable protection through CCD. But in my case, this risk was justified, since the Chromebook is not designed to work only from the power supply without a battery.
For Chromebooks from other vendors, this problem will not be relevant at all. I have seen many mentions online that their Chromebooks started up perfectly without a battery and worked fine. And many indeed managed to assemble a working Suzy-Q cable and connect to the CCD console.
Was it worth it? Definitely yes. Now my Chromebook has become a full-fledged computer on which you can safely install the current version of Linux and use any applications without restrictions. By the way, this entire post was written entirely on it — a small compact Chromebook that has been faithfully performing its duties for seven years. So I have no regrets!




Write comment