- Hardware
- A
Writing a Simple Virtual Machine
Hello everyone! I decided to try writing my own emulator to systematize my knowledge in computer architecture. We will emulate the CPU, opcodes, memory, and also add the possibility to connect external devices. The level is for those who have recently started studying computer architecture. In the future, it will be possible to add graphics, sound, and persistent memory.
Hello everyone! I'm a student, looking to gain experience in systems programming. In this project, I decided to systematize my knowledge in computer architecture, and I hope this article will help someone else understand the topic as well. So, I want to write my own computer emulator, or more precisely, something like a constructor: the user will be able to write their own opcodes and bind them to specific numbers.
Let's agree on the limitations and simplifications
All registers are 32-bit, addresses are 32-bit, memory consists of 32-bit cells
There will be no clock generator, i.e., CPU clock, at least in this part
An address points not to a specific byte, but to a 32-bit cell; each next address is the next cell (for simplicity)
No CPU caches
No interrupts and no stack for now
Step 1.1. CPU Emulation
The CPU class has the following "responsibilities":
Storing a reference to the set of commands (Command_set)
Storing a reference to an object representing the current state (registers, address) (CPU_state)
Storing a reference to the object managing memory (Memory)
At startup, the processor fetches the opcode from memory, requests the number of arguments for this opcode from its command set, gets the arguments from memory, executes the opcode
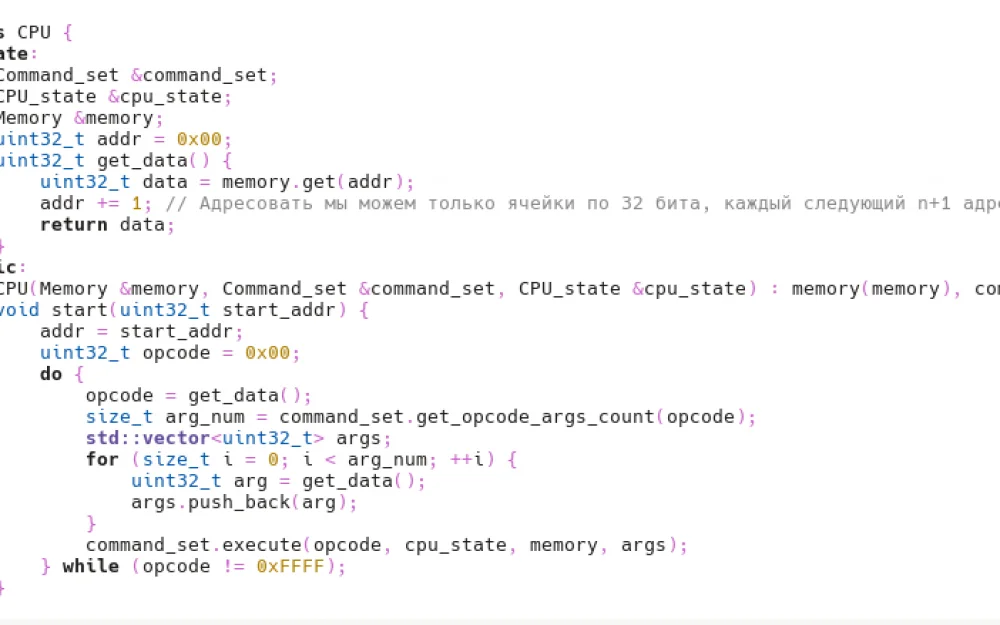
class CPU {
private:
    Command_set &command_set;
    CPU_state &cpu_state;
    Memory &memory;
    uint32_t get_data() {
        uint32_t addr = cpu_state.get_addr();
        uint32_t data = memory.get(addr);
        cpu_state.set_addr(addr + 1); // We can only address 32-bit cells, each next n+1 address is a new 32-bit cell
        return data;
    }
public:
    CPU(Memory &memory, Command_set &command_set, CPU_state &cpu_state) : memory(memory), command_set(command_set), cpu_state(cpu_state) {}
    void start(uint32_t start_addr) {
        cpu_state.set_addr(start_addr);
        uint32_t opcode = 0x00;
        do {
            opcode = get_data();
            size_t arg_num = command_set.get_opcode_args_count(opcode);
            std::vector args;
            for (size_t i = 0; i < arg_num; ++i) {
                uint32_t arg = get_data();
                args.push_back(arg);
            }
            command_set.execute(opcode, cpu_state, memory, args);
        } while (opcode != 0xFFFF);
    }
};
Memory, Command_set, as well as an instance of the CPU_state class are provided from outside: This way, we can "construct" the architecture according to the limitations above as we wish.
We'll consider Command_set, CPU_state, and Memory later.
Step 1.2. Storing the set of commands
The Command_set class is essentially a wrapper over an associative container, where each opcode is mapped to its specific number
class Command_set {
    std::unordered_map opcodes;
    Opcode &find_opcode(uint32_t opcode_num) {
        auto it = opcodes.find(opcode_num);
        if (it == opcodes.end()) {
            throw std::runtime_error("Opcode not found");
        }
        return (*it).second;
    }
public:
    void add_opcode(uint32_t opcode_num, Opcode opcode) {
        opcodes.insert({opcode_num, opcode});
    }
    void execute(uint32_t opcode_num, CPU_state &cpu_context, Memory &memory, std::span args) {
        find_opcode(opcode_num).execute(cpu_context, memory, args);
    }
    size_t get_opcode_args_count(uint32_t opcode_num) {
        return find_opcode(opcode_num).get_args_num();

    }
};
Step 1.3. Storing a specific opcode
Specifically, we'll store:
The name of the opcode (for debugging and demonstration at the first steps)
The number of arguments - these are also requested by the CPU class
The opcode handler - the function that will directly perform the opcode action
Nothing complicated here - we store, return the argument count, and call the opcode handler
using Opcode_handler = std::function)>;

class Opcode {
    std::string name;
    size_t args_num = 0;
    Opcode_handler handler;
public:
    Opcode(const std::string &name, int args_num, Opcode_handler handler) {
        this->args_num = int2size(args_num);
        this->handler = handler;
        this->name = name;
    }
    size_t get_args_num() {
        return args_num;
    }
    void execute(CPU_state &cpu_context, Memory &memory, std::span args) {
        handler(cpu_context, memory, args);
#ifdef IS_DEBUGGING
        std::cout << name << " called" << std::endl;
#endif
    }
};
For debugging purposes, we can print that this opcode was called
We pass the following to the opcode handler:
CPU context, so that the opcode can modify registers, address, set and reset flags - more on this later
Memory, so that the opcode can write data to memory
An arbitrary number of arguments
Examples of opcode handler implementations will be considered after we review registers, flags, and memory
Step 2. CPU context
Here, we store registers, the address of the current instruction, and flags
class CPU_state {
private:
    uint32_t *registers;
    uint32_t addr;
    uint32_t flags = 0;
public:
    enum Flag {
        ZF = 1 << 0, // Shift of 1 by 0 bits to the left, i.e., 0b0001
        SF = 1 << 1, // 0b0010
        OF = 1 << 2, // 0b0100
        CF = 1 << 3 // 0b1000
    };
    enum Registers {
      SP = 1 << 0
    };
    CPU_state(int regs_number) {
        registers = new uint32_t[int2size(regs_number)];
    }
    uint32_t get_register(int number) {
        size_t reg_number = int2size(number);
        if (reg_number >= REG_NUM) throw;
        return registers[reg_number];

    }
    void set_register(int number, uint32_t reg_value) {
        size_t reg_number = int2size(number);
        if (reg_number >= REG_NUM) throw std::runtime_error("Invalid register number");
        registers[reg_number] = reg_value;
    }
    uint32_t get_addr() {
        return addr;

    }
    void set_addr(uint32_t addr_value) {
        addr = addr_value;
    }
    void set_flag(Flag flag, bool value) {
        if (value) flags |= flag; // i.e., we bitwise add the flag to the flag register, value only checks whether to set or reset the flag
        else flags &= ~flag;
    }
    bool get_flag(Flag flag) const {
        return flags & flag; // we find the intersection of flags with the Flag flag
    }
    ~CPU_state() {
        delete []registers;
    }
};
Registers are stored in an array, the address is stored in a separate variable, and flags are stored in one variable bitwise
Step 3. Memory
Here is where things got complicated. Initially, I wrote fixed-size memory, stored it in an array, and everything was fine. But I needed the ability to connect devices by mapping them into memory. Let's look at this process in more detail:
struct Buf {
        size_t size = 0;
        uint32_t address_begin;
        uint32_t *buf = nullptr;
        Buf(int size, uint32_t address_begin, uint32_t *buf) {
            this->buf = buf;
            this->address_begin = address_begin;
            this->size = int2size(size);
        }
        uint32_t begin() {
            return address_begin;
        }
        uint32_t end() {
            return address_begin + size;
        }
    };
For internal access, we created a structure Buf in the class. We store the memory obtained from outside in it, the size of this memory, and the starting address where we mapped this buffer in the general memory. The logic is simple: we return the base address using the begin function, add the size to it, and return the resulting address from end().
Outside, we store the machine's memory and buffers in the Memory class, and also implement the translation from the machine memory address to the buffer address.
class Memory {
    struct Buf {
        size_t size = 0;
        uint32_t address_begin;
        uint32_t *buf = nullptr;
        Buf(int size, uint32_t address_begin, uint32_t *buf) {
            this->buf = buf;
            this->address_begin = address_begin;
            this->size = int2size(size);
        }
        uint32_t begin() {
            return address_begin;
        }
        uint32_t end() {
            return address_begin + size;
        }
    };
    uint32_t *memory = nullptr;
    size_t mem_size = 0;
    std::vector buffers;
    uint32_t *get_buf(uint32_t address) {
        if (address < mem_size) {
            return memory;
        } else {
            for (auto &buf : buffers) {
                if (address > buf.begin() && address < buf.end()) {
                    return buf.buf;
                }
            }
            throw std::out_of_range("Out of bounds");
        }
    }
    void set_buf(uint32_t address, uint32_t value) {
        if (address < mem_size) {
            memory[address] = value;
        } else {
            for (auto &buf : buffers) {
                if (address > buf.begin() && address < buf.end()) {
                    buf.buf[address - buf.begin()] = value;
                    return;
                }
            }
            throw std::out_of_range("Out of bounds");
        }
    }
public:
    Memory(int size) {
        mem_size = int2size(size);
        memory = new uint32_t[mem_size];
    }
    uint32_t get(uint32_t address) {
        if (address >= full_size()) throw std::out_of_range("address is higher than memory size");
        if (get_buf(address) == nullptr) throw;
        return get_buf(address)[address];
    }
    void set(uint32_t address, uint32_t value) {
        if (get_buf(address) == nullptr) throw;
        set_buf(address, value);
    }
    uint32_t full_size() {
        if (buffers.size() == 0) return (uint32_t)mem_size;
        return buffers[buffers.size() - 1].end();
    }
    uint32_t memory_size() {
        return (uint32_t)mem_size;
    }
    uint32_t attach_buf(int size, uint32_t *buf) {
        if (buf == nullptr) throw;
        uint32_t base_address = full_size();
        buffers.emplace_back(size, base_address, buf);
        return base_address;
    }
    ~Memory() {
        if (memory != nullptr) {
            delete[] memory;
        }
    }
};
The address translation is implemented in the functions get_buf(address) and set_buf(address, value). For this, we separately store the size of the virtual machine's memory and check if the given absolute address is smaller than the size of the machine's memory (in this case, we are talking about the internal memory of the machine, not the external buffer). Otherwise, we iterate through the buffers, and if the address falls within the range of any buffer, we return it (for internal use in the Memory class), otherwise, we throw an error.
We attach the buffer "above" the main memory and previous buffers using the attach_buf function, which returns the start address of the attached buffer.
The possibility of detaching a buffer is not provided, as it would require implementing more address arithmetic for translation and dealing with fragmentation.
The full memory size full_size(), including buffers, can be obtained in this scheme as the end of the last buffer or the size of the main memory if there are no buffers.
Step 4. Implementation of Opcodes
Here we are at the most interesting part! A little more, and we will be able to "construct" our own architecture.
void add(CPU_state &cpu_context, Memory &memory, std::span args) {
    int32_t a = cpu_context.get_register(args[0]);
    int32_t b = cpu_context.get_register(args[1]);
    int32_t result = a + b;
    std::cout << result << std::endl;

    cpu_context.set_register(args[0], result);

    cpu_context.set_flag(CPU_state::ZF, result == 0);
    cpu_context.set_flag(CPU_state::SF, result < 0);
    cpu_context.set_flag(CPU_state::OF, (a > 0 && b > 0 && result < 0) || (a < 0 && b < 0 && result > 0));
    cpu_context.set_flag(CPU_state::CF, (uint32_t)a + (uint32_t)b < (uint32_t)a);
}

void mov(CPU_state &cpu_context, Memory &memory, std::span args) {
    cpu_context.set_register(args[0], args[1]);
}

void hlt(CPU_state &cpu_context, Memory &memory, std::span args) {}

void jmp(CPU_state &cpu_context, Memory &memory, std::span args) {
    cpu_context.set_addr(args[0]);
}
Here we implemented four opcodes as an example (there will be more in the following sections!). The format for receiving data by the handler was discussed earlier. In the add function, we get values from the CPU registers specified in the arguments. Since this is an example opcode, we also display the result on the screen. Later, after adding input/output devices, we will be able to test this more naturally. But here, our goal is to create a minimally working prototype, demonstrating the architectural approach. We get values from the registers, add them, and write the result into the register specified by the first argument. If we were writing assembly, it would look like this:
add accumulator, valueWe set flags: if the result is zero, we set the Zero Flag (ZF), if the result is negative, we set the Sign Flag (SF), if there is overflow, we set the Overflow Flag (OF), and we set the Carry Flag (CF) if there is an unsigned overflow.
The MOV instruction is simple: we write the value specified by the second argument into the register specified by the first argument:
mov register, valueWe also have an opcode for hlt, but the handler does nothing, and its opcode number serves as the condition to stop the CPU's execution cycle in the CPU class.
Another instruction is JMP, which changes the address at which the processor executes instructions:
jmp addrStep 5. Loading data into memory
All of this is good, but the machine fetches instructions from memory. And we need to load them into memory somehow. The simplest solution is to write a Loader that would take data from a file and inject it into a specified address in memory.
Here’s my naive implementation:
class Memory_Loader {
public:
    static void preload_file(Memory &memory, std::ifstream &bin_file, uint32_t begin_address) {
        uint32_t addr = begin_address;
        uint32_t value = 0x0;
        while(bin_file.read(reinterpret_cast(&value), sizeof(value))) {
            memory.set(addr, value);
            ++addr; // Since in our context, the address is an index in the array (index of a 32-bit cell) of uint32_t
        }
    }
};
Here we read the binary file and inject every 4 bytes (32 bits - the size of uint32_t) into memory, incrementing the address (don’t forget, for simplicity, we address the cells in 4-byte chunks).
Step 6. Utility functions
size_t int2size(int size) {
    if (size < 0) throw std::runtime_error("Invalid conversion");
    return (size_t)size;
}
Here, we simply cast an int to size_t with a check for a negative value.
Step 7. Assembling the processor architecture!
class Basic_CPU_Factory {
public:
    static CPU* make_basic_cpu(Memory &memory, Command_set &cs, CPU_state &cpu_context) {
        cs.add_opcode(0x0001, Opcode("ADD", 2, add));
        cs.add_opcode(0x0002, Opcode("MOV", 2, mov));
        cs.add_opcode(0x0003, Opcode("JMP", 1, jmp));
        cs.add_opcode(0xFFFF, Opcode("HLT", 0, hlt));
        return new CPU(memory, cs, cpu_context);
    }
};
Here we receive memory, a command set, and the CPU context, and create a CPU instance with the added opcodes ADD, MOV, and HLT with the appropriate numbers (this class is meant to show how you can "assemble" an architecture (with some limitations)).
Step 8. Final touches.
Here’s my main() function
int main() {
    Memory mem(1024);
    Command_set cs;
    CPU_state context(52);
    CPU* cpu = Basic_CPU_Factory::make_basic_cpu(mem, cs, context);
    std::ifstream in("bin_file.bin", std::ios::binary);
    Memory_Loader::preload_file(mem, in, 0x0000);
    cpu->start(0x0);
    return 0;
}
Here I created memory for 1024 cells of 4 bytes each, so 1024 * 4 = 4096 bytes = 4 KB.
I created a class for CPU state with 52 registers, a command set, which will later be populated with CPU instructions. I read the file bin_file.bin and loaded it at address 0x0, then started the CPU from that address as well. This implementation of main() also serves as a demonstration.
Step 9. Let’s go!
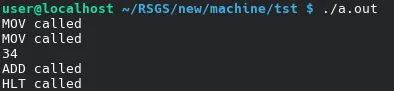
After compiling this code, I created a binary for memory loading in a HEX editor.
02 00 00 00 02 00 00 00 07 00 00 00 02 00 00 00 08 00 00 00 1B 00 00 00 01 00 00 00 02 00 00 00 08 00 00 00 FF FF 00 00
In assembly, this would look like:
mov 02, 07 ; Copied the value 7 into register 2
mov 08, 27 ; 0x001B = 27
add 02, 08 ; Added the value of register 8 (which is 7) to register 2
hlt        ; Stop!
As you’ll recall, in our demonstration the add opcode prints the result of the addition, and the CPU outputs which opcodes were executed.
Here’s the result:
Let’s modify the code a bit and add a jump to the start instruction in the end before HLT:
jmp 0 ; jump to the start02 00 00 00 02 00 00 00 07 00 00 00 02 00 00 00 08 00 00 00 1B 00 00 00 01 00 00 00 02 00 00 00 08 00 00 00 03 00 00 00 00 00 00 00 FF FF 00 00
Let’s run our emulator:

We ended up with an infinite loop, just as expected.
As we can see, the opcodes we’ve implemented are working correctly.
What’s next?
We’ve only implemented a few opcodes to demonstrate the approach, create a minimal prototype, and structure knowledge about computer architecture. In the future, this idea can be developed to a higher level:
Add opcodes, at least to make the machine Turing-complete
Add graphics and sound support: you can connect a framebuffer and a sound buffer to the memory and render using SDL2 or OpenGL
Implement persistent memory (like HDD): Write an HDDController class, which on one hand provides a buffer that can be read from and written to, and on the other hand reads from and writes to a file, for example, disk.img
Add parallelism support, but it may require reworking the architecture, and at the moment I have almost no experience with parallelism and multithreading
Write an assembler translator for this machine
In the very distant future: write a DOS-like OS
Create animation: in the binary, at the beginning, make a loop that loads images from a certain address into the framebuffer, then increments the address, and then the actual image data in Bitmap format
Conclusion
So, we have created a "virtual machine" that is able to execute opcodes, has its own RAM, and the ability to connect external devices, including persistent memory, GPU, and audio devices. The goal has been achieved—we have created a minimally functional emulator.
I hope this article helps someone in learning computer architecture—it helped me. I would also like to hear feedback from more experienced people; I made significant simplifications in code design—I did not use smart pointers, move semantics, and mainly used C-style casts. I tried not to write anything I wasn't sure about, so my approach is naive and probably not very safe. In any case, the code works, and this is my first low-level project of this scale.
See you next time!

![From Virtual Hands to AI for Survivalists: Curious Open Agent OSes [and One Hardware Project]](https://cdn.tekkix.com/imgs/2026/05/habrcom/big/ce0b1057616faed51cd8b9f3b2b9.webp)


Write comment