- Security
- A
Basic SAST and DAST setup for django in gitlab cicd: how to quickly implement security solutions
Hello, my name is Egor and I am a Tech Lead at IdaProject :) I am engaged in strategy, processes, and teams in the direction of backend development.
Today I will tell you about the basic setup of SAST and DAST for django in gitlab cicd. In development, the use of SAST (Static Application Security Testing) and DAST (Dynamic Application Security Testing) has become a standard in recent years. There is already quite a lot of material on this topic on habr, but I want to focus on the quick and basic implementation of a security solution in the following technology stack:
Infrastructure: Docker, Docker Compose, GitLab, GitLab CI/CD
Backend: Python, Django with Poetry
Frontend: Vue.js, Nuxt.js
Let's go!
SAST (Static Application Security Testing)
Static Application Security Testing (SAST) is a method of static code analysis that helps identify potential vulnerabilities at the development stage.
We will use the following tools:
bandit — a tool for checking Python code for common vulnerabilities.
trivy — a Swiss knife suitable for checking Docker containers, git repositories, operating systems, and source code.
gitleaks — a tool for finding passwords, hashes, and other forgotten sensitive data in the code.
The earlier you find a vulnerability, the faster and easier it will be to fix it. The earliest stage for this is the local machine. Therefore, it is extremely important to install pre-commit in your project.
You can integrate bandit and gitleaks tools into pre-commit. They will check the source code for vulnerabilities when creating a commit on the local machine and will not allow the commit to complete if they find something.
DAST (Dynamic Application Security Testing)
Dynamic Application Security Testing (DAST) is a security testing method that is performed while the application is running. Unlike SAST, DAST analyzes a running application by interacting with it as an attacker would. We will use OWASP ZAP (Zed Attack Proxy).
Architecture
For simplicity, we use a fairly simple project. All sources will be available on GitHub.
So, we have the following structure:
backend (Django + DRF)
frontend (Vue + Nuxt)
gitlab (CI/CD instructions)
pre-commit-config.yml (pre-commit configuration)
docker-compose.yml (configuration for running the entire project)
The entire project can be started with the command:
docker compose -f docker-compose.yml up -build GitLab CI/CD
First, let's set up checks for SAST solutions in GitLab CI/CD. We will split the CI/CD instructions into files for readability.
default:

  image: 'docker:23.0-dind'

  before_script:

    - echo "$CI_REGISTRY_PASSWORD" | docker login -u "$CI_REGISTRY_USER" --password-stdin $CI_REGISTRY

stages:

  - build

  - security

  - post-deploy

include:

  - local: '/gitlab/build.yml'

  - local: '/gitlab/security.yml'

  - local: '/gitlab/post-deploy.yml'
gitleaks, bandit and pre-commit
The simplest, fastest, and most importantly, useful thing we can do right away is to set up pre-commit. What is pre-commit and how to set it up can be read here. From the documentation for gitleaks and bandit we can add hooks that will check our files when committing.
# file .pre-commit-config.yaml

repos:
- repo: https://github.com/PyCQA/bandit
  rev: '1.7.8'

  hooks:

  - id: bandit

    args: ["-c", "backend/pyproject.toml"]

- repo: https://github.com/gitleaks/gitleaks

  rev: v8.18.3

  hooks:

    - id: gitleaks
Here it is worth highlighting the custom configuration for bandit, namely the line args: ["-c", "backend/pyproject.toml"]. Here we pass the file pyproject.toml, which is usually a configuration file for the entire python application. You can read more about the custom configuration of the bandit utility here.
Next, run the commands:
pre-commit install
pre-commit rungitleaks, bandit in GitLab CI/CD
pre-commit is certainly great, but sometimes developers do not install it on their local device. Therefore, adding gitleaks and bandit to CI/CD will not be superfluous. We have defined a separate stage "security", in which the security check of our images will take place.
The file gitlab/security.yml will have the following content:
gitleaks:

  stage: security

  before_script: [ ]

  image:

    name: "zricethezav/gitleaks"

    entrypoint: [ "" ]

  script:

    - gitleaks detect -v ./

  allow_failure: true

bandit:

  stage: security

  before_script: [ ]

  image:

    name: "ghcr.io/pycqa/bandit/bandit"

    entrypoint: [ "" ]

  script:

    - gitleaks detect -v ./

  allow_failure: true
Local run of trivy
Trivy can be run both on a local machine and in CI/CD. It is great for checking source code or Docker images. Example of checking source code:
docker run -v /var/run/docker.sock:/var/run/docker.sock -v ${PWD}:/path aquasec/trivy:0.52.0 fs Example of checking a local image:
docker run -v /var/run/docker.sock:/var/run/docker.sock -v ${PWD}:/path aquasec/trivy:0.52.0 image sast-and-dast-for-gitlab-backendtrivy in GitLab CI/CD
Let's add the following content to the gitlab/security.yml file:
Backend image check:
trivy:backend:

  stage: security

  before_script: [ ]

  image:

    name: docker.io/aquasec/trivy:latest

    entrypoint: [ "" ]

  variables:

    GIT_STRATEGY: none

    TRIVY_USERNAME: "$CI_REGISTRY_USER"  # Login to download the image from the registry

    TRIVY_PASSWORD: "$CI_REGISTRY_PASSWORD" # Password to download the image from the registry

    TRIVY_AUTH_URL: "$CI_REGISTRY"  # Password to download the image from the registry

    TRIVY_NO_PROGRESS: "true"

    TRIVY_CACHE_DIR: ".trivycache/"

  script:

    - time trivy image --clear-cache

    - time trivy image --download-db-only

    - time trivy image --exit-code 1 --severity CRITICAL "${CI_REGISTRY_IMAGE}/backend:${CI_COMMIT_REF_NAME}"

  cache:

    paths:

      - .trivycache/

  allow_failure: true
Frontend image check:
trivy:frontend:

  stage: security

  before_script: [ ]

  image:

    name: docker.io/aquasec/trivy:latest

    entrypoint: [ "" ]

  variables:

    GIT_STRATEGY: none

    TRIVY_USERNAME: "$CI_REGISTRY_USER"

    TRIVY_PASSWORD: "$CI_REGISTRY_PASSWORD"

    TRIVY_AUTH_URL: "$CI_REGISTRY"

    TRIVY_NO_PROGRESS: "true"

    TRIVY_CACHE_DIR: ".trivycache/"

  script:

    - time trivy image --clear-cache

    - time trivy image --download-db-only

    - time trivy image --exit-code 1 --severity CRITICAL "${CI_REGISTRY_IMAGE}/frontend:${CI_COMMIT_REF_NAME}"

  cache:

    paths:

      - .trivycache/

  allow_failure: true
Checking the entire repository for vulnerabilities:
trivy:repository:

  stage: security

  before_script: [ ]

  image:

    name: docker.io/aquasec/trivy:latest

    entrypoint: [ "" ]

  variables:

    TRIVY_USERNAME: "$CI_REGISTRY_USER"

    TRIVY_PASSWORD: "$CI_REGISTRY_PASSWORD"

    TRIVY_AUTH_URL: "$CI_REGISTRY"

    TRIVY_NO_PROGRESS: "true"

    TRIVY_CACHE_DIR: ".trivycache/"

  script:

    - time trivy image --clear-cache

    - time trivy fs --exit-code 1 --severity CRITICAL ./

  cache:

    paths:

      - .trivycache/

  allow_failure: true
For the trivy:repository task (from the file above), it is worth making a clarification. The question usually arises: why should we check the repository with the source code if we already do this with all containers? The answer is that some files that are used in multi-stage builds may not be included in the application image, but they also participate in the image build and, accordingly, may implement a vulnerability at this stage. Therefore, it is more reliable to use different verification methods, especially within the same tool.
OWASP ZAP (Zed Attack Proxy)
OWASP ZAP is one of the most popular tools for DAST analysis. It allows you to search for the most popular vulnerabilities, but it can also be customized for specific needs.
In this example, we will make a basic version of the automatic check of the running application. First, we will do this locally, and then we will automate it using GitLab CI/CD.
Local ZAP Launch
If you already have a web application deployed, you can do the initial and simplest vulnerability analysis. Use the command:
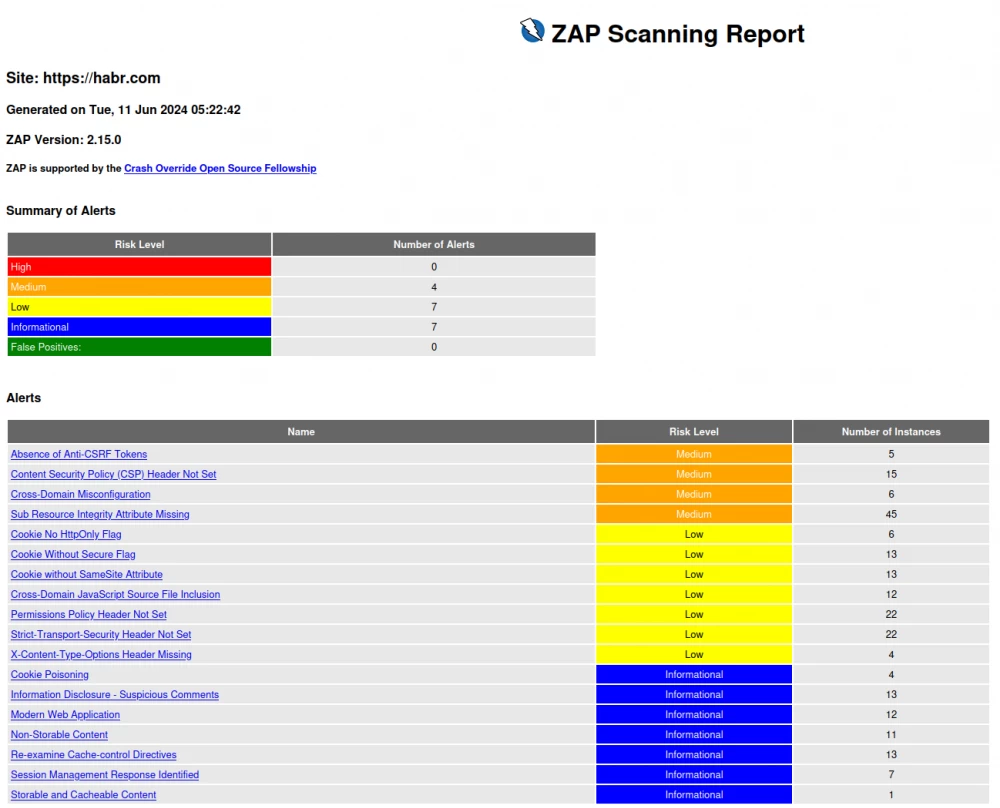
docker run -v $(pwd):/zap/wrk/:rw -t ghcr.io/zaproxy/zaproxy:latest zap-baseline.py -t https://habr.com -r report.htmlAll detected vulnerabilities will be displayed in the console, but they are inconvenient to read.
WARN-NEW: Session Management Response Identified [10112] x 7

        https://habr.com/en/flows/develop/ (302 Found)

        https://habr.com/kek/v1/auth/habrahabr-register/?back=/en/search/&hl=en (302 Found)

        https://habr.com/kek/v1/auth/habrahabr-register/?back=/ru/search/&hl=ru (302 Found)

        https://habr.com/kek/v1/auth/habrahabr-register/?back=/ru/sitemap.xml/&hl=ru (302 Found)

        https://habr.com/kek/v1/auth/habrahabr/?back=/en/search/&hl=en (302 Found)

WARN-NEW: Absence of Anti-CSRF Tokens [10202] x 5

        https://habr.com (200 OK)

        https://habr.com/en/feed/ (200 OK)

        https://habr.com/en/search/ (200 OK)

        https://habr.com/ru/feed/ (200 OK)

        https://habr.com/ru/search/ (200 OK)

WARN-NEW: Sub Resource Integrity Attribute Missing [90003] x 45

        https://habr.com/ru/sitemap.xml/ (404 Not Found)

        https://habr.com/ru/sitemap.xml/ (404 Not Found)

        https://habr.com/ru/sitemap.xml/ (404 Not Found)

        https://habr.com/ru/sitemap.xml/ (404 Not Found)

        https://habr.com/ru/sitemap.xml/ (404 Not Found)

FAIL-NEW: 0     FAIL-INPROG: 0  WARN-NEW: 17    WARN-INPROG: 0  INFO: 0 IGNORE: 0       PASS: 48
To make the information more understandable, it is better to use the reporting functionality. Now we used -r report.html, which allowed us to get the report as a single HTML page.
One of the most important advantages of the HTML report is that each vulnerability has a full description, example, and detailed solution. Such reports are well suited for managers who want to understand at a high level what is happening with the project, what vulnerabilities exist, and their criticality.
OWASP API Testing
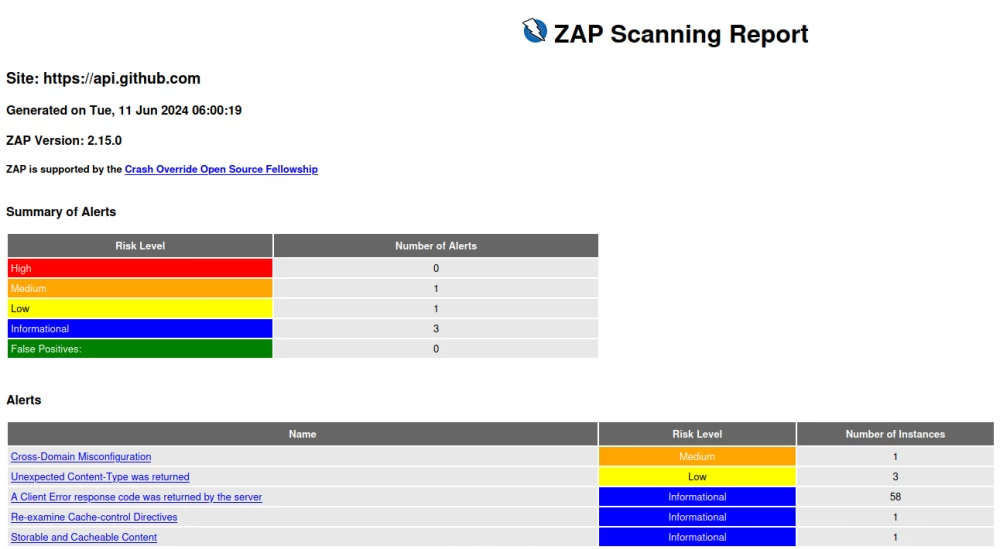
ZAP can also test API endpoints. This can be an OpenAPI specification, REST API, GraphQL, and even SOAP.
Locally, you can run a check for REST API as follows:
docker run -v $(pwd):/zap/wrk/:rw -t ghcr.io/zaproxy/zaproxy:latest zap-baseline.py -t https://api.github.com/ -r report.htmlTo check the OpenAPI specification, you can run the following script:
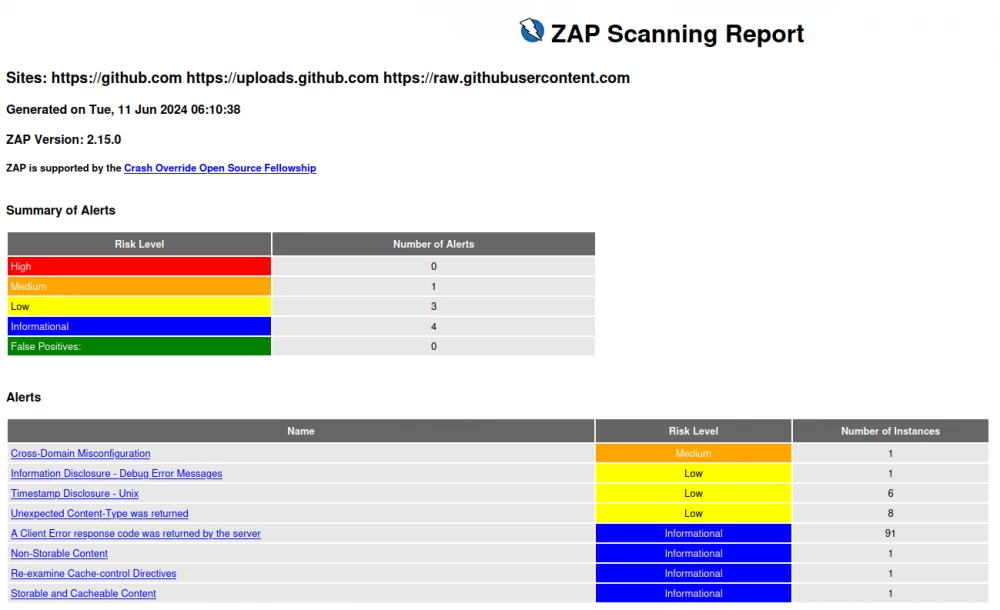
docker run -v $(pwd):/zap/wrk/:rw -t ghcr.io/zaproxy/zaproxy:latest zap-api-scan.py -t https://raw.githubusercontent.com/github/rest-api-description/main/descriptions/api.github.com/api.github.com.json -f openapi -r report.htmlIt should be noted that when checking the OpenAPI specification, OWASP ZAP will find and create all possible URLs for verification and will go through each of them. In addition, if a POST request with a form is specified, it will try to insert test data there, so if you are checking on the production version of the API, you need to keep this in mind.
More details about how OWASP ZAP checks the API can be found here.
OWASP ZAP in GitLab CI/CD
To implement OWASP ZAP in GitLab CI/CD, different approaches can be used. In this article, we will implement a simple addition of instructions to CI/CD as separate tasks. To do this, we will make a separate stage in CI/CD, called post-deploy.
Important: since OWASP ZAP requires a working application, you need to do the check after deployment — and preferably with a time delay (for example, five minutes).
zap:site:

  stage: post-deploy

  before_script: [ ]

  image:

    name: ghcr.io/zaproxy/zaproxy:latest

    entrypoint: [ "" ]

  variables:

    ZAP_REPORT_DIR: /zap/wrk/

    ZAP_REPORT: report_site.html

  script:

    - mkdir -p ${ZAP_REPORT_DIR}

    - zap-baseline.py -t https://idaproject.com -r ${ZAP_REPORT} || true

    - cp ${ZAP_REPORT_DIR}${ZAP_REPORT} ${ZAP_REPORT}

  artifacts:

    when: always

    expire_in: 1 week

    paths:

      - ${ZAP_REPORT}

zap:api:

  stage: post-deploy

  before_script: [ ]

  image:

    name: ghcr.io/zaproxy/zaproxy:latest

    entrypoint: [ "" ]

  variables:

    ZAP_REPORT_DIR: /zap/wrk/

    ZAP_REPORT: report_api.html

  script:

    - mkdir -p ${ZAP_REPORT_DIR}

    - zap-api-scan.py -t https://raw.githubusercontent.com/github/rest-api-description/main/descriptions/api.github.com/api.github.com.json -f openapi -r ${ZAP_REPORT} || true

    - cp ${ZAP_REPORT_DIR}${ZAP_REPORT} ${ZAP_REPORT}

  artifacts:

    when: always

    expire_in: 1 week

    paths:

      - ${ZAP_REPORT}
This approach can be improved by preparing contexts in which you can embed authorization and use additional modules. More details can be found in this article on tekkix.
Conclusion
Implementing security solutions using SAST and DAST is an important step towards protecting your application. In this article, we reviewed the basic principles of setting up and using Bandit, Gitleaks, Trivy, and OWASP ZAP tools both on a local machine and within CI/CD.
Your next step should be an in-depth study of each tool and its capabilities. Therefore, I recommend reading the documentation for each tool and comparing different approaches to implementing security solutions, for example:
Implementing DevSecOps in the development process. Part 1. Overview of tools, Pre-commit Checks
How to turn a DevOps pipeline into a DevSecOps pipeline. Overview of the Shift Left concept
And, of course, I will once again add a link to the repository with the code on GitHub.
That's all, thank you for your attention, and welcome to the comments!
- What is KNOX according to Galaxy AI, how to install the Ministry of Digital Development certificate and other impressions over the year
- Here’s the translation you requested:PETG like glass, hairdryer in action, and matches in the fasteners: 2.5 months with Reborn 3
- Android. Data theft via keyboard: myth or reality?


Write comment