- Network
- A
VPN through I2P: wireguard & i2pd
Guide on how to run VPN through I2P. Complete description of server and client configuration. Sleight of hand and flexibility of mind — please see under the cut!
Disclaimer. The author of the article does not in any way encourage anything that contradicts the legislation of the Russian Federation and other blessed states. The use case of this article was born in everyday life: I was on a business trip in one of the neighboring (friendly) countries, and there wireguard for some reason did not work well, and without it, the connection with the office in Moscow stopped - remote work does not work. So I had to invent...
What it's about
In this article, you will learn how to connect to a wireguard VPN server through I2P, wrapping all the necessary device traffic in a VPN, while the I2P (i2pd) application will work normally through the home Internet provider. The presented configuration is described for Linux systems, in particular for distributions based on Debian (there should be no fundamental problems with others either).
The described mechanism can be easily transferred to similar cases with other applications, including without using the I2P network. If you are well acquainted with the capabilities of Linux network configuration, you are unlikely to learn anything fundamentally new.
Server
Commands are given from root (without sudo).
Install wireguard:
apt install wireguardConfigure wireguard as a receiving server. To avoid console dancing, you can use the online config generator. Pay attention to the CIDR (network address) so that it does not conflict with your other networks. In the example, I use 10.20.25.0/24. Put the server part in /etc/wireguard/wg0.conf (discard the PostUp and PostDown lines, this is unnecessary). Also, don't forget to save the client config.
In my case, the server config is designed for one client and looks something like this (you can use it if the network does not conflict with your other networks, and don't forget to substitute the keys):
[Interface]
Address = 10.20.25.1/24
ListenPort = 51820
PrivateKey = ***

[Peer]
PublicKey = ***
AllowedIPs = 10.20.25.2/32
Wireguard does not have a setting to bind to a specific address, so it listens on all network interfaces. If this does not suit you, use a firewall.
Raise the wireguard interface and add it to startup:
systemctl start wg-quick@wg0
systemctl enable wg-quick@wg0
Enable traffic forwarding. In the file /etc/sysctl.conf, uncomment the line net.ipv4.ip_forward = 1 (if this line does not exist, just add it to the beginning of the file). Apply the changes with the command
sysctl -pIf you see an error that the command is not found, use whereis sysctl and call the utility by the full path /usr/sbin/sysctl.
To ensure that the system can not only forward packets but also do so correctly between different networks, enable masquerading (on Debian 12, nftables is used as the default firewall). Add the following to the end of the /etc/nftables.conf file:
table ip nat {
    chain postrouting {
        type nat hook postrouting priority 100; policy accept;
        iifname "wg0" masquerade
    }
}
Note that this configuration enables masquerading only for requests coming through the wireguard interface (wg0). To enable masquerading in all directions, leave only the word masquerade in the line.
On a fresh system, nftables.conf will look like this:
#!/usr/sbin/nft -f

flush ruleset

table inet filter {
        chain input {
                type filter hook input priority filter;
        }
        chain forward {
                type filter hook forward priority filter;
        }
        chain output {
                type filter hook output priority filter;
        }
}

table ip nat {
    chain postrouting {
        type nat hook postrouting priority 100; policy accept;
        iifname "wg0" masquerade
    }
}
After changing the config, restart nftables:
systemtl restart nftablesThe basic system setup as a VPN server is complete. Now let's move on to the exotic part.
Install i2pd according to the guide from the docs:
apt-get install apt-transport-https gpg
wget -q -O - https://repo.i2pd.xyz/.help/add_repo | bash -s -
apt-get update
apt-get install i2pd
Create a server tunnel to accept connections through the I2P network. Clean up the /etc/i2pd/tunnels.conf file and bring it to the following form:
[WG-TUNNEL]
type = udpserver
address = 127.0.0.1
host = 127.0.0.1
port = 51820
inport = 51820
inbound.length = 0
inbound.quantity = 1
outbound.length = 0
outbound.quantity = 1
keys = wg-tun.dat
Note: The configuration with zero-length tunnels is provided. This means that any person or bot who knows the I2P address of the VPN tunnel can easily determine the server on which it is hosted, as the ends of the incoming and outgoing tunnels will have a single constant IP address.
If for some reason you need to hide the server from an imaginary observer, set the tunnel length to one transit node and increase their "width" using these values:
inbound.length = 1
inbound.quantity = 16
outbound.length = 1
outbound.quantity = 16
You can read more about I2P tunnels here.
Restart i2pd and just in case duplicate the service autostart, which was already added there automatically during installation:
systemctl restart i2pd
systemctl enable i2pd
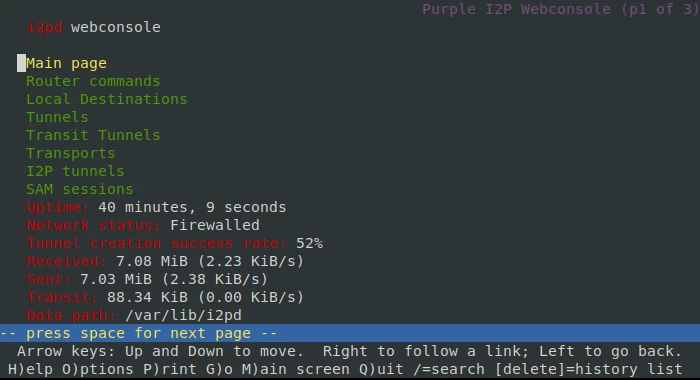
The last thing we need on the server is to find out the I2P address of our tunnel. The easiest way is to go to the i2pd web interface. I will show you how to do this through the console web browser:
apt install lynx
lynx 127.0.0.1:7070
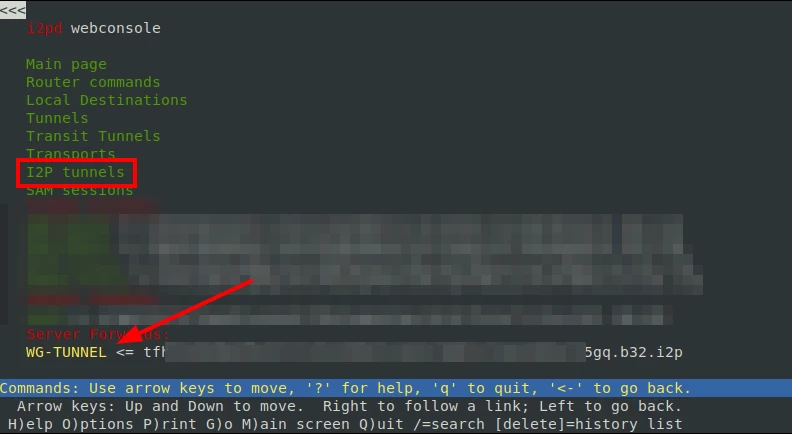
Navigate using the arrow keys on the keyboard. Select the "I2P tunnels" item and copy the *.b32.i2p address from the configuration header (WG-TUNNEL in the example above).
Client
First, install i2pd and wireguard in the same way as it was done on the server. Do not touch the configs yet.
If you now start the VPN with the 0.0.0.0/0 route, that is, as the system's network gateway, i2pd along with other applications will go through the wireguard tunnel. The nuance is that we need to wrap the wireguard traffic in i2pd, and let other applications go through WG. Question!
If the VPN routes some private network, there will be no problems. But let's consider the case with VPN as the main gateway. After reading, you will understand how to simplify this instruction, omitting all the dances around the fire, if your case is specifically about routing one private subnet.
Attempts to allow some specific ports or addresses through the firewall for direct i2pd access through the home provider will hit a dead end: the I2P router communicates with a huge number of random addresses and on different ports. Even the protocols are different: TCP and UDP are fully used.
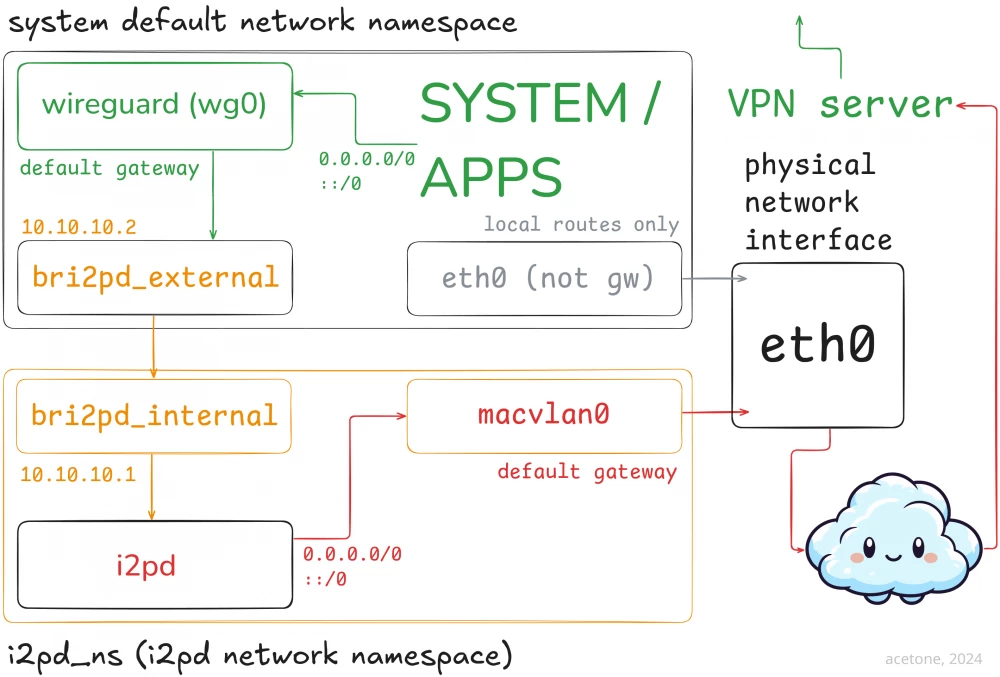
The solution is to organize an isolated network namespace, create a virtual network interface there, which will go through the physical network adapter to the Internet through the home provider without any VPN. Through a special virtual network, we will pull the i2pd tunnel into the main network space of the OS and connect the wireguard client to it. To make the whole system as secure as possible, we will pin a static local address on the network interface in the main network namespace and deliberately not set the gateway settings. A tough killswitch will turn out!
I tried to depict the essence in the diagram so that, in addition to the configuration lines, there would be ground for simple understanding. Below are the very lines that need to be copied and put into the setup_network.sh file in any convenient place.
Note that in the IP_ADDRESS variable, you need to specify a free address of your local network - an isolated network interface will be created with it in the i2pd namespace, which will become an equal participant in your local network in addition to the main interface.
#!/bin/bash
# acetone, 2024

# Set your default gateway settings
INTERFACE="eth0"
IP_ADDRESS="192.168.0.99/24"
GATEWAY="192.168.0.1"

# Nothing below this line should be changed unless you know what you are doing!

# Create i2pd network namespace
ip netns add i2pd_ns
ip netns exec i2pd_ns ip link set lo up

# Create macvlan interface (gateway for i2pd_ns)
ip link add macvlan0 link $INTERFACE type macvlan mode bridge
ip link set macvlan0 netns i2pd_ns

# Activate the macvlan interface in the i2pd namespace
ip netns exec i2pd_ns ip link set macvlan0 up

# Configuring the IP address and route for i2pd_ns
ip netns exec i2pd_ns ip addr add $IP_ADDRESS dev macvlan0
ip netns exec i2pd_ns ip route add default via $GATEWAY dev macvlan0

# Create virtual interfaces for i2pd to communicate with the main system
ip link add bri2pd_external type veth peer name bri2pd_internal
ip link set bri2pd_external up
ip link set bri2pd_internal netns i2pd_ns up
ip addr add 10.10.10.1/30 dev bri2pd_external
ip netns exec i2pd_ns ip addr add 10.10.10.2/30 dev bri2pd_internal
Run the script to create an isolated network and other goodies in the system (as root).
chmod +x ./setup_network.sh
./setup_network.sh
I use a systemd service to ensure the script runs at system startup without my intervention. If you want to do the same, create the file /etc/systemd/system/setup-network-ns.service with the following content (adjust the ExecStart line):
[Unit]
Description=Setup Network Namespace
After=network.target
Wants=network.target

[Service]
Type=oneshot
User=root
ExecStart=/path/to/your/setup_network.sh
RemainAfterExit=yes

[Install]
WantedBy=multi-user.target
Once the service file is created, add it to the startup:
systemctl enable setup-network-nsThe network namespace is created. To run applications in it without superuser rights and without entering a password, install the netns-exec utility:
apt install git build-essential
git clone --recursive https://github.com/freeacetone/netns-exec
cd netns-exec
make
make install
Final stretch! Configure i2pd and wireguard.
In /etc/i2pd/tunnels.conf, remove the unnecessary parts and create a tunnel to the server (replace the value in the destination line):
[WG-CLIENT]
type = udpclient
address = 10.10.10.2
host = 10.10.10.2
port = 51820
destination = ***.b32.i2p
destinationport = 51820
inbound.length = 1
inbound.quantity = 16
outbound.length = 1
outbound.quantity = 16
keys = transient-vpn
The config is set with a tunnel length of 1 transit node. This means your device will not directly contact the server's IP address. There will always be random transit nodes. If you want to connect directly, change the values to
inbound.length = 0
inbound.quantity = 1
outbound.length = 0
outbound.quantity = 1
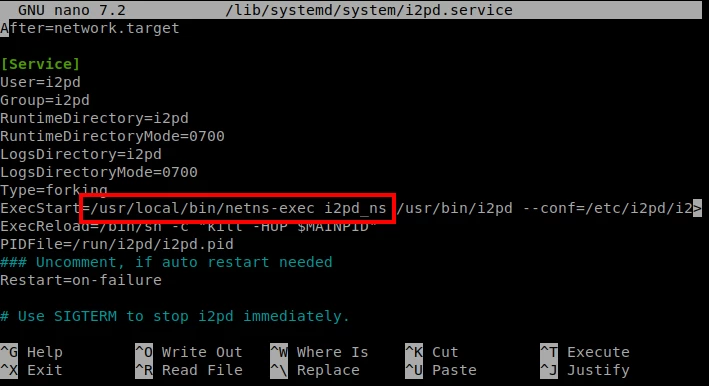
Now you need to make a small change to the i2pd service file so that i2pd runs in an isolated network namespace. In the file /lib/systemd/system/i2pd.service, adjust the ExecStart line by adding /usr/local/bin/netns-exec i2pd_ns to the beginning
systemctl daemon-reload
systemctl restart i2pd
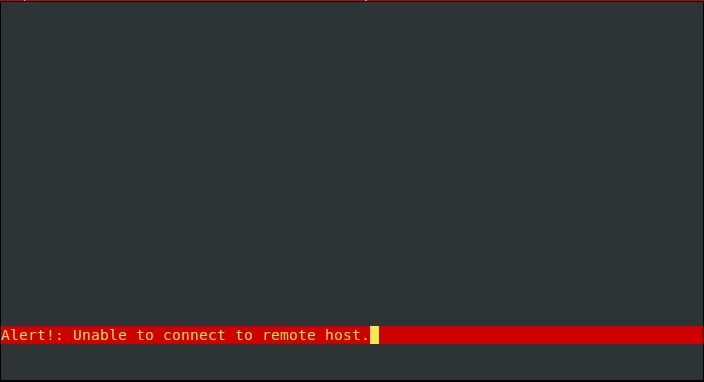
If everything was done correctly, i2pd is running in a separate network and already provides a tunnel to the VPN server. You can easily check its operation in a separate network through a console browser:
apt install lynx
lynx 127.0.0.1:7070
Error — that's correct! i2pd is running in an isolated namespace. If you run the browser in the same namespace (i2pd_ns), everything will be fine:
Finally, we configure the wireguard tunnel. Create the file /etc/wireguard/wg0.conf, insert the client config into it (substitute the keys and replace the Address value depending on the server config):
[Interface]
PrivateKey = ***
Address = 10.20.25.2/24
DNS = 94.140.14.14

[Peer]
PublicKey = ***
Endpoint = 10.10.10.2:51820
AllowedIPs = 0.0.0.0/0, ::/0
In AllowedIPs it is important to insert the default IPv6 route (::/0) even if the VPN server does not support it — insurance against IPv6 leaking past the VPN.
The "DNS" directive will not work if resolvconf is not installed on the system. It's easy to install:
apt install resolvconf Done! We raise the wireguard tunnel and add it to startup:
systemctl start wg-quick@wg0
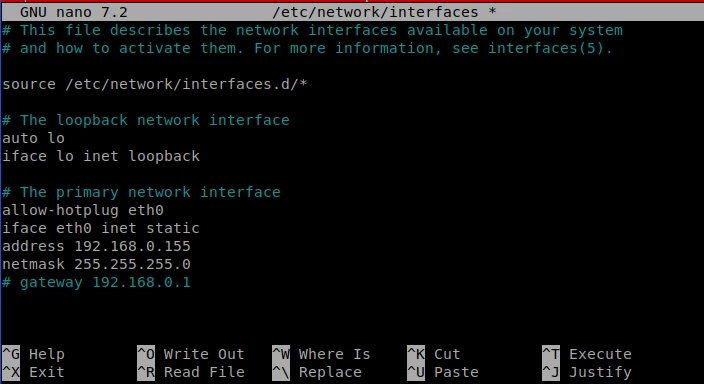
systemctl enable wg-quick@wg0Important: to set up a killswitch (prevent packet leakage when the VPN is off), after completing all actions, when you make sure that the VPN is working, set the static settings of your main network interface, removing the gateway.
Experience
Several measurements on downloading a large file via wget on a 100Mbps cable showed that with zero-length tunnels, the speed drops by about two to four times with rare possible jumps up to 80% of the real channel bandwidth (I believe in a bright future where new i2pd releases will improve the figure). With non-zero length tunnels, a stable measurement is almost impossible: intermediate nodes are a pig in a poke. Videos load and that's fine. Such a connection cannot be called stable, but it cannot be called non-working either, and this is the main thing. VPN over I2P, Carl!
Are random traffic leaks possible? With the given configuration - no. The network namespace for i2pd is isolated from the main system at the OS kernel level, and there are no default routes in the user-accessible space except for the VPN tunnel. If wireguard crashes for some reason, the PC will remain offline even though i2pd will continue to operate normally.
High-tech crutch is more beautiful than the native leg.





Write comment