- AI
- A
Installation and Configuration of Flowise AI for Creating RAG Agents
Hello everyone!
This is another article in the series where we look at different ways of using AI agents with RAG—a method for optimizing the work and output of an LLM agent by adding a knowledge base to the context. Simply put, we give the model a certain amount of knowledge that it can work with. This can be a document for searching relevant data, or a database.
This approach can be useful for various tasks. Such a model will be able to work with up-to-date data relevant to you, even if the memory of the LLM itself is limited to outdated data from, say, 2022.
Today we will look at another web interface for interacting with AI. This time it's FlowiseAI. I’ll show the installation and how to work with it in a way even a beginner will understand.
FlowiseAI
Flowise is one of the most convenient interfaces for easily building applications using LLMs without writing a single line of code. It supports various LLM runners such as Ollama and APIs compatible with OpenAI, with a built-in RAG output engine.
Besides integrations with OpenAI and Ollama, Flowise offers built-in tools for searching the web using SearXNG, Google PSE, Brave Search, Serpstack, Serper, Serply, DuckDuckGo, SearchAPI, Bing, and TavilySearch.
And once again—it's an intuitive interface that any beginner can use right after reading this article.
Let’s start by deploying the interface!
Installing Flowise AI in the Cloud
We’ll launch FlowiseAI in our Amvera cloud—a service for easy IT application deployment. The platform is not only notable for the simplicity of configuring applications: to run Flowise, we’ll need just one file, which will be available below. Plus, we provide a free external domain name with a free SSL certificate from Let's Encrypt. So you won’t need any knowledge of working with the terminal or virtual machines in general, nor will you need to buy a domain from outside registrars.
Other features of Amvera include:
Free and full proxying to OpenAI, Gemini, Grok, Claude, and other providers, which will make our work much easier!
Per-minute billing with charges made every hour. If you decide to pause your project for a while, the money won’t be deducted.
And on top of all this, you also get a free introductory balance of $1.32 to start upon registration.
Update your projects using the git push amvera master command.
It will take about 10 minutes for the first registration and project creation, and about 10–15 minutes to build the project (you can just step away during this stage).
Registering with Amvera
Registering with Amvera is simple and only requires email verification. You can register via the link.
After successful registration, you’ll get access to your Amvera personal account, where you can start creating your project using the button of the same name.
In the first window that opens, select the service type "Application".
Click next and choose a name and a plan for the project. The name can be anything, and for the plan (at least for the initial launch), it is recommended to choose one of the higher tiers—you can lower it later.
You can skip the data upload step; the required build file is the Dockerfile. We can upload the file later.
Next, you need to create 6 environment variables. It's very important for both the names and the values to copy everything as shown below precisely:
BLOB_STORAGE_PATH = /data/.flowise/storage
DATABASE_PATH = /data/.flowise
PORT = 3000
HOST = 0.0.0.0
FLOWISE_USERNAME = come up with a username for your Flowise account
FLOWISE_PASSWORD = come up with a password for the Flowise account created above
5. The fifth and final step is configuration. Here you simply specify docker and two ports (80,3000), separated by a comma without spaces, as shown in the screenshot below:
6. Complete the project creation. Go to its page and in the "Repository" tab click the "Upload Data" button. Here you need to drag one file named Dockerfile (make sure there are no extensions like .txt).
The file itself looks like this:
FROM node:18.15.0

WORKDIR /app

RUN npm install -g flowise

EXPOSE 3000

CMD ["npx", "flowise", "start"]
Once the file is uploaded, you can build the project! To do this, go to the project page and the "Configuration" tab—there you'll find the "Build" button.
If you're having trouble, contact support at [email protected] or in the chat https://t.me/amverachat. Please include your username and project name right away. We'll do our best to help.
The first build of the application takes about 15–20 minutes.
While the project is building (you can do this at any stage), let's create a free external domain name in the "Domains" tab. Go there and click "Create Domain Name". In the window that opens, select the connection type "HTTPS" and the domain type "Free Amvera Domain". Next, in the additional domain settings, write "/" (without quotes) in the URL path and "3000" in the port.
Apply the settings.
Getting Started and Examples of Using Flowise AI
Wait for the "Application launched" status and open the link you created earlier.
The Flowise interface will appear, where you'll need to enter the credentials created earlier for access. If instead you see a 502/503 or 404 error—double-check all the settings in the article, especially the configuration and domain settings.
Creating the First Chatflow
In the "Chatflows" tab, click the "Add new" button and the workspace—Chatflow—will open. This is where we'll build the body of our application.
A Little Theory
In FlowiseAI each part of the application body is called a Node. Each node is a configurable block responsible for its own method. For example, it can be an Agent—an AI agent; Chain; Chat Model; and Tools—auxiliary tools. Properly connecting them is how we get a working application.
Examples of a Working Application
Chatbot in the Flowise interface with ChatGPT and SerpAPI Search
Let's start with the simplest chatbot inside the FlowiseAI interface, which will work with the help of:
ChatModel - ChatOpenAI.
Serp API tool for accessing Google search.
The chatflow will look like this:
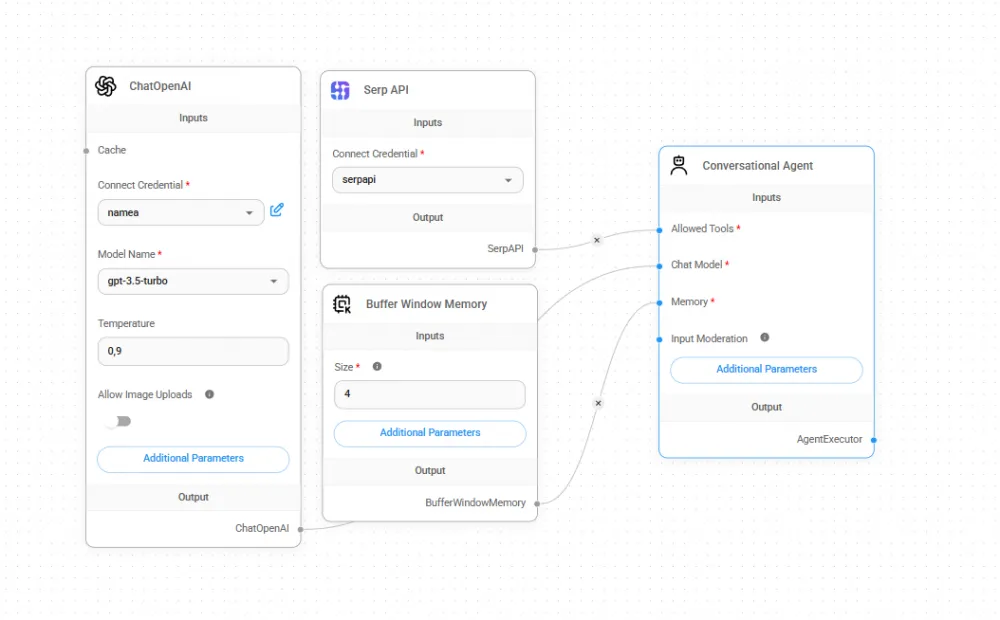
For each node that requires credentials, we create and select them. It is important to connect each node correctly, otherwise, the application will not work.
The application created above is a chatbot in the Flowise interface, so let's open the chat in the top right corner and ask a question that will demonstrate the SerpAPI's functionality.
Chatbot in the Flowise interface for working with data from CSV
This example is needed for quick processing of information in a CSV file.
To do this, we will use only 2 nodes: the CSV agent and ChatOpenAI, connected together.
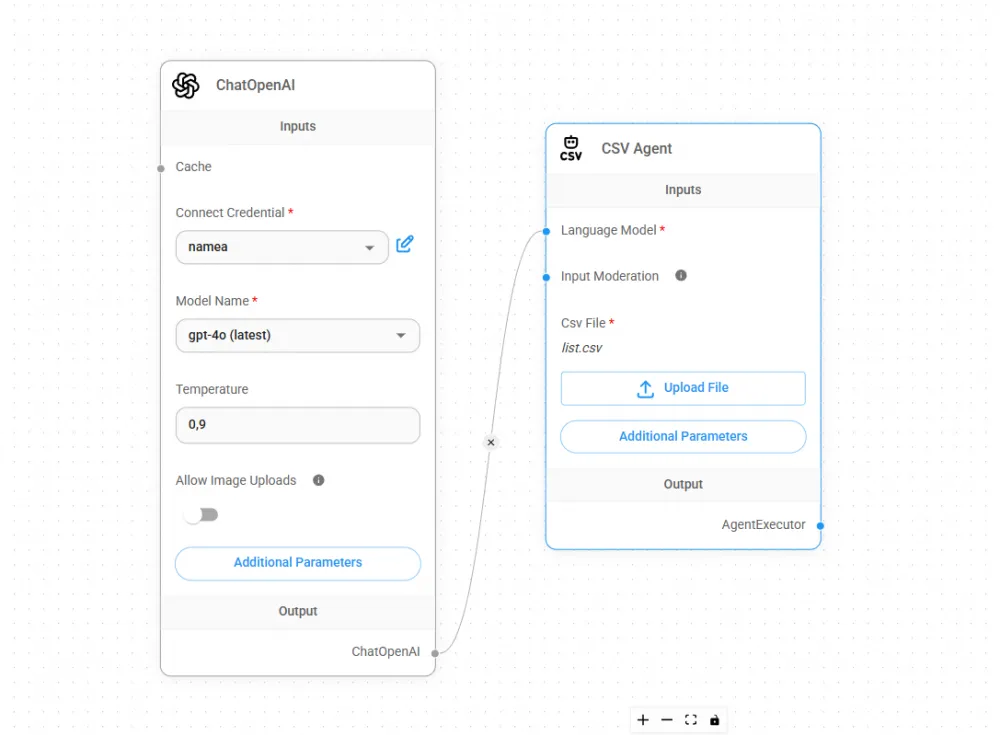
Here, we see that the CSV agent node has a button for uploading the CSV file. Using it, we upload the file of interest and work with it in the same chat.
Connecting Telegram bot using Flowise API
Flowise also provides the opportunity to open our application via API. This means we can create a simple Telegram bot and access the created Chatflow API to get a response from the agent. Let's connect it to the Chatflow with the connected SerpAPI.
So, in the top right corner, there is a button with, clicking on it opens a window with API connection examples. There you can also configure authorization if you don't want to make the API public.
Let's write the code for our bot using the aiogram 3.x library and API DefaultKey (bearer) authorization.
import asyncio
import logging
import aiohttp
from aiogram import Bot, Dispatcher
from aiogram.types import Message
from aiogram.filters import CommandStart

TOKEN = "YOUR_BOT_TOKEN"
API_URL = "YOUR_API_URL"
HEADERS = {"AUTH_TOKEN"} #If used

bot = Bot(token=TOKEN)
dp = Dispatcher()

async def get_api_response(text: str):
    async with aiohttp.ClientSession() as session:
        async with session.post(API_URL, headers=HEADERS, json={"input": text}) as response:
            if response.status == 200:
                data = await response.json()
                return data.get("output", "Response not found.")
            else:
                return f"Error {response.status}: {await response.text()}"

@dp.message(CommandStart())
async def start_handler(message: Message):
    await message.answer("I am the chatbot for working with the Flowise API of my application!")

@dp.message()
async def message_handler(message: Message):
    response = await get_api_response(message.text)
    await message.answer(response)

async def main():
    logging.basicConfig(level=logging.INFO)
    await dp.start_polling(bot)

if __name__ == "__main__":
    asyncio.run(main())
Here, as the value of the TOKEN variable, the bot token is passed, and API_URL is the API itself and the header with authorization if you use it.
You can also deploy this bot using the following instructions or any of the Telegram bot cycles on tekkix. We will skip this step for now.
If we did everything correctly, the Telegram bot will respond just like the chat in our Chatflow.
Conclusion
Everything we covered above are very simple examples of working with FlowiseAI. In practice, with it, you can develop the most practical applications without writing code.
Later, we will explore examples that are slightly more complex than those mentioned above and move on to methods for automating full-fledged tasks. Thank you all!


Write comment