- DIY
- A
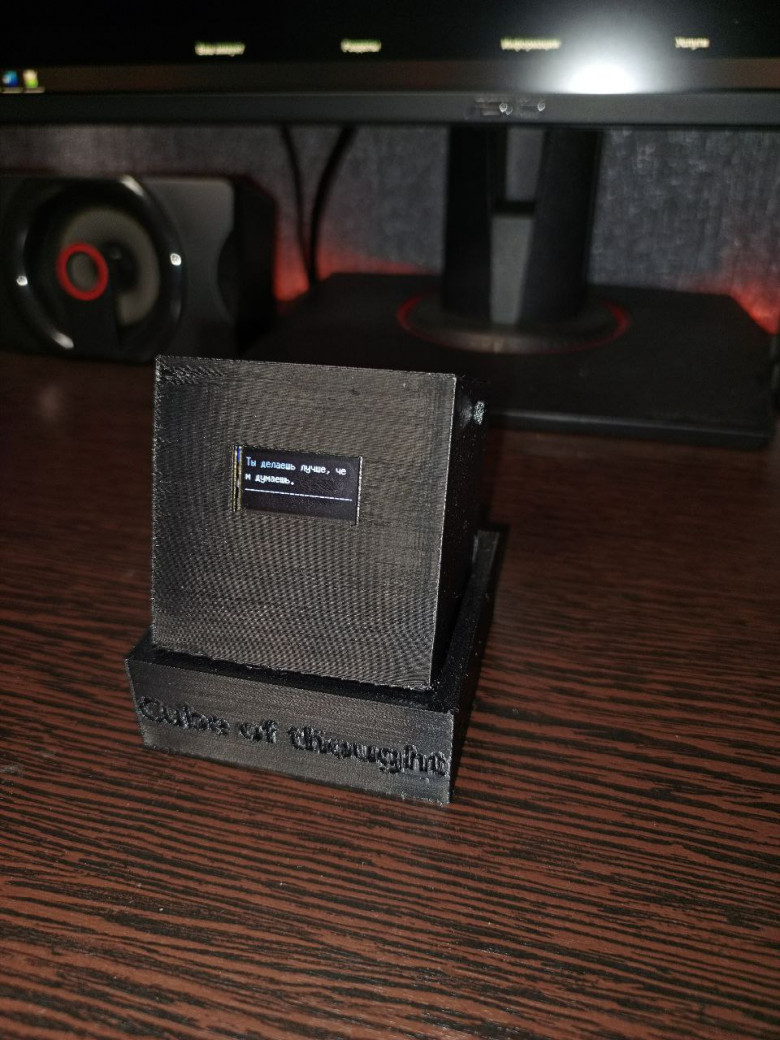
Thought Cube: A Simple Project That Speaks for You
Warning for the reader: This article is not a guide, tutorial, or tech blog. I am not an engineer, blogger, or microcontroller expert. Just a person who decided to figure out the ESP32 one evening and unexpectedly built the "Thought Cube".
This was an entirely spontaneous project. No blueprints, no goals, no confidence in success. But at some point, it became clear: I wasn’t just making a piece of plastic with a screen. I was making something... warm, cozy, and simple.
In this article, I will tell you how my Cube came to be. What it does, what it's made of, how it works, and why it even exists. If you're looking for complex electronics or guides like "from scratch to production" — this is not it.
However, maybe you'll be inspired to make something of your own. And that would mean the article was worth it.
How it all started and how I came to this project.
Honestly, I didn’t have any plan to "make something motivational." I was just waiting for parts for a weather station — everything was supposed to be serious, useful, with pressure charts and a BME280 sensor. But, as often happens, my hands got bored before the package arrived.
In the drawers, there was an extra ESP32, a small display, a couple of touch buttons, and a TP4056 with a battery. Seemed like a kit for anything, but not for the meaning of life. But I took a closer look... and the gears in my head began to turn. That’s how the idea to build a small cozy project in an evening came about — just to pass the time.
I'm not a fan of motivational phrases or all that "psychological fluff." But one of my friends loves those "phrase of the day" things. And it seems I caught that trait.
Thus, the idea for the cube was born, a cube that tells you what you forget to tell yourself.
Simple. A bit silly. But in its own way, warm.
Sometimes, all you need to hear is "You can do it" — even if it's the cube saying it.
The meaning of the cube and what it does.
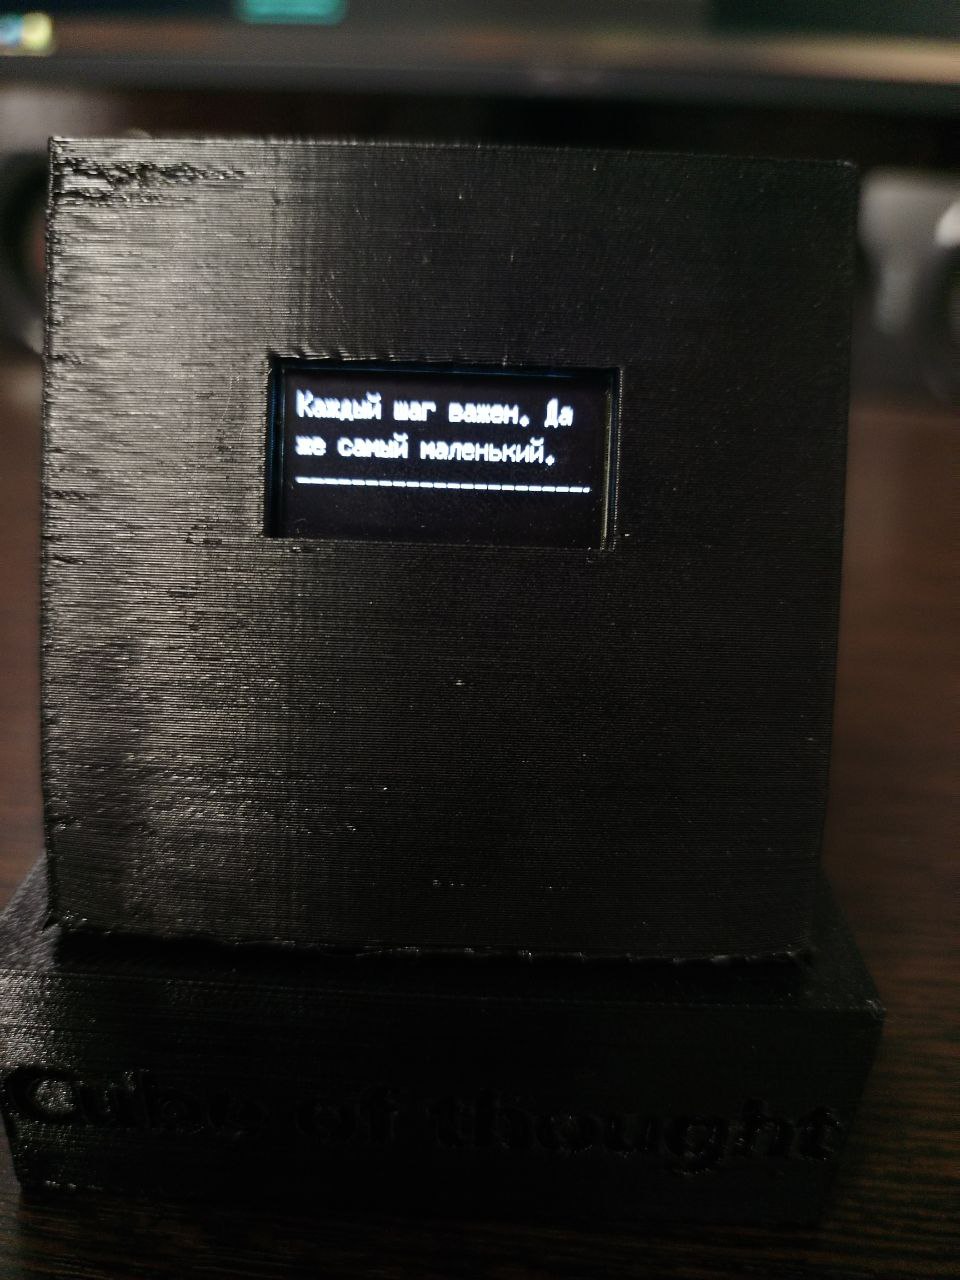
Essentially, the Cube of Thoughts is just a screen with phrases. It doesn't talk, doesn’t show the weather, and doesn’t even count steps. It simply... appears when the silence gets too loud.
On its screen — short phrases, from warm to philosophical. Something like a digital companion without unnecessary words. Sometimes kind, sometimes tough. Sometimes the ones you'd like to hear from someone close — but you say them to yourself. Or the cube says them for you.
The phrases appear automatically after a certain time or by pressing the touch button — forward or backward. The text scrolls smoothly if it doesn't fit entirely. Simple, but for some reason, it works.
It’s not needed.
But when it’s on — it becomes something personal.
And it feels like it really knows when you need exactly that phrase.
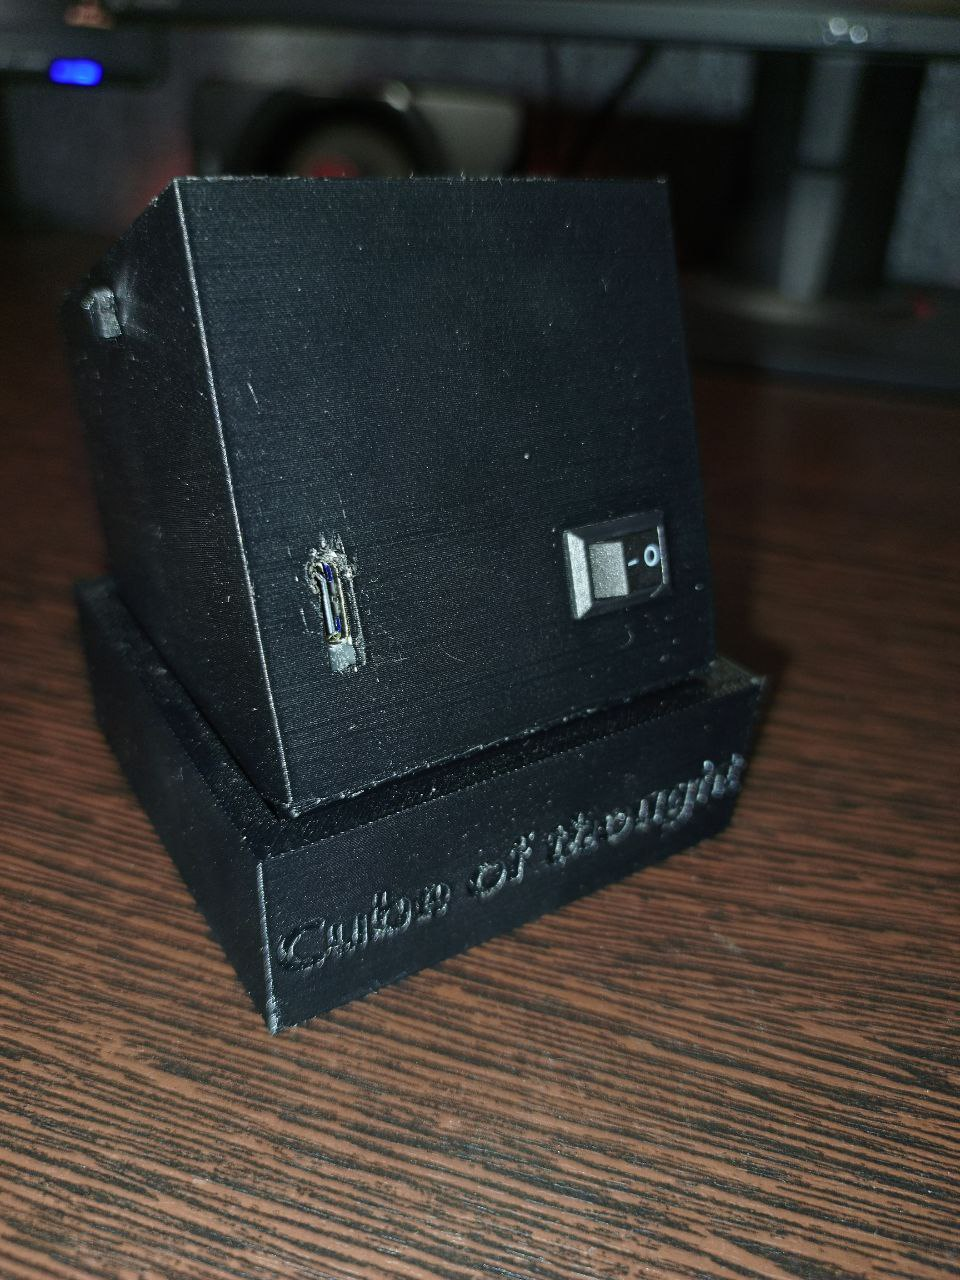
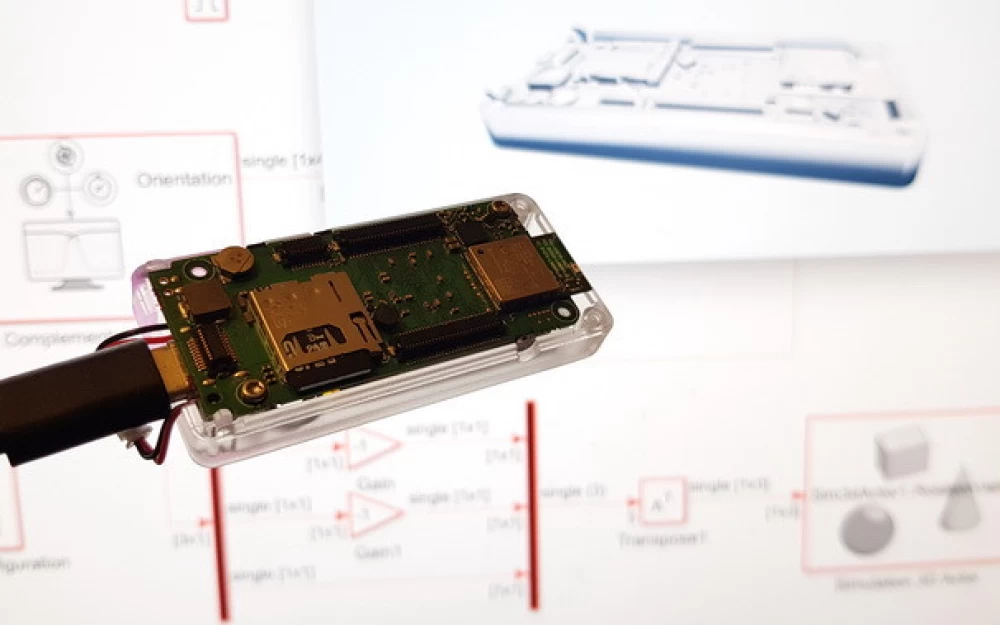
Components and wiring diagram.
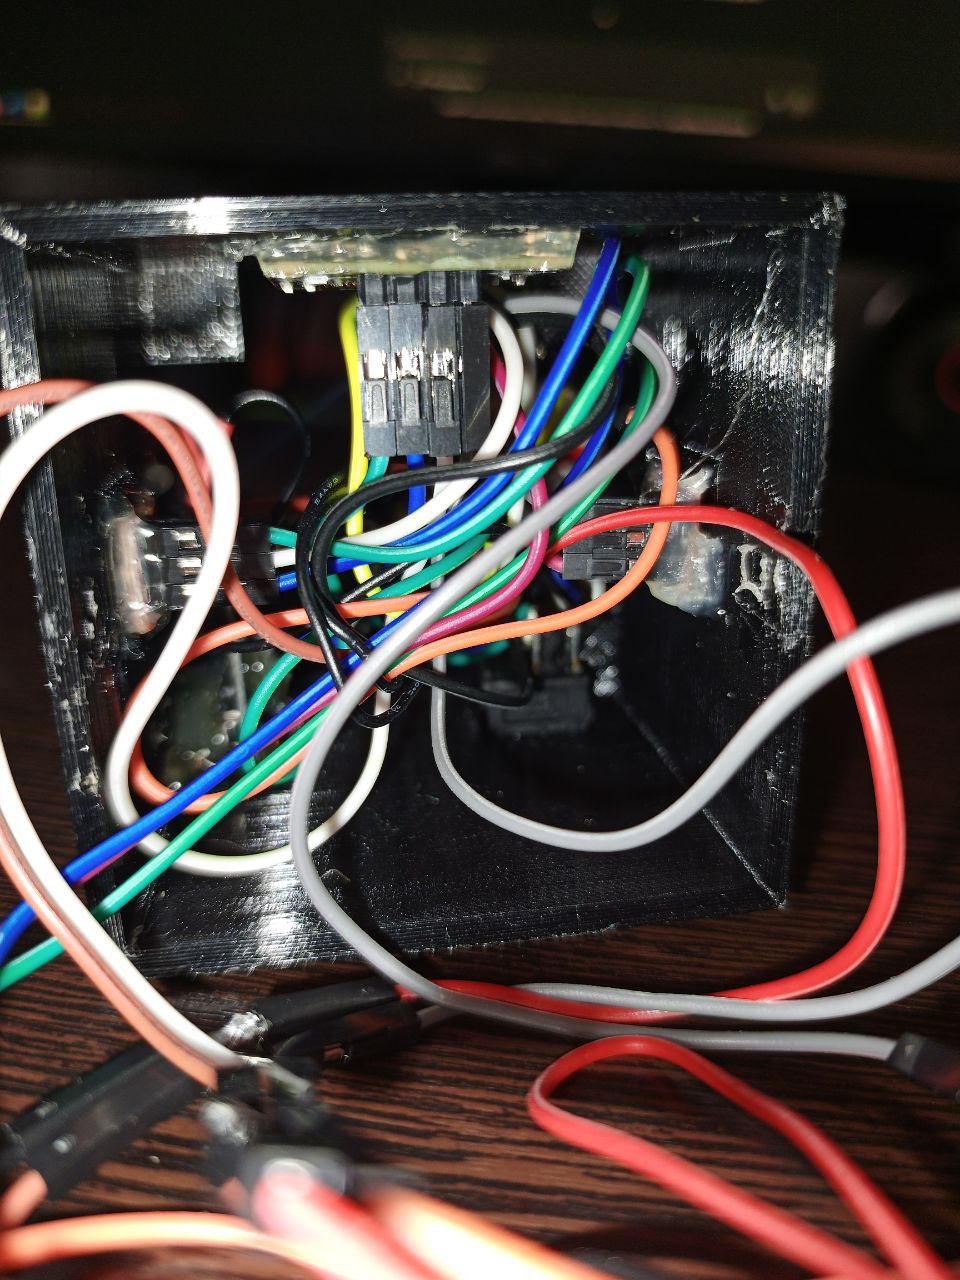
Inside the cube — nothing special. Just a kit that anyone who has ever ordered something from AliExpress might have.
Here are the main components:
ESP32
The brain of the device. Connected:
D22, D21 — display (I²C);
D19, D18 — TTP223 buttons;
GND and power, naturally.
OLED 0.96" 128×64, I²C
The classic monochrome screen. Clear, contrasty, perfect for small text.
Two TTP223 touch buttons
React to touch. One — "forward," the other — "backward."
TP4056 + 650mAh battery
Manages charging. A switch for turning off power is between them.
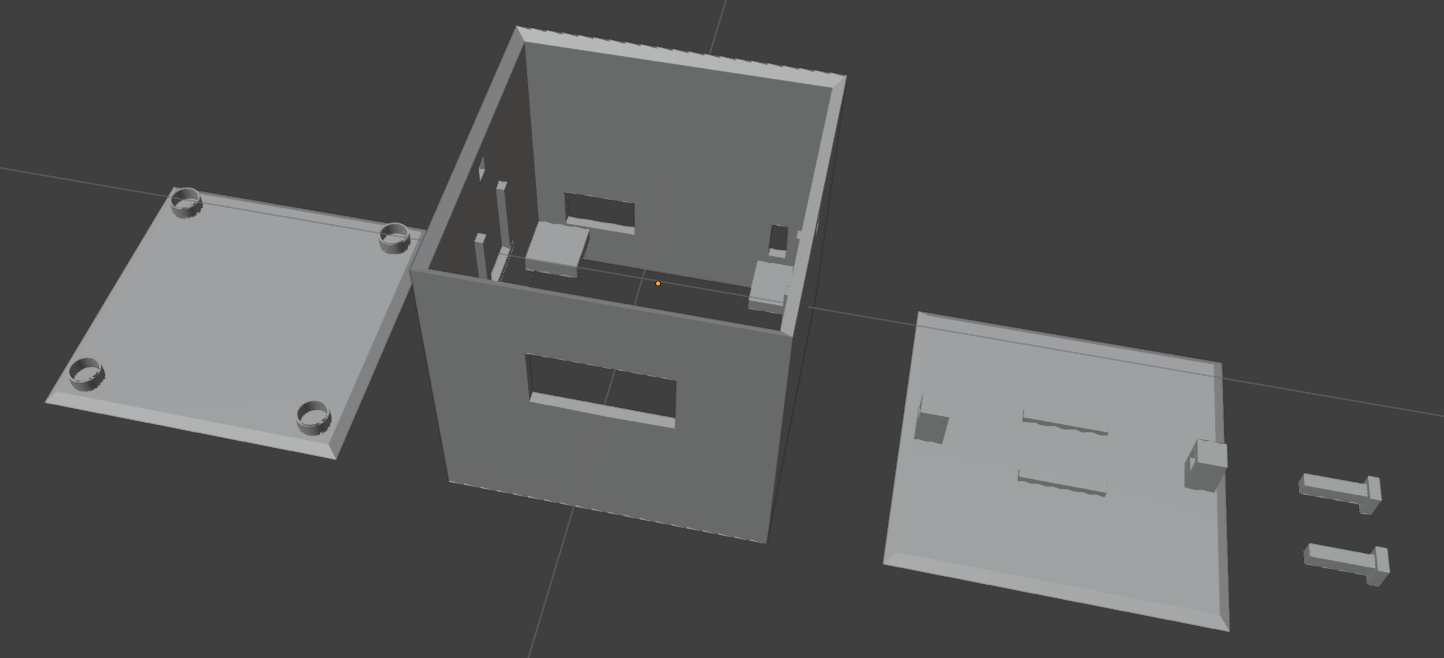
8 magnets 6x3 For attaching the lower part of the case.
Small case, designed from scratch in Blender
Exactly from scratch. No guides. No experience. In 4 hours. (don’t judge too harshly)
6 removable components, including space for the display, board, and buttons. Visually — strict, cubic, neat. In the spirit of the idea.
Everything is connected fairly straightforwardly. The ESP32 provides power to the display and buttons, while the TP4056 monitors the charge.
The most difficult part is figuring out where to plug everything into GND when you have only one ESP32, and ground is as precious as gold.

Logic and Code.
The logic of the cube is simple and understandable, like a cup of tea in the evening.
It all relies on Arduino code using U8g2lib for working with the display. No monster libraries.
The memory stores an array of phrases — you can store a hundred or two.
Each phrase is automatically broken into lines and scrolls if it doesn't fit the screen.
Every 30 seconds, the cube randomly selects a new phrase.
Or you can switch manually — by touching one of the two touch buttons (also randomly).
When starting, the cube selects a random phrase and immediately displays it on the screen. Everything is as simple as possible:
 void setup() {
 pinMode(btnNext, INPUT);
 pinMode(btnPrev, INPUT);
u8g2.begin();
 u8g2.enableUTF8Print();
 u8g2.setFont(u8g2_font_6x13_t_cyrillic);
 randomSeed(analogRead(0));
 int rnd = random(phraseCount);
 history[0] = rnd;
 historyCount = 1;
 drawPhrase(rnd);
 startTime = millis();
 }
If you press “back” — the phrase is taken from history.
Yes, the cube has memory. Small, but proud).
The main logic in loop(): auto-scrolling of text, changing phrases over time, and response to button presses:
void loop() {
 unsigned long now = millis();

// Auto-scrolling
 if (now - lastScrollTime > scrollDelay) {
 currentLine++;
 if (currentLine > totalLines - linesPerPage) currentLine = 0;
 drawText();
 lastScrollTime = now;
 }

// Automatic phrase change
 if (now - startTime > phraseDuration) {
 nextPhrase();
 }

// Forward button
 if (digitalRead(btnNext) && !prevBtnNext) {
 nextPhrase();
 }

// Back button
 if (digitalRead(btnPrev) && !prevBtnPrev) {
 if (historyPos > 0) {
 historyPos--;
 drawPhrase(history[historyPos]);
 }
 }

delay(50); // anti-bounce
 }
The text is broken into lines and displayed line by line. If there are more lines than the screen can fit — auto-scrolling is triggered:
void drawText() {
 u8g2.clearBuffer();
 for (int i = 0; i < linesPerPage; i++) {
 int lineIndex = currentLine + i;
 if (lineIndex >= totalLines) break;
 u8g2.setCursor(0, 15 + i * 16);
 u8g2.print(lines[lineIndex]);
 }
 u8g2.sendBuffer();
 }
Everything works steadily, without glitches.
The code is not complicated — you can read it like a story.
Check it out on GitHub (you’ll also find STL models for printing and .blend files there) — so anyone can adapt it to themselves.
Or just play around. Who knows, maybe something of your own will come up?
I would like to note separately: ChatGPT helped me with the code writing and structuring.
I'm not a microcontroller programming specialist, but I did study, adapt, and adjust everything manually for my project.
So if something works, thanks to it.
If it doesn't work, that's my fault.
Assembly.
It was surprisingly simple to assemble. Not like typical DIY, where you usually have to solder six adapters, drill three holes, and then spend an hour Googling why it's not working. Here, everything just fit into place.
The wires were minimal, and there was almost no soldering: everything was done with pins and Dupont connectors.
The only nuance was grounding (GND). ESP32 is great, but when a display, two touch buttons, and a charger with a battery are connected to it — the GND pins run out quickly. The solution is simple: twist it together, drop a bit of solder, and go ahead.
I intentionally made everything modular and disassemblable, including using hot glue — just in case I want to modify it later.
You can, of course, assemble it "for eternity" with soldering, varnish, and the blessing of the soldering iron.
After turning it on, everything worked on the first try. No flashing hell, no smoking regulators. The screen just lit up, and within a few seconds, the cube said its first phrase.
A rare case when you assemble something and it works immediately. It's even a bit unusual.
Case and Blender: Jumping into 3D.
I made the case for the cube in Blender.
Yes, yes, the very same Blender where most people make 3D animations, not DIY cases. I hadn't even opened it before.
No guides. No experience. Zero knowledge. I just sat down and within 4 hours, I sculpted it.
In the end, it turned out to be six removable components, a neat appearance, and precisely fitted grooves for the screen, ESP32, buttons, switch, and charging module.
Nothing rattles, everything fits snugly. And even though it's not industrial design, it works, looks decent, and most importantly, it's mine.
Blender turned out to be unexpectedly convenient: if you're not afraid, you can quickly put together anything you need.
Now this is my first completed 3D project — and I'm truly proud of it.
Even if it's not perfect. But it's real.
Project Development Opportunities.
Right now, it's just a cube with phrases. But its potential is much greater than it might seem.
You could add a microphone and simple AI — it would become a "dumb conversationalist" that reacts to voice.
Or turn it into a reminder that tracks how long you're sitting and asks you to straighten up (let's be honest, we could all use that).
You could upgrade the screen: make it color, larger — and display pictures, gifs, or memes.
And if you also integrate it with a server, you'd have a mini-terminal sending daily portions of memes, phrases, or reminders.
Another idea: connect a gyroscope — and make the cube a mentor that reacts to shaking or flipping. And from there, it's not far from a simple toy robot).
Or you could go further — add Wi-Fi, log sound, and maybe even bring in a webcam.
A mini-room guard. Almost like a smart home, but warmer.
Although, maybe it's not worth turning it into a smart thing.
Sometimes it's enough to have someone next to you who says a warm word.
Even if it's just a cube.
Conclusion.
This project is not about technology. Not about optimization, performance, or some wow effect. It's just a cube that I put together one evening — casually, between tasks, between thoughts. It doesn't do anything. And perhaps that's its strength.
Sometimes you want to do something not because it's necessary, but because it feels warm just from the process. You put it together — and it turned out. Not for utility. For the feeling. For the "why not".
If this text gave you at least one idea or one smile — then it was all worth it. And if you put together your own cube — let it say to you what was missing.
(And yes, there are a few Easter eggs in the cube. I don't recommend reading the code too carefully — sometimes it's better to just trust the device and remember the old game codes from the 90s, for example...)
Thank you for reading.
The code and STL files will be on GitHub.
If you liked the project — I would appreciate feedback and a thumbs-up on the post.
P.S. you may have already seen this cube briefly in my previous article about my first experience with a 3D printer — you can take a look here.


Write comment