- Network
- A
Linux On A Stick
This article was born as a result of combining ideas from a laboratory work in preparation for the CCNA exam by Cisco, and the Network Protocols in Linux course, which was taught by Georgiy Vladimirovich Kuryachiy in the spring of 2024 at the Department of Automation of Computing Systems at Moscow State University named after M.V. Lomonosov.
This article was born as a result of combining ideas from a laboratory work in preparation for the Cisco CCNA exam, and the course "Network Protocols in Linux", which was taught by Georgy Vladimirovich Kuryachy in the spring of 2024 at the Department of Automation of Computing Systems of Moscow State University named after M.V. Lomonosov.
If we formulate the task in one phrase, then in the Router-On-A-Stick scheme, replace the router (Router) with a machine running GNU/Linux. This task essentially represents a modification of the laboratory work and is more of academic interest.
Task Statement
When preparing for the Cisco CCNA exam, after studying virtual local area networks (VLANs), the task of routing traffic between several virtual local area networks arises. And several approaches are proposed to solve it, one of which is called Router-On-A-Stick (ROAS).
Briefly, in the Router-On-A-Stick (ROAS) approach, a separate router is used for routing between virtual local area networks, which is connected to several virtual local area networks defined on the switch through a trunk channel, while only one physical interface of the router is used.
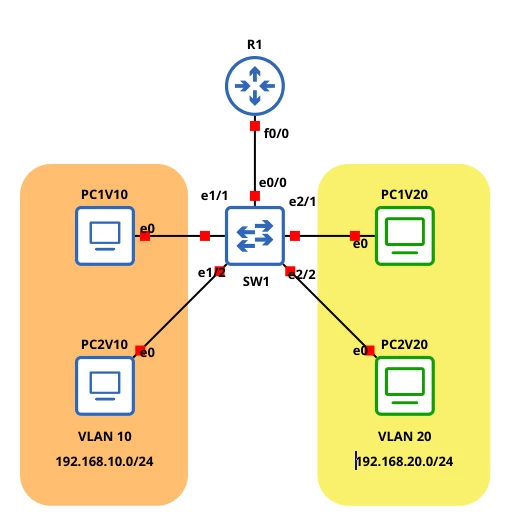
The classic version can be represented in the form of the following network topology.
The diagram shows two virtual local area networks VLAN 10 (192.168.10.0/24) and VLAN 20 (192.168.20.0/24), configured on the switch SW1, to each of which two workstations are connected, and the router R1 is used for routing traffic between them.
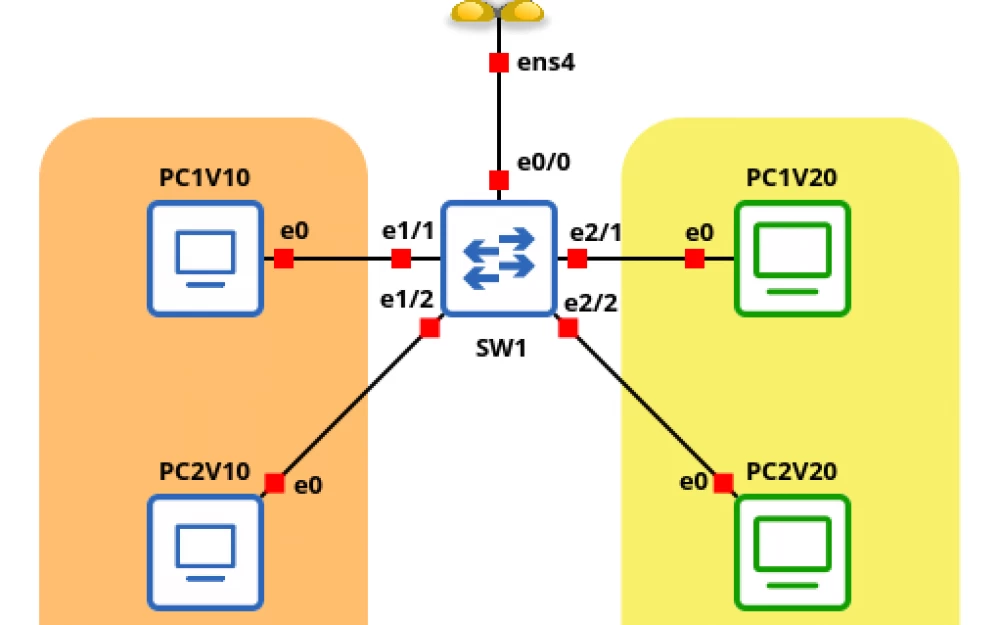
What if we replace the router with a machine running some GNU/Linux-based distribution? And we get the following topology.
Environment Configuration
Switch Configuration
Since the main interest is configuring a machine running GNU/Linux, there is no point in focusing on the switch configuration. For the purposes of this lab work, the Cisco switch image i86bi-linux-l2-ipbasek9-15.1g.bin was used with the following configuration:
Switch Configuration
Current configuration : 1742 bytes
!
version 15.1
service timestamps debug datetime msec
service timestamps log datetime msec
no service password-encryption
service compress-config
!
hostname SW1
!
boot-start-marker
boot-end-marker
!
!
logging discriminator EXCESS severity drops 6 msg-body drops EXCESSCOLL
logging buffered 50000
logging console discriminator EXCESS
!
no aaa new-model
clock timezone +05 5 0
no ipv6 cef
ipv6 multicast rpf use-bgp
no ip icmp rate-limit unreachable
!
no ip domain-lookup
no ip cef
!
!
!
!
spanning-tree mode pvst
spanning-tree extend system-id
!
!
!
!
vlan internal allocation policy ascending
!
ip tcp synwait-time 5
!
!
!
!
!
!
interface Ethernet0/0
 switchport trunk encapsulation dot1q
 switchport mode trunk
 duplex auto
!
interface Ethernet0/1
 duplex auto
!
interface Ethernet0/2
 duplex auto
!
interface Ethernet0/3
 duplex auto
!
interface Ethernet1/0
 duplex auto
!
interface Ethernet1/1
 switchport access vlan 10
 switchport mode access
 duplex auto
!
interface Ethernet1/2
 switchport access vlan 10
 switchport mode access
 duplex auto
!
interface Ethernet1/3
 duplex auto
!
interface Ethernet2/0
 duplex auto
!
interface Ethernet2/1
 switchport access vlan 20
 switchport mode access
 duplex auto
!
interface Ethernet2/2
 switchport access vlan 20
 switchport mode access
 duplex auto
!
interface Ethernet2/3
 duplex auto
!
interface Ethernet3/0
 duplex auto
!
interface Ethernet3/1
 duplex auto
!
interface Ethernet3/2
 duplex auto
!
interface Ethernet3/3
 duplex auto
!
interface Vlan1
 no ip address
!
!
no ip http server
!
!
!
!
!
control-plane
!
!
line con 0
 exec-timeout 0 0
 privilege level 15
 logging synchronous
line aux 0
 exec-timeout 0 0
 privilege level 15
 logging synchronous
line vty 0 4
 login
!
end
Workstation Configuration
The machines provided with GNS3 were used as workstations
Virtual PC Simulator, version 0.8.3
Welcome to Virtual PC Simulator, version 0.8.3
Dedicated to Daling.
Build time: Sep  9 2023 11:15:00
Copyright (c) 2007-2015, Paul Meng ([email protected])
All rights reserved.

VPCS is free software, distributed under the terms of the "BSD" licence.
Source code and license can be found at vpcs.sf.net.
For more information, please visit wiki.freecode.com.cn.
Workstation Address Table
Hostname | Address | Default Gateway | VLAN ID |
|---|---|---|---|
PC1V10 | 192.168.10.10 | 192.168.10.1 | 10 |
PC2V10 | 192.168.10.20 | 192.168.10.1 | 10 |
PC1V20 | 192.168.20.10 | 192.168.20.1 | 20 |
PC2V20 | 192.168.20.10 | 192.168.20.1 | 20 |
Network Connectivity Check
After the switch and workstations have been configured, you can ensure that network connectivity is provided between workstations within the same virtual local area network. For VLAN 10, there is network connectivity between PC1V10 and PC2V10, and for VLAN 20 - between PC1V20 and PC2V20
PC1V10> ping 192.168.10.20

84 bytes from 192.168.10.20 icmp_seq=1 ttl=64 time=1.461 ms
84 bytes from 192.168.10.20 icmp_seq=2 ttl=64 time=0.486 ms
84 bytes from 192.168.10.20 icmp_seq=3 ttl=64 time=0.376 ms
84 bytes from 192.168.10.20 icmp_seq=4 ttl=64 time=0.576 ms
84 bytes from 192.168.10.20 icmp_seq=5 ttl=64 time=0.471 ms
PC1V20> ping 192.168.20.20
84 bytes from 192.168.20.20 icmp_seq=1 ttl=64 time=0.359 ms
84 bytes from 192.168.20.20 icmp_seq=2 ttl=64 time=0.565 ms
84 bytes from 192.168.20.20 icmp_seq=3 ttl=64 time=0.332 ms
84 bytes from 192.168.20.20 icmp_seq=4 ttl=64 time=0.470 ms
84 bytes from 192.168.20.20 icmp_seq=5 ttl=64 time=0.568 msAt the same time, since the machine running GNU/Linux is still without proper configuration, the default gateway is unavailable, and there is no network connectivity between virtual local area networks VLAN 10 and VLAN 20.
PC1V10> ping 192.168.20.10

host (192.168.10.1) not reachable
PC1V20> ping 192.168.10.10
host (192.168.20.1) not reachableGNU/Linux Configuration
And now, after preparing the necessary environment, it's time to move on to the interesting part of the lab work!
The Debian GNU/Linux 12 image is used as the GNU/Linux distribution
debian@debian:~$ uname -a
Linux debian 6.1.0-22-cloud-amd64 #1 SMP PREEMPT_DYNAMIC Debian 6.1.94-1 (2024-06-21) x86_64 GNU/Linux
This machine has only one physical network interface ens4 available, so we will configure it.
root@debian:~# ip a
1: lo:  mtu 65536 qdisc noqueue state UNKNOWN group default qlen 1000
    link/loopback 00:00:00:00:00:00 brd 00:00:00:00:00:00
    inet 127.0.0.1/8 scope host lo
       valid_lft forever preferred_lft forever
    inet6 ::1/128 scope host noprefixroute
       valid_lft forever preferred_lft forever
2: ens4:  mtu 1500 qdisc noop state DOWN group default qlen 1000
    link/ether 0c:e5:7e:1c:00:00 brd ff:ff:ff:ff:ff:ff
    altname enp0s4
Let's start by creating sub-interfaces on the physical interface ens4 for our virtual local area networks using the commands:
ip link add link ens4 name ens4.10 type vlan id 10ip link add link ens4 name ens4.20 type vlan id 20Next, assign an IPv4 address to each of the sub-interfaces:
ip addr add dev ens4.10 192.168.10.1/24ip addr add dev ens4.20 192.168.20.1/24And finally, bring up the ens4 interface using the command:
ip link set dev ens4 upAt this point, the network settings are as follows:
root@debian:~# ip a
1: lo:  mtu 65536 qdisc noqueue state UNKNOWN group default qlen 1000
    link/loopback 00:00:00:00:00:00 brd 00:00:00:00:00:00
    inet 127.0.0.1/8 scope host lo
       valid_lft forever preferred_lft forever
    inet6 ::1/128 scope host noprefixroute
       valid_lft forever preferred_lft forever
2: ens4:  mtu 1500 qdisc fq_codel state UP group default qlen 1000
    link/ether 0c:e5:7e:1c:00:00 brd ff:ff:ff:ff:ff:ff
    altname enp0s4
    inet6 fe80::ee5:7eff:fe1c:0/64 scope link
       valid_lft forever preferred_lft forever
3: ens4.10@ens4:  mtu 1500 qdisc noqueue state UP group default qlen 1000
    link/ether 0c:e5:7e:1c:00:00 brd ff:ff:ff:ff:ff:ff
    inet 192.168.10.1/24 scope global ens4.10
       valid_lft forever preferred_lft forever
    inet6 fe80::ee5:7eff:fe1c:0/64 scope link
       valid_lft forever preferred_lft forever
4: ens4.20@ens4:  mtu 1500 qdisc noqueue state UP group default qlen 1000
    link/ether 0c:e5:7e:1c:00:00 brd ff:ff:ff:ff:ff:ff
    inet 192.168.20.1/24 scope global ens4.20
       valid_lft forever preferred_lft forever
    inet6 fe80::ee5:7eff:fe1c:0/64 scope link
       valid_lft forever preferred_lft forever
Now we can ensure that we have network connectivity between the workstations and their default gateway.
PC1V10> ping 192.168.10.1

84 bytes from 192.168.10.1 icmp_seq=1 ttl=64 time=0.438 ms
84 bytes from 192.168.10.1 icmp_seq=2 ttl=64 time=0.728 ms
84 bytes from 192.168.10.1 icmp_seq=3 ttl=64 time=0.718 ms
84 bytes from 192.168.10.1 icmp_seq=4 ttl=64 time=0.747 ms
84 bytes from 192.168.10.1 icmp_seq=5 ttl=64 time=0.676 ms
PC1V20> ping 192.168.20.1
84 bytes from 192.168.20.1 icmp_seq=1 ttl=64 time=0.695 ms
84 bytes from 192.168.20.1 icmp_seq=2 ttl=64 time=0.624 ms
84 bytes from 192.168.20.1 icmp_seq=3 ttl=64 time=1.347 ms
84 bytes from 192.168.20.1 icmp_seq=4 ttl=64 time=0.847 ms
84 bytes from 192.168.20.1 icmp_seq=5 ttl=64 time=0.787 msBut there is still no connectivity between the virtual local area networks:
PC1V10> ping 192.168.20.10

192.168.20.10 icmp_seq=1 timeout
192.168.20.10 icmp_seq=2 timeout
192.168.20.10 icmp_seq=3 timeout
192.168.20.10 icmp_seq=4 timeout
192.168.20.10 icmp_seq=5 timeout
The fact is that by default in this distribution, routing at the Linux kernel level is disabled, and it needs to be enabled. This task is solved by executing the following command:
sysctl net.ipv4.ip_forward=1And with this, the configuration is complete! This can be verified by checking the network connectivity between workstations in different virtual local area networks. For example, between PC1V10 and PC1V20
PC1V10> ping 192.168.20.10

84 bytes from 192.168.20.10 icmp_seq=1 ttl=63 time=2.219 ms
84 bytes from 192.168.20.10 icmp_seq=2 ttl=63 time=1.233 ms
84 bytes from 192.168.20.10 icmp_seq=3 ttl=63 time=1.465 ms
84 bytes from 192.168.20.10 icmp_seq=4 ttl=63 time=0.905 ms
84 bytes from 192.168.20.10 icmp_seq=5 ttl=63 time=1.130 ms
Or PC2V10 and PC2V20
PC2V10> ping 192.168.20.20

84 bytes from 192.168.20.20 icmp_seq=1 ttl=63 time=3.012 ms
84 bytes from 192.168.20.20 icmp_seq=2 ttl=63 time=1.358 ms
84 bytes from 192.168.20.20 icmp_seq=3 ttl=63 time=0.944 ms
84 bytes from 192.168.20.20 icmp_seq=4 ttl=63 time=1.369 ms
84 bytes from 192.168.20.20 icmp_seq=5 ttl=63 time=1.400 ms
Output
From the completed lab work, it is clear that placing GNU/Linux On-A-Stick is no more difficult than doing it with a Cisco router. It also provides the opportunity to gain experience working in a heterogeneous environment.
The described lab work was performed in the GNS3 2.2.50 environment.


Write comment