- DIY
- A
DIY Silk Screen Printing on Homemade Printed Circuit Boards
In various manuals regarding the production of printed circuit boards, authors usually focus heavily on the process of etching/milling the circuit traces, as well as drilling holes, leaving the issue of creating a solder mask outside of consideration, or addressing it only as an afterthought.
Therefore, let's try to examine this issue in more detail, including highlighting some non-obvious possibilities that exist here.
Generally speaking, my interest in this topic was sparked by watching the following video:
Let me say right away that the method discussed in the video above for creating a solder mask is quite convenient and good because it allows you to create it even without any equipment, without involving complex manufacturing processes.
However, it is evident that it is quite rudimentary, and it is clear that the author of this video uses a whole series of processes that are unnecessary if one were to adopt more professional approaches, especially in cases where it is required to produce more or less serial products with stable quality.
Here, by unnecessary processes, I mean that it requires:
printing the mask on transparent film, which then needs to be applied to each board;
laying down a transparent polyester film during the work process, which gets dirty and will need to be cleaned. Over time, wear (non-cleanable stains, deterioration of transparency) will certainly be observed;
cleaning the exposed boards.
Moreover, interestingly, we can see from the video above that the author uses technology for individual production, including for serial production of boards—which is quite irrational in terms of time costs.
Therefore, for such work, if they are observed with some periodicity (and in general, if high quality is needed), it may be better to consider switching to the production of similar masks using screen printing...
Although this sounds a bit daunting at first, in reality, it is a quite understandable process that allows raising the quality and speed of production to an unattainable height before. :-)
It just so happened that in the past, I had to work in silk screen production and, therefore, all the information below will be first-hand, not seen somewhere or read, as I spent a considerable amount of time there.
To give you a preview, I will say that the article will be structured in such a way that we will first take a detailed look at the silk screen process, after which we will explore another interesting alternative opportunity that I have never seen before, and which simply begs to be realized after becoming acquainted with the silk screen process.
Manufacturing a mask using silk screening
So, silk screening…
As one can easily guess, the very fact that silk is involved in this process unequivocally points us to the East, specifically to the early printers of ancient China, from where the technology presumably spread, including to Japan.
The essence of the silk screening process lies in pushing a coloring substance through a stencil, which is securely bonded to a base made of some fabric.
It can be said that the essence of the technology itself (pushing paint through a stencil) has reached us practically unchanged, although, of course, all elements of the construction and the technology as such have undergone numerous changes over time.
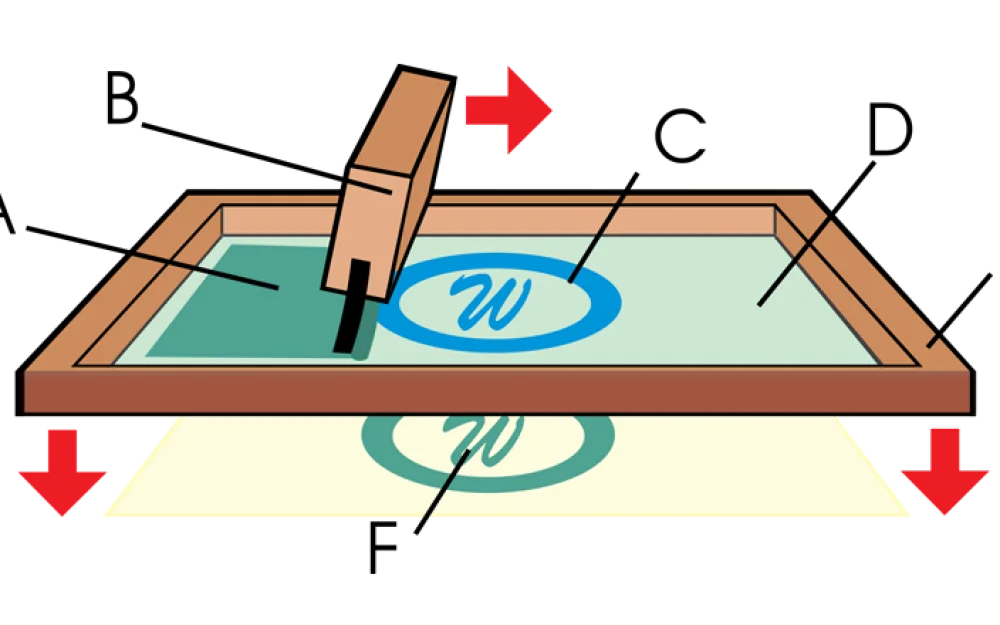
This is what it looks like:
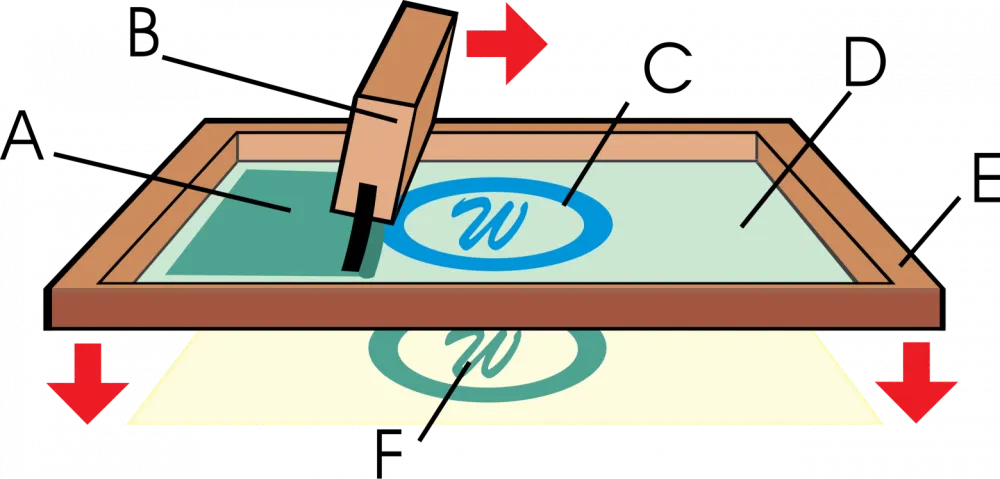
In the image above, the key elements of this process are highlighted.
The process usually occurs as follows:
In the stencil made on the basis of a wooden frame, some amount of paint is poured (it should ideally be shown in the picture above, on the left side, in the form of a peculiar puddle, right inside the stencil, poured along the entire length of the stencil).
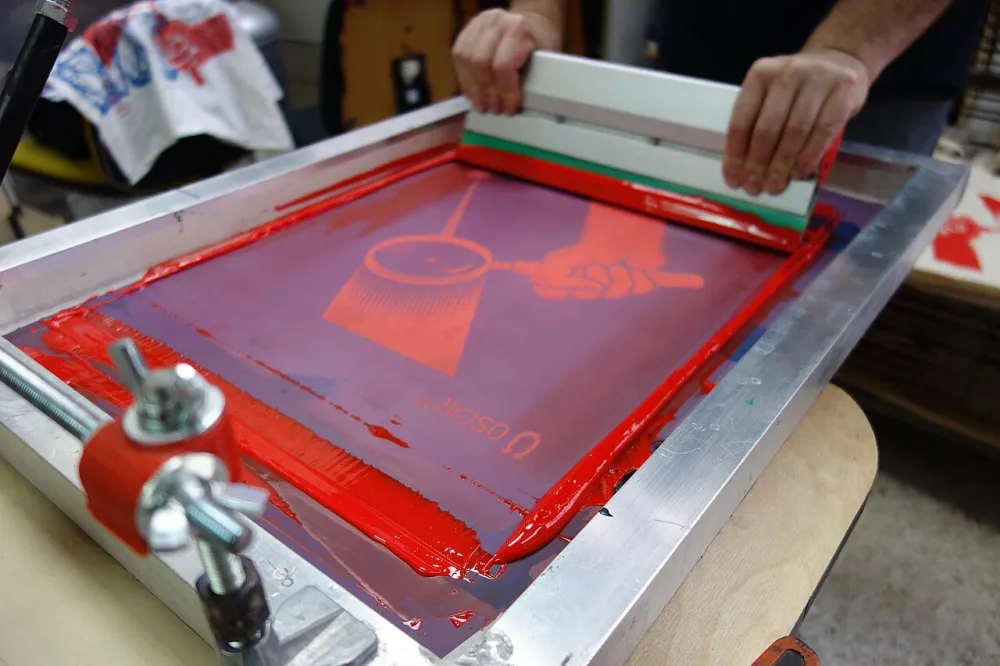
The paint used for screen printing usually has a rather thick consistency and resembles mayonnaise (in density) — thus, if it is poured into the frame with the stencil, then, due to its density and the fairly frequent intertwining of threads in the stencil, it simply cannot flow down spontaneously and just sits in the form of a "pile" on the stencil. :-)Next, with both hands, the printer takes a device called a "squeegee" (B), tilts it at an angle of about 45°, and positions it at the very beginning of the frame, so that our pile of paint remains on the right side of the squeegee.
Then, with a vigorous motion, pressing down a bit from above, the printer sweeps the squeegee across the frame from left to right — that is, he rubs and presses the paint through the stencil. It is preferable to only sweep the squeegee once (left to right and that's it; you cannot sweep the squeegee multiple times) — to avoid smearing paint over the target surface. Despite this, many deviate from this rule, but if you want quality… Well, you get the idea. :-)
In the illustration above, we see that the area with smeared paint on the surface is marked as (A), the open stencil is marked as (C), (D) — the area that has not yet been painted, (E) — the wooden frame with the stencil, (F) — the paint pressed through the stencil onto the target surface.
During this process, the stencil and the target surface are positioned in such a way that the stencil is secured at a certain distance from the surface — the distance is necessary so that after the paint has been pressed through, the stencil immediately lifts off the surface and does not smear the paint.
For fine work, a distance of 1-3 mm is recommended, while for coarse work (for example, printing your favorite rock band's logo on a t-shirt) the distance can be greater, up to 5-6 mm
Also, it is necessary to say a few words about the squeegee... Usually, it represents a kind of specialized spatula, approximately half a meter long (in fact, the length can be any, depending on the size of your stencil; but, when it comes to printing on T-shirts, it is indeed about half a meter long).
Typically, it can be made from a special aluminum profile, with a system of bolts that clamp and hold the "blade" (or "sheet") of the squeegee — a long plate made of special rubber-like compounds, which usually has a width of about 2 cm, a thickness of about 1 cm, and an arbitrary length (in the case of printing on T-shirts, this length is about half a meter):
The material of the blade (sheet) is selected in such a way that it is both sufficiently rigid and sufficiently soft at the same time — that is, it effectively presses the paint through the mesh, while not damaging it.
Furthermore, the material of the blade is chosen so that paint of a certain type sticks to it as little as possible. For example, as far as I know, silicone sheets are used for working with UV paints (that is, those cured by ultraviolet light).
Here, we should make a small digression and mention that UV paints are particularly good for use in screen printing, as they do not dry in the air at all, which means a long working time for the stencil (i.e., the stencil will be durable), where this time will mostly be limited only by the mechanical wear of the stencil from the friction of the squeegee, and not due to the paint drying on the stencil! This is important, so let’s note this for ourselves…
Now, let's consider all the main key stages of work within silk screen printing.
Layout
First, a layout is created in any vector editor on the computer. Why in a vector format: this is due to the very property of vector images, the most important of which for us in this case are the absolutely clear edges of the areas of the image — both outside and inside different zones.
The reason for this lies in the very nature of vector images — where a curve describes a specific area, where it (the area) is assigned one common color.
Thanks to this, the area has absolutely clear boundaries and scalability without loss of quality — vector images can be scaled to any size without losing quality.
In contrast to this option, raster images (for example, photos taken with a smartphone) represent a pixel grid, with coordinates of each pixel, and its color. For example, for monitors, one of the options will be RGB (red, green, blue), for printing — CMYK (cyan, magenta, yellow, key (i.e., black or "key color"), etc.
Thus, due to the finiteness of the information volume, raster images do not scale well, in that they lose quality when scaled.
However, in our case, we are not interested in this, but in the fact that due to the properties of the format itself, the edge of a raster image is always represented as a kind of staircase (or "saw"), without clear boundaries (even if they seem so). On the left is a vector image, on the right is a raster image:
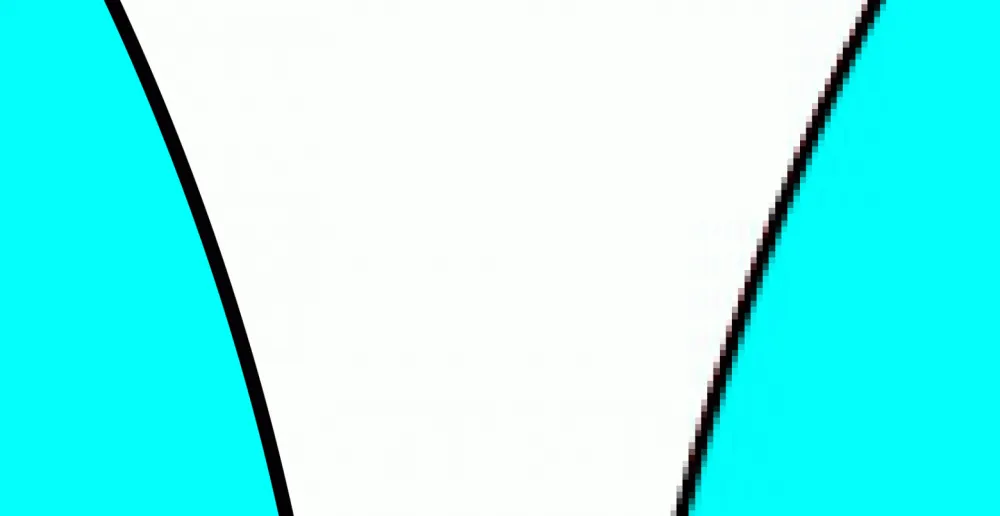
For us, in the case of silk screen printing, this is a problem, as it does not allow the creation of objects with clear edges, which is especially important if we intend to use silk screen printing for solder mask of printed circuit boards, where there may be many small elements.
As a vector editor for preparing the layout, one can use, for example, Corel Draw, Adobe Illustrator, or if we intend to take the simplest path — the free vector Open Source editor Inkscape.
From experience, I can say that it is no worse than Corel Draw and supports the same ideology, with practically the same functions — at least, I have studied it quite closely and could not find anything that was missing and hindered work.
Moreover, it has a unique feature, — exporting vector images to g-code. That is, if you have any CNC machine, or, say, a laser engraver, you can draw an image in this editor, then export it to g-code, and start execution on your machine! ;-)
The layout must be made in mirror reflection, and later we will see why.
What to print the layout on
A rather interesting point is what is used to print the finished layout — I have seen that previously, for example, semi-transparent tracing paper (i.e., paper) for laser printers is used to print the image.
Next, right over this image, a so-called aerosol fixative or drawing fixer is sprayed, a mixture similar to a very fast-drying lacquer (less than a minute), which fixes the print from smudging and, at the same time, increases optical density — the black color becomes very deep, almost not allowing light to pass between the dots of the printed image (there will be no unplanned holes in the stencil), and the tracing paper becomes very transparent.
As a simpler alternative, you can try using special transparent heat-resistant films for laser printers — they already have a special surface for reliable toner retention, and the high transparency of the film gives a good result.
Mesh
Essentially, the entire screen printing technology is built around the mesh, so it should be mentioned specifically…
The old times when natural silk was used for screen printing meshes are long gone, and currently, synthetic fibers are used to make such meshes, with polyester fiber being the most accessible for home use and beyond.
With careful use, this fiber is very reliable, allowing for many thousands of prints.
The quality of the resulting print directly depends on how high the thread count is per square centimeter. In simpler terms: the more threads there are, the finer details the stencil mesh can hold.
In practical terms, for a sufficiently thick layer of printing, it makes sense to use meshes with about 110 threads per centimeter. If the board layout is dense enough, and a thinner layer of the mask is required, you can try a mesh resolution even higher, up to 140 threads per centimeter.
It should also be noted that if UV inks are planned to be used, to create clear contours, it is advisable to use a yellow mesh, as, for example, a white mesh is more susceptible to parasitic scattering for this spectrum.
Stencil Frame
The simplest way to make a frame for the stencil is to nail it together from regular wooden blocks, placing it on a flat surface beforehand so that at least one plane of the frame is maximally flat — and this is actually practiced even in production, strangely enough (we've seen it, we know... :-)).
Next, the mesh is stretched over this frame as tightly as possible so that it practically rings like a drum :-) — and I’m not joking, it actually starts to ring if it’s stretched properly, resulting in a kind of expensive tambourine. :-)))
The mesh is stretched by wrapping the edges of the mesh around the blocks and nailing it down with small nails or, the better option — using a stapler:
The mesh does not stretch much, so stretching it goes quite easily.
After stretching, you can additionally coat the sides, on the vertical planes (where the mesh is nailed to the frame) with glue — so that the mesh adheres to the frame and remains secured across the entire surface, not just by the nails/staples (otherwise, it will tear over time).
Light-Sensitive Composition (Photoemulsion)
After we have made the frame and stretched the mesh on it, it is necessary to apply a thin layer of light-sensitive composition (called "photoemulsion") onto this mesh (usually in a sufficiently dark room) — the application can be done with the same squeegee that will later be used for spreading the paint.
The coating should be applied to the mesh from the outside of the frame, not from the inside — that is, from the bottom side! The reason for this is so that the squeegee will later glide over the smooth mesh, not over the rough surface where the coating was!
This composition is sensitive to ultraviolet light, and after applying it, it should be left in the same room for about an hour to an hour and a half to dry directly on the mesh.
Exposure
After we have applied the composition to the frame and dried it, it's time to expose it.
For this, the frame is laid out in such a way that the mesh is on top, and directly on top of it, we place the printout (on translucent tracing paper or translucent film for laser printers) that we made at one of the earlier stages.
Again, I will repeat that the layout should have been made in a mirror image, as we will be laying it on the bottom surface of the mesh, and we will print from the top.
Now, it is necessary to somehow press the printed layout against the mesh.
In industrial technology, a special vacuum device is used for this — it sounds quite loud, but in reality, it looks "like a homemade construction made with the left foot" :-))) — and essentially represents a similar structure resembling air hockey, only if you imagine that a stencil was placed on the air hockey table, on top of it, a large bag with a rigid frame around the edges was laid, from which air is pumped out, firmly pressing the stencil with the printout together, after which, from below, exposure occurs with an ultraviolet lamp installed under the stencil on the table. I have shown a rough diagram below
In practice, I did it simpler: I simply placed glass acrylic on top of the printout, through which I shone an ultraviolet lamp
Washing
After exposure (the specific exposure time is indicated on each composition, it needs to be checked), you just need to wash the frame, where the areas hit by ultraviolet light harden, while those covered by the printout (the dark areas where the toner is) are easily washed away with water, leaving a clean mesh.
Well, that's basically it, and how to print was written above! ;-)
Washing Off the Old Stencil
After a while, you will realize that this stencil has become outdated for some reason: it is mechanically worn out (very unlikely, there should be hundreds or thousands of impressions for that), or you have changed your mind and now want to create a different design (much more likely)…
Be that as it may, you cannot simply wash off this stencil — the following approach is used: the stencil is sprayed with a special washing solution and left in this moist state for a while (the specific time is also indicated on the washing solution).
As a result, the stencil softens and can be easily washed off with regular tap water!
Many use a life hack to simplify this process: they wash it off with a stream from a mobile car wash under pressure (they even do it in a household bathtub) — it turns out to be quite quick and effective.
What I want to note: despite the fact that the technology seems somewhat tedious at first glance, due to the durability of the stencil, as well as the fact that UV paint does not dry in the air — you can end up with a stencil that, in home conditions, you will have to change… I don’t even know when! :-D Most likely, never :-D.
Moreover, it is much quicker to do in practice than to describe it in detail like this. So, it’s not as scary as it may seem at first glance...
Life Hack, Lastly: Many attach door or furniture hinges to the frame (simply screw them on with self-tapping screws), so that it always lifts and lowers to the same place — this simplifies working with it; additionally, they screw a door handle onto the top part of the frame, again for the convenience of using the setup
As an Interesting Idea...
And now, a very interesting life hack that, in my opinion, can radically improve the quality and speed up the creation of solder masks — but it will only be suitable for owners of photopolymer printers. So…
Now that we have studied the technology of screen printing in detail, we can modify it almost any way we want and apply it for our purposes!
One of the interesting options, in my opinion, is the use of a photopolymer printer as a screen printing complex of 3 in 1:
exposure means;
pressing means;
image formation means.
I have not seen such an option yet, and I believe it would be very interesting!
So, how could this look...
First, let's clarify that most amateur printed circuit boards will likely be quite small, we can even conditionally say, "fitting in the palm of your hand."
Therefore, for most home tasks, even a very small screen printing frame will be sufficient for us, which easily fits on the work desk of the photopolymer printer:
first, we make a compact frame using, for example, FDM printing;
we stretch a professional screen mesh for screen printing onto the frame;
we apply a professional light-sensitive composition on this mesh and let it dry;
we attach the frame with the mesh to the descending print platform of the photopolymer printer;
we lower the platform with the frame tightly onto the printing table so that the mesh is pressed firmly against the printing glass;
we expose the stencil to the printer's ultraviolet light (the exposure time can be found in the passport of the specific photosensitive composition);
we remove the frame from the printer, wash it, and attach it to hinges (as we saw above, so that it can be flipped like a door and is convenient for use);
we print a squeegee (from TPU, as an option; by the way, polyurethane sheets are quite commonly used in screen printing) or buy a professional squeegee material (i.e., a rubber-like blade);
we attach this material into a homemade, FDM-printed squeegee.
Voila - we now have a fully professional technology, just adapted for DIY, and fitting literally on your desk!
With this approach, you can easily replicate stencils, wash, redo, etc. — that is, the technology offers vast possibilities!!!
Wherein the use of a photopolymer printer effectively replaces an entire range of equipment — in reality, when I saw these things in production (to give you an idea), for all three processes — exposure, pressing, image formation, at least three rooms were allocated! And all of this will fit on a small table! O_0
Amazing? In my opinion, yes… :-)

Write comment