- Network
- A
VPN with Mobile IP on Raspberry Pi. WG tunnel
For smart guys, there's nothing interesting in the article, it's about a regular tunnel. It's for the smallest, but desperately in need. :)
Why?
Wow. 16 years registered, first article. :)
For smart guys, there is nothing interesting in the article, it is about an ordinary tunnel. It is for the smallest, but desperately in need. :)
When I started organizing "knowledge" in the form of this article, and realized what I ended up with, I noticed that there is plenty of information on this topic (even on tekkix), it's a pity that I realized this only when I had already done everything and understood what I actually needed to google. In general, let it remain so that someone who googles just as incorrectly can accidentally stumble upon this article and find something useful for themselves. During the implementation process, I stumbled several times at each step, so I decided to comment on everything here as detailed as possible.
To be honest, when I needed to send all traffic through a VPN so that a "human" IP would appear at the output, Google didn't help me much with this, and I didn't even understand which direction to google, the banal "Residential IP VPN" only gave commercial offers (and I wouldn't mind buying it, but the country I needed was not on the list) or "Mobile IP VPN", which gave out some kind of garbage, or services for selling mobile proxies. And a proxy was not enough for me, I needed every bit coming from me to come out with an IP that wouldn't scream "I'm a server in a data center, most likely I'm a VPN" (even without traffic analysis). And again, the country I needed was not for sale.
My knowledge of networks, routes, and other things is at the level of a housewife (as well as *nix systems), so the process of obtaining the result was, to put it mildly, not fast. Despite the fact that VPNs in Russia are in an unclear status, the technology itself is not prohibited (WG is blocked only on foreign addresses, if the server is located in Russia, then there are no problems with access to it from Russia and abroad), so it will work, and in the case of a foreign SIM card, you will also get a foreign IP with all the ensuing consequences, well, this is already a forced bonus. :)
Although the article is about Raspberry Pi, its presence is not essential; the exit point can be any other VPS, or, for example, your home router/computer if you want to make yourself a Residential IP VPN. The essence is in building a tunnel.
Setup
Raspberry Pi 5
LTE Hat (there are plenty on AliExpress, you can also find them on Avito, but a simple USB modem will also work. However, I wanted a small, beautiful, solid box with only antennas sticking out, and only the power cable connected. Also, the priority of such a modem (route metric) is set higher than WiFi by default, so no additional settings are needed.
VPS. I am not ready to rely on the fact that some ISP will not suddenly start issuing IPs behind NAT, so I do not count on DynDNS; a solid option is needed.
VPS
Any server will do; I used FirstVDS simply because I was already registered there, and it was faster to set up a separate server for testing. However, it would be more correct to take a server in the country where your SIM card will be inserted.
So, let's assume the server is new, and the first thing to do is set it up. I have Ubuntu installed on my VPS, so the instructions will be for it (for Debian, it seems to be more or less similar).
$ adduser -m USERNAME # Create a user to avoid working as root
$ usermod -aG sudo USERNAME # Allow the user to execute commands as root
# Connect to the server as the NEW user and update the system
$ sudo apt update && sudo apt upgrade -y
Docker
Next, we will install all components through Docker. I had not worked with it before, but it turned out to be incredibly convenient, especially when you do dozens of experiments/reinstallations during the setup process. The main system is almost isolated from all your clumsy actions; everything you experiment with networks will remain in the container, and your server will not suddenly become unavailable due to clumsiness.
$ curl -sSL https://get.docker.com/ | sh # Install Docker
$ sudo groupadd docker # Create a group
$ sudo usermod -a -G docker $USER # Allow Docker to work under the current (created above) user, not as root
Portainer
For managing Docker containers, I chose Portainer. You can do without it, everything in the command line is faster and shorter, but it is more convenient this way (and useful for further experiments).
$ sudo mkdir -p /portainer # Create a directory for portainer
$ sudo docker pull portainer/portainer-ce:latest # Download its latest image
# Run portainer in Docker itself
# 9443 — SSL port inside the container
# 9444 — SSL port that will be exposed outside.
# You can make them the same, but I don't really like default values
$ sudo docker run -d -p 9444:9443 --name=portainer --restart=always -v /var/run/docker.sock:/var/run/docker.sock -v /portainer:/data portainer/portainer-ce:latest
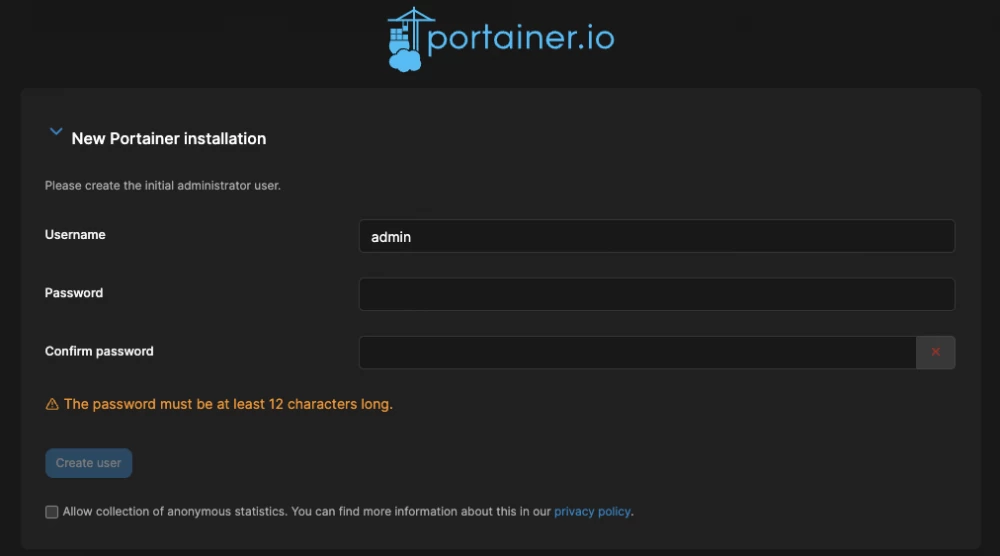
After that, you can open in the browser httpS://your.vps.server:9444, a window should appear with a prompt to set a username and password:
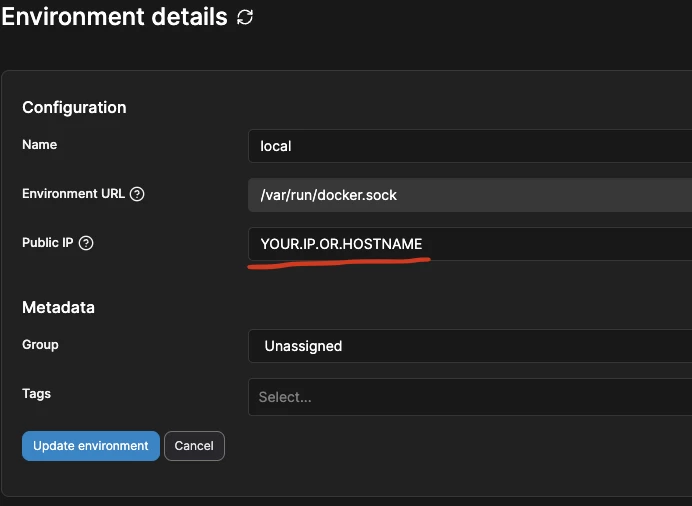
Actually, you specify your data and then on the start page it will not be superfluous to specify one more small detail:
Here specify the IP or server address. This is optional, but when you click on the port of some container instead of going to http://0.0.0.0:PORT you will go to the correct address:
Next, go to manage your containers:
Wireguard (VPS)
For those who are too lazy to see how it is done through the UI, below a way to do it all with one command
Next, you need to install Wireguard. Good people have made templates (section "Templates" in the left menu) for quick installation of WG "in one click", but they are not very customizable and I did not start "in one click", some refinement was required, so I decided that it would be better to show how to deploy the container "from scratch", without templates.
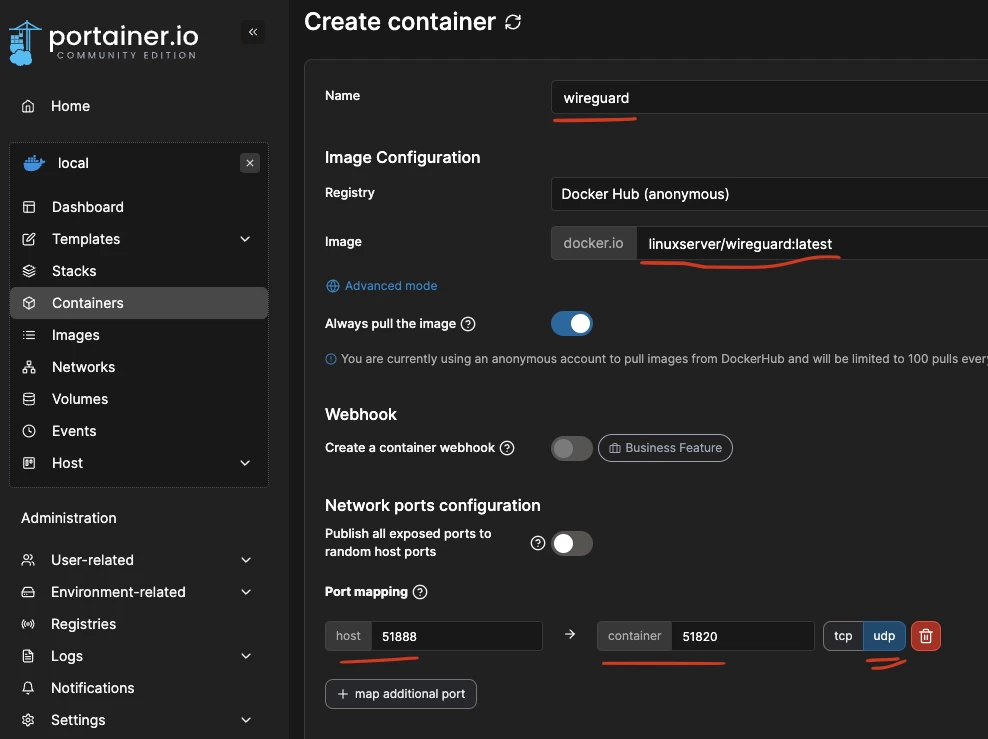
In the upper right corner, click on the blue button "Add container", enter the container name (any), the image name linuxserver/wireguard:latest (exactly like that) and add the port that will be exposed outside. The HOST port can be any, and the CONTAINER port must be 51820 and must be UDP:
Next, scroll down to the "Advanced container settings" section.
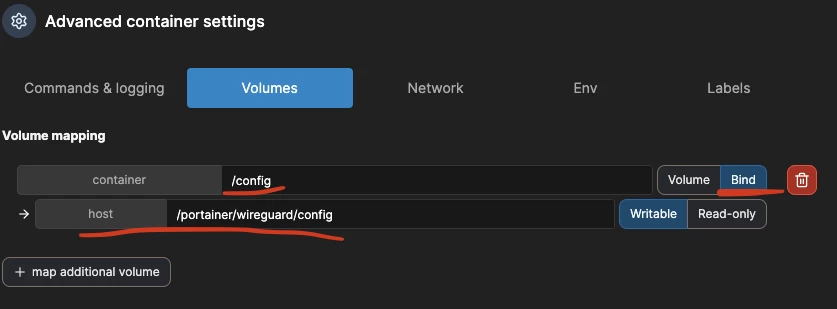
In the "Volumes" section, you need to bind the WG config directory (/config) inside the container to some directory on our server that we can easily access:
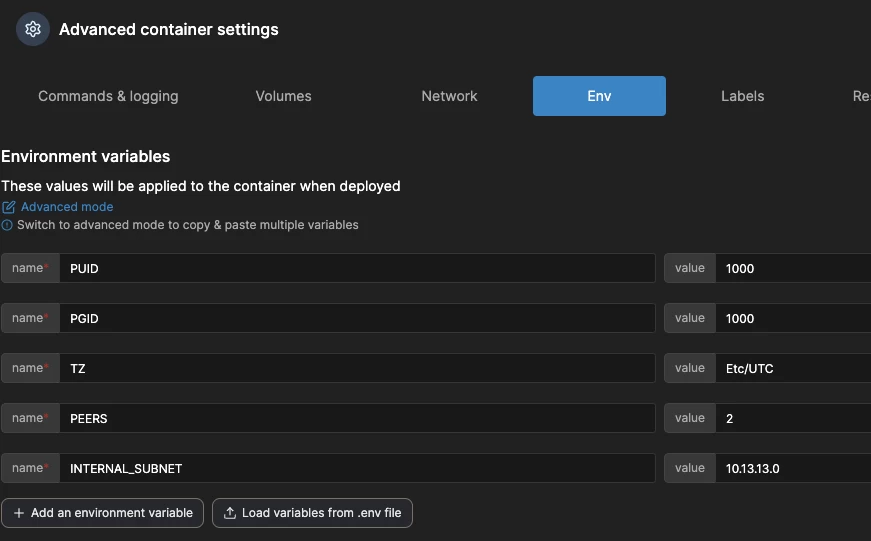
Next, we need to set some environment variables on the "Env" tab:
# These two properties map the user inside the container to the local user
# The one we created at the very beginning
PUID=1000
PGID=1000
# The range of addresses that will be used in the network
# that WireGuard will create for clients
INTERNAL_SUBNET=10.13.13.0
# This is just setting the timezone, each container can have its own,
# so it's beneficial to set UTC everywhere, I think
TZ=Etc/UTC
# It doesn't affect anything, "clients" can be added later as many as you want.
# You can even specify zero here, it's just the number of clients (peers)
# for which configurations will be created at startup. If you use this
# Wireguard only as a VPS server, you can specify values greater than zero
# For our task, it is not necessary to specify, but for testing, you can.
PEERS=2
# If you changed the external port, then to generate the correct configs for clients
# you need to specify this port here as well, if you used the default, then you don't need to
SERVERPORT=51888On the "Restart policy" tab, select "Unless stopped", so that the container restarts in case of any issues, but does not restart if we stop it manually.
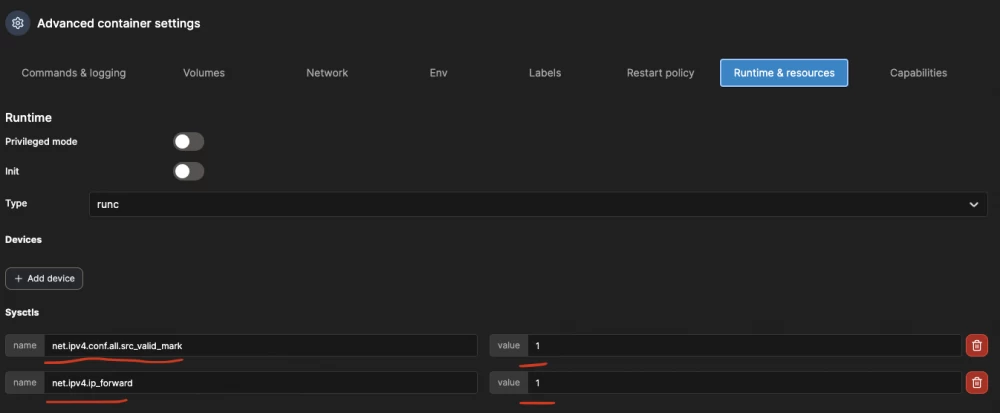
Next, on the "Runtime & resources" tab, you need to add the necessary condition for wireguard to work: net.ipv4.conf.all.src_valid_mark=1, and also allow packet forwarding between different networksnet.ipv4.ip_forward=1
And finally, on the "Capabilities" tab, set the NET_ADMIN switch to true, so that WG can work with networks:
All right, you can click on the blue "Deploy container" button, wireguard should start, and your new container will appear in the list of containers.
It wouldn't hurt to check that everything is okay and click on the "logs" button to see that everything started without errors.
There, in the log, QR codes for connecting to the server will be printed. They won't be needed, but you can quickly check from your phone that everything is working, for example. At this step, you already have a VPN.
By the way, everything that was done above through the UI can be done with one command in the console:
docker run -d --name=wireguard --cap-add=NET_ADMIN -e PUID=1000 -e PGID=1000 -e TZ=Etc/UTC -e SERVERPORT=51888 -e PEERS=2 -e INTERNAL_SUBNET=10.13.13.0 -p 51888:51820/udp -v /portainer/wireguard/config:/config --sysctl="net.ipv4.conf.all.src_valid_mark=1" --sysctl="net.ipv4.ip_forward=1" --restart unless-stopped linuxserver/wireguard:latestSetting up the tunnel on VPS
Actually, now you need to set up the rules so that when the WG client and raspberry connect to this server, the client's traffic goes through the raspberry.
Since we mapped the internal /config directory to the real /portainer/wireguard/config, the server configuration file will be generated at /portainer/wireguard/config/wg_confs/wg0.conf:
$ nano /portainer/wireguard/config/wg_confs/wg0.conf[Interface]
Address = 10.13.13.1
ListenPort = 51820
PrivateKey = VPS_PRIVATE_KEY
PostUp = iptables -A FORWARD -i %i -j ACCEPT; iptables -A FORWARD -o %i -j ACCEPT; iptables -t nat -A POSTROUTING -o eth+ -j MASQUERADE
PostDown = iptables -D FORWARD -i %i -j ACCEPT; iptables -D FORWARD -o %i -j ACCEPT; iptables -t nat -D POSTROUTING -o eth+ -j MASQUERADE
[Peer]
PublicKey = CLIENT_PUBLIC_KEY
PresharedKey = CLIENT_PSK
AllowedIPs = 10.13.13.2/32
[Peer]
PublicKey = PI_PUBLIC_KEY
PresharedKey = PI_PSK
AllowedIPs = 10.13.13.3/32If the task was "launch your VPN server", then this could be the end, but we need to tweak it a bit:
# Deleting the generated file
$ rm /portainer/wireguard/config/wg_confs/wg0.conf
# Creating a new one
$ nano /portainer/wireguard/config/wg_confs/wg0.conf
[Interface]
# Address of our "server"
Address = 10.13.13.1/32
# Port inside the container for connection (not external, exposed outside)
ListenPort = 51820
# Server private key
PrivateKey = VPS_PRIVATE_KEY
# If you need access to your VPS "from inside" for some tasks
# For example, if you made some ports inaccessible from the internet,
# you can uncomment this line
# PostUp = iptables -t nat -A PREROUTING -d 10.13.13.1/32 -j DNAT --to-destination 172.17.0.1
# Or use a more "general" option, where specific addresses
# will be substituted automatically, both commands do the same thing:
# PostUp = iptables -t nat -A PREROUTING -d $(ip addr show %i | awk '/inet/ {print $2}') -j DNAT --to-destination $(ip addr show eth0 | awk '/inet/ {print $2}' | awk -F"." '{print $1"."$2"."$3".1"}')
# In the commands below, %i will be replaced with the name of the wireguard network interface
# By default, it is 'wg0'
# Since WG is in a container, we don't need any
# additional routing tables here to separate traffic
# into WG/non-WG: another plus of Docker containers.
# Also, we do not go to the internet through this server, routing
# to the internet (as in the auto-generated config above) is also not needed
# Peer configuration of our Raspberry Pi
[Peer]
# PUBLIC key of the client
PublicKey = PUBLIC_PI_KEY
# Since we will be going to the internet through this peer, we cannot restrict
# addresses here, zeros mean "any connections are allowed".
# We reserve the address "10.13.13.2/32" for it, just keep it in mind
AllowedIPs = 0.0.0.0/0
# Our laptop, phone, router, anything that wants to go to the internet
# through VPN, and wants its IP to appear as "mobile" outside
[Peer]
PublicKey = PUBLIC_CLIENT_1_KEY
AllowedIPs = 10.13.13.3/32
# Second and subsequent clients, if you need to connect more than one device
[Peer]
PublicKey = PUBLIC_CLIENT_2_KEY
AllowedIPs = 10.13.13.4/32Save (Ctrl+O), exit (Ctrl+X).
I removed the PresharedKey (this is additional protection for the peer key strength).
# Restarting the WG container
$ docker restart wireguard
To generate keys, you can use either online generators or the wireguard console command. However, since wg is likely not installed anywhere except in containers, the command can only be executed inside the container. On a Raspberry or VPS, or any other computer where wg is installed – it doesn't matter. In our case, the following can be done on any of the peers:
# Start a shell in the container named "wireguard"
$ docker exec -it wireguard sh
# Generate a pair of public-private keys (you can generate a dozen at once,
# for all peers):
$ priv=`wg genkey` && printf "Private key: $priv\nPublic key: `echo "$priv" | wg pubkey`\n" && unset -v priv
# Example output:
# Private key: EIrYKTpC93LiFBFsoyH/v8eCmMfD4rJLSmc2cgDl9lc=
# Public key: I1mrtQTkguQRbD5bNTPGk8Li3EbBhcDmc2xCNaTIwj0=
# Exit the container shell back to the host:
$ exit
Raspberry Pi
Here, probably, the simplest way: we assemble the parts together, insert the SIM card, install Raspberry Pi OS, everything according to the manuals from the official site, it's impossible to make a mistake there. As the host OS, we choose Pi Lite x64. I conducted quite a few different experiments and tested a couple of different Hats for the Raspberry, on other OS types like Ubuntu they were not always recognized without hassle, and the minimal official OS supports them out of the box, and we don't need a UI on the server.
When installing the official OS, you can specify a user (they will no longer be root, which is what we need), set their password, and also specify the parameters of the home network so that the Raspberry automatically connects to it at startup. Then, on your router, you will be able to find out its IP to connect. So, you don't need to connect any monitors and keyboards to this box, you can put it next to you on a power bank and continue the setup.
As with Docker, until now I had not dealt with single-board computers, now I have several and I have a desire to do something interesting with them, a server that consumes 5W is wonderful.
Docker + Portainer
The only difference from VPS is that now your server is next to you, you can even put it in your pocket, so the steps are almost identical. You can act exactly as described above in the VPS section, or you can look to the future and refer to the helper scripts from pi-hosted (a good set of scripts for those who want to turn their Raspberry into a monster).
Wireguard (Pi)
In order not to post a bunch of screenshots again, I will leave only the console command that launches the container with WG (in this example, I chose port 51999, it is not necessary, you can always leave it by default 51820):
docker run -d --name=wireguard --cap-add=NET_ADMIN -e PUID=1000 -e PGID=1000 -e TZ=Etc/UTC -e INTERNAL_SUBNET=10.13.13.0 -p 51999:51820/udp -v /portainer/Files/AppData/Config/wireguard/config:/config --sysctl="net.ipv4.conf.all.src_valid_mark=1" --sysctl="net.ipv4.ip_forward=1" --restart unless-stopped linuxserver/wireguard:latestIn fact, you can copy the previous command (from the VPS section). WG does not care if it is a "server" or a "client", everything is a "peer".
The only differences here are the absence of PEERS, to show that it is not necessary and you can add as many clients as you want yourself, as well as a different path to the configuration directory, since I used pi-hosted, and this is the default path there.
Setting up a tunnel on Raspberry Pi
# Deleting the generated file
$ rm /portainer/Files/AppData/Config/wireguard/config/wg_confs/wg0.conf
# Creating a new one
$ nano /portainer/Files/AppData/Config/wireguard/config/wg_confs/wg0.conf
[Interface]
PrivateKey = PI_PRIVATE_KEY
Address = 10.13.13.2/32
# If you want to use RPi as a VPS "server" directly, then
# you can specify the port here, and add the client below
ListenPort = 51820
# Adding some rules when starting WG
# All incoming packets to the WG network (wg0 interface) are marked with 0x30
# The mark can be any, if we were not running in a container, we would need
# to ensure that no one else uses this mark and choose a unique one
PreUp = iptables -t mangle -A PREROUTING -i %i -j MARK --set-mark 0x30
# Replacing the address of all outgoing packets marked with 0x30
# with the address according to the current routing tables.
# In other words, if someone from the VPN network wants to access the internet,
# we allow this packet to go through any interface it falls under
# without forcing it to go only through LTE/WiFi/LAN
PreUp = iptables -t nat -A POSTROUTING ! -o %i -m mark --mark 0x30 -j MASQUERADE
# Removing the two previous rules when stopping WG
PostDown = iptables -t mangle -D PREROUTING -i %i -j MARK --set-mark 0x30; iptables -t nat -D POSTROUTING ! -o %i -m mark --mark 0x30 -j MASQUERADE
# Here we specify the connection parameters to our VPS
[Peer]
PublicKey = VPS_PRIVATE_KEY
# You need to specify the public IP/host of our VPS and the port
# that we mapped there
Endpoint = vps.host.ip:51888
# Allow traffic from the entire wg subnet,
# all peers from 10.13.13.1 to 10.13.13.255
AllowedIPs = 10.13.13.0/24
# Send heartbeats every 15 seconds, so that in case
# we are behind NAT, we don't disconnect
PersistentKeepalive = 15
# If you want to use this WG as a "server" as well,
# you can add "clients" here, but to connect you will need
# to know the real IP of this raspberry (for example, you are in the same local network/WiFi
# or the ISP assigned a normal, accessible IP
[Peer]
PublicKey = DIRECT_CLIENT_PUBLIC_KEY
# Since all peers will eventually merge into one network, you need to ensure
# that addresses do not overlap and since in the VPS config we stopped
# at the client with address 10.13.13.4, the minimum here will be 5
# They do not necessarily have to go in order, if anything
AllowedIPs = 10.13.13.5/32Save (Ctrl+O), exit (Ctrl+X).
# Restarting the WG container
$ docker restart wireguard
Clients
Everything is set up, the tunnel is working, all that's left is to create configs for the clients and provide them to the clients themselves (mobile, laptop).
We had 2 clients on the VPS, here are examples of their configurations:
Client 1 on VPS (laptop/router)
[Interface]
# PRIVATE key of our client
PrivateKey = PRIVATE_CLIENT_1_KEY
# This address should match the address that was specified
# in the VPS config
Address = 10.13.13.3/32
# DNS server for all requests, without specifying it, access
# to the internet will only work if you specify direct
# IP addresses. I use Google (8.8.8.8) or Cloudflare (1.1.1.1)
DNS = 1.1.1.1

# VPS
[Peer]
# PUBLIC key of the VPS server
PublicKey = PUBLIC_VPS_KEY
# Since we are going to access the internet through this point
# packets can come back to us from absolutely any IP
# so we don't need to restrict "allowed" addresses here
# set "allow everything"
AllowedIPs = 0.0.0.0/0
# Public IP of the server and the port we assigned to it
Endpoint = vps.host.ip:51888
Client 2 on VPS (smartphone)
Exactly the same config, only the private key is needed from the second client and the address will be 10.13.13.4/32
Client 3 on Raspberry Pi (direct connection, without VPS)
Again, almost the same:
[Interface]
PrivateKey = PRIVATE_CLIENT_3_KEY
# DNS can be different for each client
DNS = 8.8.8.8
# Pay attention to the address
Address = 10.13.13.4/32

[Peer]
# Here are the details from Raspberry Pi, not from VPS
PublicKey = PUBLIC_PI_KEY
AllowedIPs = 0.0.0.0/0
# Address of Raspberry Pi
# (local if you are on the same local network, or public IP of the ISP)
# Port not from VPS, but the one exported in the container on RPi
# In our example it was 51999
Endpoint = local.or.good.public.raspberry.ip:51999
That's it. The tunnel is set up, the IP is now human, and if you use a foreign SIM card (even in roaming), you get a foreign IP with all the bonuses. You can find a friend who will share five watts of electricity at home, you don't need to ask for internet.
When restarting servers, containers are automatically brought up and connected, and when Raspberry or VPS goes down, clients' internet connection is disconnected by default, so it's impossible to accidentally expose your real IP.
The raised tunnel does not affect the traffic of the VPS or Raspberry itself, as it is in the container and the server itself goes directly to the internet, you can check this with the command curl 2ip.io to find out your external IP in the VPS or Raspberry console.
You can check the status of the interface, connected clients, and the amount of traffic passed through them with the command wg inside the container:
# Start a shell in the container named "wireguard"
$ docker exec -it wireguard sh
# Display the status of Wireguard
$ wg
Conclusion
Usually, LTE upload speed is much lower than download speed, but I got some kind of wrong SIM card in the tests, where download and upload speeds are equal. However, it is logical to assume that when working through the tunnel, it will "download" what you send to it, and "upload" what you want to download from the internet, so your speed limit will be based on the minimum parameter (usually LTE upload speed).
"Today I understood a lot" (c)
I still have a lot of plans for this Raspberry, this was the first step in a rather long and difficult journey of understanding these "network technologies" of yours. I am thinking of increasing fault tolerance (balancing internet connections so that if there is access to WiFi and/or cable in addition to the 220-volt outlet at the installation site, access to the box remains when LTE drops), possibly adding some other tunnels, and most likely there will be a container with a smartphone emulator and FakeGPS. So far, all these topics are unknown to me, but I have the desire and need to study them.
Useful links
Unofficial but very informative Wireguard documentation.
A good article about different types of tunnels on Wireguard (and another one as well).






Write comment