- Software
- A
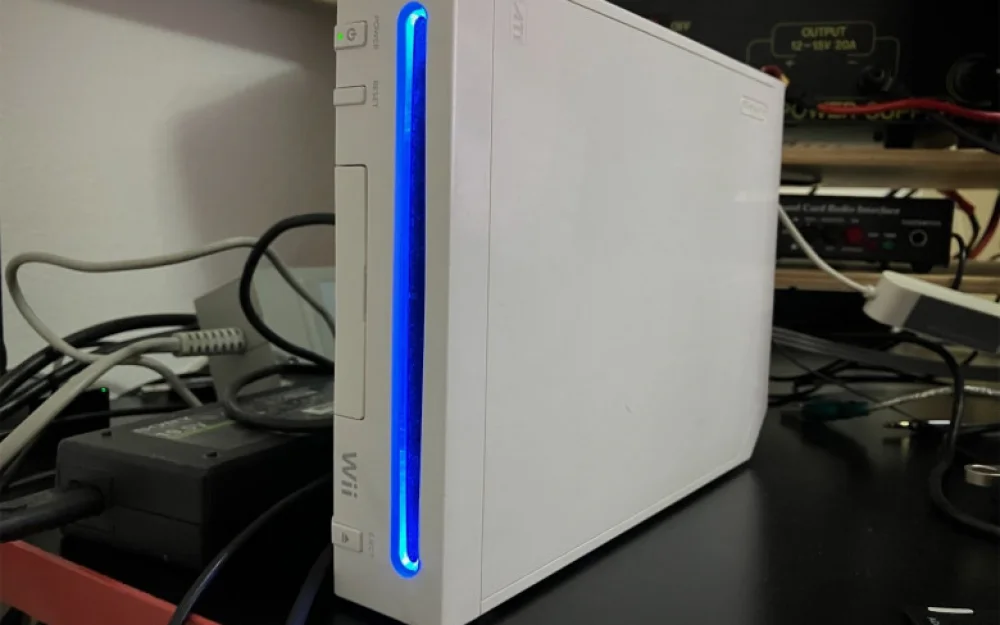
Everything worked! Debian Linux on Nintendo Wii
After writing the first article, I received a lot of comments and feedback. It was very nice, thank you! I will definitely try to launch X there and run the suggested tests. Along with this, a simple thought kept spinning in my head: is it possible to install Linux there?
As soon as I started looking into this question, it seemed that installing it would be very easy. But reality had its surprises. Today I will show how to get a working Linux on this gaming console with an IBM Broadway PowerPC processor.
What is BootMii
In the vastness of the internet, you can find many different Linux images for this device. Most of them are based on old kernels, which is due to the rather modest technical specifications of the Wii. They are united by the method of booting — they rely on something called BootMii. This is a small piece of code that was originally developed not for launching third-party OSes, but to allow for emergency recovery of the console in case something goes wrong.
It is important to understand: the Wii is somewhat similar to a regular computer, but in reality, there is neither BIOS nor UEFI here. If something goes wrong during the exploration process, the system will simply turn into a useless brick without adequate recovery options. BootMii was created precisely for this case — it operates as close to the "zero level" of loading as possible and can easily create an exact bitwise snapshot of the current state of the NAND flash memory.
The main advantage of BootMii can be said to be that it is capable of booting before all other software, including the System Menu. However, this only works on older versions of the console released around 2009. In newer versions, this feature has been removed at the hardware level (which is my case). Nevertheless, there remains the option to launch BootMii from within the Homebrew channel, meaning there is a way to make a full backup.
BootMii
To make this magical thing work, you need to perform its installation. BootMii comes with the HackMii exploit, which installs the Homebrew channel on the console. In my case, the vulnerability worked perfectly through a specially crafted letter, known as letterbomb. It triggers a failure in the message processing mechanism and forces the console to execute arbitrary code. The rest is a matter of technique: select the necessary menu item and wait a bit.
When everything is done correctly, you go to the Homebrew channel, press the Home button on the controller, and select Launch BootMii:
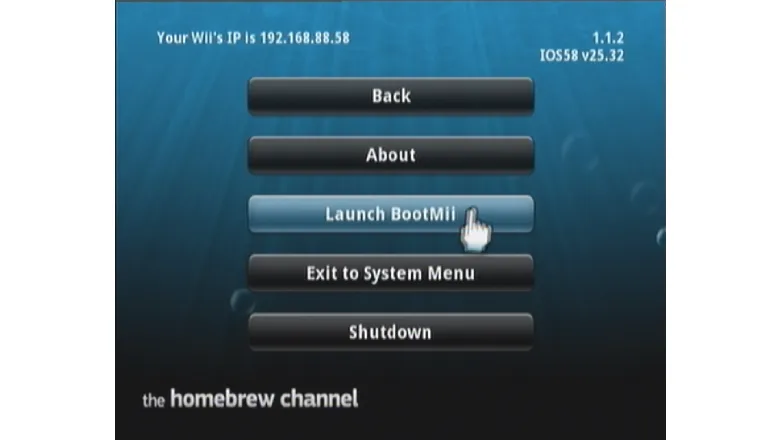
After that, you find yourself in an interesting menu where the console does not interact with the Wiimote controller at all. For the first few seconds, I thought the gadget had frozen, but no. In BootMii, control is done using physical buttons on the case, such as Power, Reset, and Eject. When selecting the Backup icon, the system will warn that it will write a file and then verify it.
I am making a backup
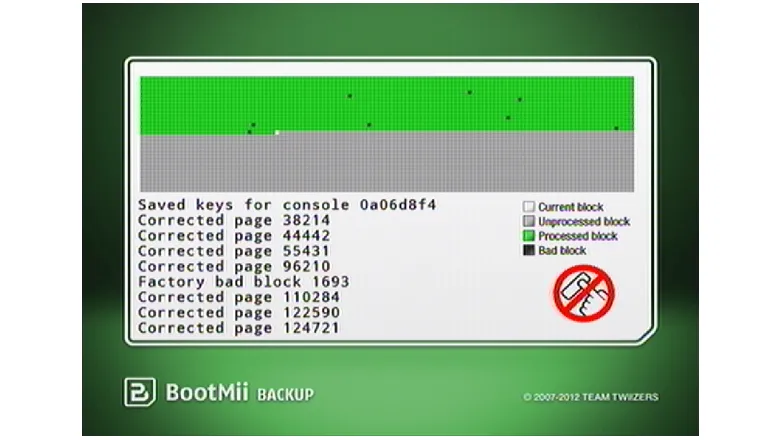
If anyone remembers what the process of defragmenting a hard drive looked like in older versions of Windows, you will be pleasantly surprised — here it looks quite similar. The cursor blinks, blocks are being read. And yes, among them were quite a few bad blocks.
Inside the Wii is a very ordinary flash memory chip. It was tested during production, and some blocks were marked as faulty. One can draw an analogy with "dead pixels" on monitors. A couple of them are not considered a defect and do not constitute a warranty case. The same goes here — it is quite acceptable to have a small number of faulty ones.
A slightly different matter is with blocks labeled as Corrected page. This means that a bit error was detected when reading the NAND page, and it was successfully corrected by the ECC (Error Correction Code) mechanism. The data was read, and no additional problems arose in the process.
Five minutes later, a complete image of my flash drive appeared on the SD card (nand.bin), as well as a dump keys.bin with unique cryptographic keys tied to my console. This is probably the most valuable file, without which it is impossible to perform a correct decryption of the NAND content. Now, if as a result of my experiments the console stops working properly, but I can access BootMii, I will easily restore the flash memory contents.
Selecting a Linux Option
Before diving into everything, I decided to look at the experiences of those who have already successfully deployed Linux on the Wii. A lot was helped by the resource wiibrew.org, which has a list of working options. The most relevant one is ArchPOWER, an unofficial port of ArchLinux for PowerPC/POWER architectures.
The instructions for launching were simple and clear: take any Linux distribution, copy the installation script there, connect the SD card, and the rest will be in dialog mode — choose the storage, format it, and wait. During the process, the script will download the image from the Internet and prepare two partitions. One will contain the files for launching from BootMii, and the other the root directory.
If you don't want to partition the SD card, you can place the root on a separate USB flash drive. This is convenient if Linux will not be the primary system but used occasionally. It's decided — I'm installing.
I downloaded the script:
$ git clone https://github.com/Wii-Linux/pc-installerAnd ran it:
$ cd pc-installer; sudo ./installer.shAfter answering all the questions, in 10 minutes I received a ready SD card image, happily plugged it into the Wii, started BootMii — and this appeared on the screen:
The black-and-white picture clearly indicated that the signal was being output in NTSC, while I had a PAL console. But what confused me the most was that the image on the screen did not change, and the hint press reset (1x) or press eject to boot did not help at all. Of course, I tried to follow the advice, but all in vain. Then I looked into the directory where the installer placed files in /bootmii, and discovered that the expected ppcboot.elf was missing.
At the same time, the gumboot loader was in a separate folder along with the corresponding .lst file. Here, I tried many different things: I copied gumboot.elf to /bootmii renaming it to ppcboot.elf, and tried to correctly place all files manually instead of using a script. The best result I managed to achieve looked like this:
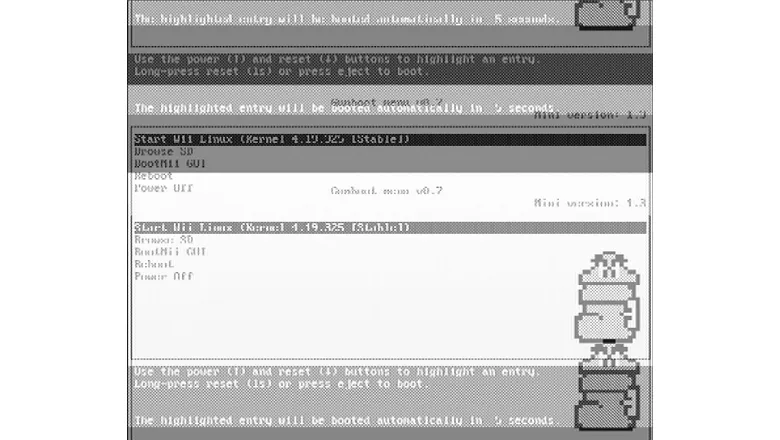
At this point, everything froze, and after rebooting, the console stopped recognizing the controller until I synchronized it using the Sync buttons (on the Wii itself and on the Wiimote inside the battery compartment). It got to the point where I repeated all the procedures from scratch, using a smaller SD card — the loading screen still appeared, and nothing happened.
After spending quite a bit of time, I decided to try an alternative. If the previous option was built on a relatively fresh kernel 4.5.0, others operated on significantly older kernels. I didn't go down to 2.6.32, although I knew that the same XWhiite was quite operational and even had a graphical interface.
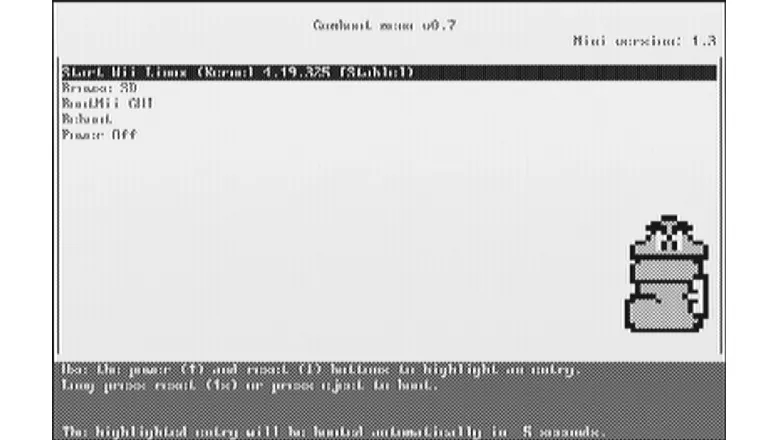
Instead, I chose a somewhat middle option on kernel 3.15.10, a project called wii-linux-ngx. Although work on it stopped about five years ago, many recommended it on forums and Reddit. The installation here is even simpler — just write the image to an SD card, insert it into the Wii, and go into BootMii.
The result, on one hand, was encouraging, but on the other hand, it was disappointing:
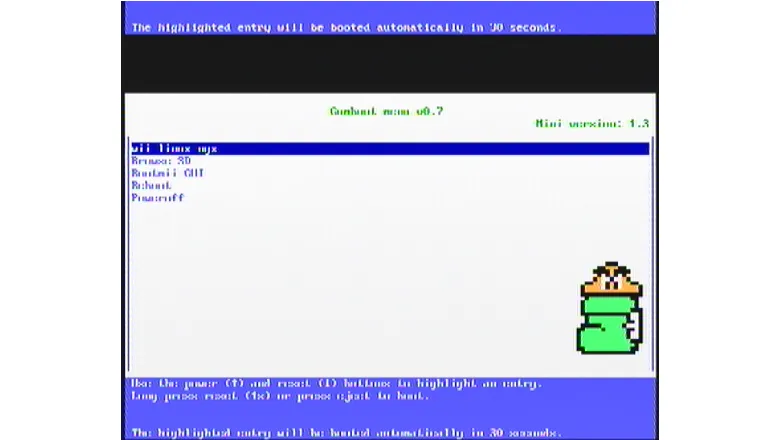
The countdown timer wasn't ticking, the image on the screen didn't change, and I thought everything had frozen. But suddenly I noticed that the disk presence indicator started to blink:
Its randomness led me to think: what if it's currently acting as the HDD LED? And yes — that's exactly what it was. As soon as the disk activity stopped, I decided to check the DHCP leases on the router and suddenly found that the hostname wii-linux-ngx appeared in the list of devices. Well, since that was the case, I immediately tried to connect to the IP address with an SSH client.
The documentation stated: login — root, password — root. But when I try to log in via SSH like this, I'm denied access. The issue is not with the credentials, but with the PermitRootLogin directive, which by default prohibits root login via SSH. Since the entire file system resides on the SD card, I simply edited /etc/ssh/sshd_config and added PermitRootLogin yes.
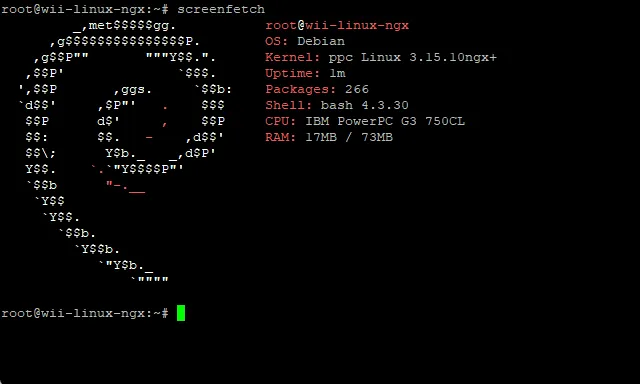
I booted up — and lo and behold! A welcome banner greeted me with a quote from Japanese game designer Shigeru Miyamoto:
Linux wii-linux-ngx 3.15.10ngx+ #169 Sat Aug 19 22:49:32 CEST 2017 ppc
The programs included with the Debian GNU/Linux system are free software;
the exact distribution terms for each program are described in the
individual files in /usr/share/doc/*/copyright.

Debian GNU/Linux comes with ABSOLUTELY NO WARRANTY, to the extent
permitted by applicable law.

There are big lines between those who play video games and those who do not. For                                                                                                                                                              those who don't, video games are irrelevant. They think all video games must be                                                                                                                                                              too difficult.
Shigeru Miyamoto
I looked at the information about the processor:
root@wii-linux-ngx:~# lscpu
Architecture:          ppc
CPU op-mode(s):        32-bit
Byte Order:            Big Endian
CPU(s):                1
On-line CPU(s) list:   0
Thread(s) per core:    1
Core(s) per socket:    1
Socket(s):             1
Vendor ID:             IBM
Model:                 nintendo,wii
BogoMIPS:              121.56
L1d cache:             32K
L1i cache:             32K
But then df -h gave a rather sad picture, confirming that there is actually no disk space:
root@wii-linux-ngx:~# df -h
Filesystem      Size  Used Avail Use% Mounted on
/dev/mmcblk0p2   340M   340M   0   100% /
devtmpfs         37M     0   37M   0% /dev
tmpfs           7.4M  152K  7.2M   3% /run
tmpfs           5.0M     0  5.0M   0% /run/lock
tmpfs            15M     0   15M   0% /run/shm
/dev/mmcblk0p1   40M  3.6M   36M   9% /boot
tmpfs            40M     0   40M   0% /tmp
I have a 16 GB card, which means there is an option to expand the root directory to its maximum size. I did this as follows:
root@wii-linux-ngx:~# fdisk /dev/mmcblk0I deleted partition number 2 and immediately created it again, but not 340 MB, but to the end of the SD card:
Disk /dev/mmcblk0: 15.1 GiB, 16172187648 bytes, 31586304 sectors
Units: sectors of 1 * 512 = 512 bytes
Sector size (logical/physical): 512 bytes / 512 bytes
I/O size (minimum/optimal): 512 bytes / 512 bytes
Disklabel type: dos
Disk identifier: 0xbb8434da

Device         Boot Start      End  Sectors Size Id Type
/dev/mmcblk0p1       2048    83967    81920  40M  b W95 FAT32
/dev/mmcblk0p2      83968 31586303 31502336  15G 83 Linux
I saved the changes and rebooted. After that, I expanded the file system into the free blocks:
root@wii-linux-ngx:~# resize2fs /dev/mmcblk0p2This procedure took 10–15 minutes. Then I checked the available disk space:
root@wii-linux-ngx:~# df -h
Filesystem      Size  Used Avail Use% Mounted on
/dev/mmcblk0p2   15G  377M   14G   3% /
devtmpfs         37M     0   37M   0% /dev
tmpfs           7.4M  152K  7.2M   3% /run
tmpfs           5.0M     0  5.0M   0% /run/lock
tmpfs            15M     0   15M   0% /run/shm
/dev/mmcblk0p1   40M  3.6M   36M   9% /boot
tmpfs            40M     0   40M   0% /tmp
Now you can start updating packages and installing additional software. By default, the system has a very old repository that has long gone offline. So I edited /etc/apt/sources.list and left only:
deb http://archive.debian.org/debian jessie main contrib non-freeNow you can run the package update, this notorious
root@wii-linux-ngx:~# apt update && apt -y upgradeand confidently go about your business for a couple of hours. Unfortunately, there is very little RAM, and without additional tricks like configuring zram, the system runs frankly slowly. Nevertheless, the operation was successful, and I was able to install screenfetch directly from apt:
Conclusion
But what about the image on the screen, you may ask. Well, there is none, not at all. That is, as long as the system is functioning properly, nothing appears on the display at all. Perhaps the video mode does not correspond to the required one, initramfs does not bring up the console, or the root of the problem needs to be sought in gumboot. I have not yet managed to overcome this glitch. The system itself boots stably and quite quickly.
In the near future plans — to check ArchPOWER once again: I suspect that there was a startup of the OS there too, but I didn’t realize it due to the lack of a picture. Most likely, I will also be able to access it via SSH and get a more recent kernel. I also plan to try Fedora 20 and Ubuntu 14.04 when I have more free time.
As for the practical sense — well, I will be honest with you. Installing Linux was purely a matter of sports interest unlike NetBSD. I wanted to understand how complicated this procedure would be and whether the Wii could work stably on this OS. In the end, I confirmed that yes — launching Linux is possible, but there are more problems and bugs. On the plus side — a wireless connection is added, not just working through the USB network card.
Probably, in the foreseeable future I will close another gestalt: I will try to run MacOS 9 on it and will definitely share this experience with you. For now, I will go rewrite the SD card again.


Write comment