- DIY
- A
From Static Panorama to Interactive 3D Map: Creating a Virtual Tour on Pannellum
Why Invent Your Own Street View?
Why invent your own Street View?
We are all accustomed to Google Street View, but what if you need to showcase a space that a 360-camera car cannot reach? The interior of an office, a museum, a university hall. Commercial solutions for virtual tours are often expensive or limited in customization.
Hello! My name is Ilya, I am a student at Irkutsk Polytechnic. I faced the task of creating an interactive map of a floor in the university building. A similar interactive map had been created before, but it was not optimized for simple use by an average user who wanted to familiarize themselves with the walls of the institute, as this map was in the form of an .exe file and had a number of problems:
There was no way to work in a web version
To view it, one had to download a heavy file (which no one is going to do)
Loading each photo took an unbearably long time
The application could only be used on a PC
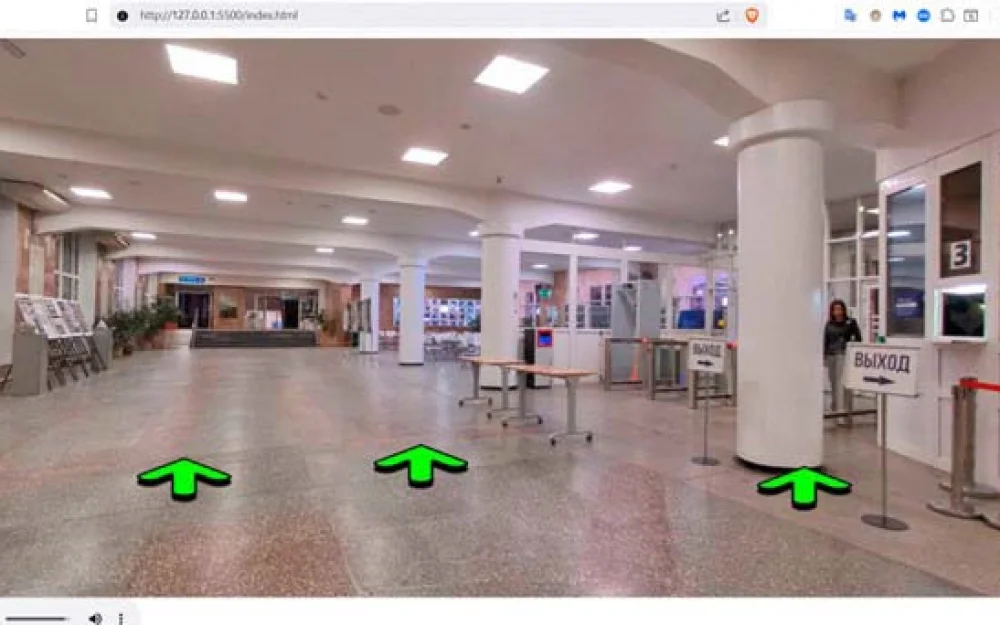
The task was not just to show panoramas, but to link them into a navigation system where one could "move" from room to room. In this article, I will show how we created a full-fledged web tour with custom controls using the Pannellum library and simple JavaScript.
1. Choosing tools: why Pannellum became the solution?
After analyzing the previous system, it became clear that its key drawbacks—desktop-centricity, heaviness, and closed nature—became the main criteria for the new solution. We needed a technology that provides:
1. Browser accessibility (solves issues with .exe and OS).
2. Fast loading (in contrast to the "unbearably long" wait).
3. Ease of distribution (a simple link instead of a "heavy file").
Options were considered:
Three.js + Photo-Sphere-Viewer: Maximum flexibility, but more code to write "from scratch".
Marzipano: A powerful framework from Google, but with a higher entry threshold.
Pannellum: The perfect balance. A lightweight (~70 KB), open library. It provides a ready-made yet customizable panoramic viewer with support for hotspots, gyroscope, and, critically, works on any device with a modern browser.
The choice fell on Pannellum because it directly addressed all the issues of the old system: the ability to integrate into the web environment, speed, cross-platform compatibility, and the availability of an MIT license (which allows free use of the library).
2. Project Architecture: From Monolithic .exe to Lightweight Web Network
We abandoned the monolithic program in favor of a simple and clear web architecture: one HTML page – one panoramic location.
Why this is correct:
Simplicity of development: Each room can be developed and tested separately.
Navigation logic: Transitioning between locations is a regular page load via a link ( or window.location). This is intuitive for both the user and the developer.
2.1 Practice: Local Server for Development and Testing
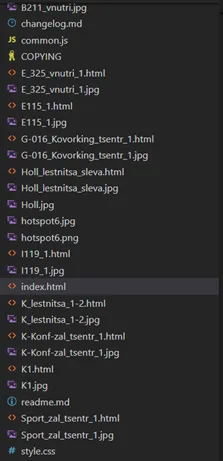
For convenience in visualizing the result, we will install an extension for Visual Studio Code that allows you to quickly run a local web server directly from the editor, automatically refreshing the browser page when project files are changed.
Installation: In VS Code, open the Extensions panel (Ctrl+Shift+X), search for "Live Server" by Ritwick Dey, and click "Install".
Launch: After installation, a "Go Live" button will appear in the bottom right corner of the editor. You can also right-click on any HTML file and select "Open with Live Server".

Result: The server will start at http://localhost:5500 (the port may change), and the page will open automatically in the browser. Now all panorama features will work correctly.
3. Breaking down the code: from HTML skeleton to interactive map
The architecture "one location - one HTML file" begins with a clean and clear template. Let's break it down piece by piece to understand how each element prepares the ground for interactivity.
3.1 HTML template and CSS: the skeleton and skin of our location
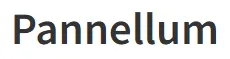
The main index.html (and any other location file) serves as the framework. All customization logic has been moved to separate files.
pannellum.viewer('pannelleum', {

        "type": "equirectangular",

        "panorama": "Holl.jpg",

        "autoLoad": true,

        "hotSpots": [

        {

            "pitch": -14,

            "yaw": 4,

            "type": "custom",

            "createTooltipFunc": hotspot,

            "createTooltipArgs": {

                "text": "Hall staircase on the left",

                "URL": "./Holl_lestnitsa_sleva.html"

            }
}
In this configuration object for Pannellum, each parameter specifies key properties of the panorama and navigation:
Main panorama parameters:
"type": "equirectangular" — the projection format of the panorama (standard for 360° images).
"panorama": "Holl.jpg" — the path to the panorama photo file.
"autoLoad": true — automatic loading of the panorama when the page is opened.
Hot spot (hotSpot) parameters:
"pitch": -14 — vertical angle (in degrees), similar to latitude. A negative value = below the horizon.
"yaw": 4 — horizontal angle (in degrees), similar to longitude. Defines the position around the circle.
"type": "custom" — indicates that the point will be custom (not a standard Pannellum icon).
"createTooltipFunc": hotspot — a reference to our JavaScript function that creates the appearance and behavior of the point.
"createTooltipArgs": { ... } — an object with arguments passed to the hotspot function:
"text": "Hall staircase on the left" — tooltip text.
"URL": "./Holl_lestnitsa_sleva.html" — the target for navigation upon clicking.
Next – a key point of integrating our style.css. This file is responsible for integrating custom elements with the Pannellum viewer, which was one of the main technical tasks.
Analysis of style.css: control over the interface
/* style.css */
/* 1. Container for the panorama - the basis of the scene */
#pannelleum {
    width: 100%;
    height: 700px; /* Fixed height for stability */
    position: relative; /* Creates a context for positioning buttons! */
}

/* 2. "Back" button */
.back-button {
    position: absolute; /* Pulls out of the flow and positions */
    bottom: 5%;
    left: 0.7%;
    padding: 0.65%;
    background-color: #007bff;
    color: white;
    border: none;
    border-radius: 18%;
    cursor: pointer;
    z-index: 1; /* Important: raises above the layers of the panorama */
}

/* 3. Custom hotspot (created in JS) */
.custom-hotspot {
    width: 120px;
    height: 70px;
    background-image: url('hotspot6.png'); /* Our graphic instead of the standard icon */
    background-size: cover;
    cursor: pointer;
}

/* 4. Sound button with two states */
.sound-button {
    position: absolute;
    top: 1.8%;
    right: 0.7%;
    padding: 2.5%;
    border: none;
    border-radius: 100%;
    cursor: pointer;
    z-index: 1;
    background-size: cover;
    background-position: center;
}
/* States are controlled by JS through class change */
.sound-button_on { background-image: url('./img_tools/Play.png'); }
.sound-button_off { background-image: url('./img_tools/Stop.png'); }

/* 5. Tooltip for hotspots */
.custom-tooltip {
    position: fixed; /* To follow the cursor across the screen */
    background: #fff;
    padding: 8px 12px;
    border-radius: 4px;
    box-shadow: 0 2px 8px rgba(0,0,0,0.15);
    z-index: 9999; /* Always on top of other elements */
    pointer-events: none; /* To not interfere with interaction */
    white-space: nowrap;
    font-family: Arial, sans-serif;
    font-size: 14px;
}
Why is this needed?
Full control: CSS gives us the freedom to make the interface unique, rather than using the standard look of Pannellum.
Absolute positioning and z‑index: This solution addresses a key integration issue. Without position: relative on the #pannelleum container and position: absolute with z‑index on the buttons, the latter "sink" below the panorama and become unclickable.
Performance: Styles for points (background‑image) are loaded once and cached by the browser.

A little Photoshop, and our pointer is ready!
3.2 The heart of the system: custom JavaScript for navigation and interaction
All dynamic logic has been moved to common.js. This file contains functions for managing navigation, interactive elements, and sound (in some locations, audio tracks needed to be added).
// common.js
// Function to go back
function goBack() {
    window.history.back();
}

var sound = false;
// Sound control
function sound_on_off() {
    if (sound) {
        document.getElementById('sound_button').className="sound-button sound-button_on";
        audio.pause();
    }
    else {
        document.getElementById('sound_button').className="sound-button sound-button_off";
        audio.play().catch(e => console.error("Playback error:", e));
    }
    sound = !sound;
}

// Stop sound after the track ends
audio.addEventListener('ended', function() {
    sound=false;
    document.getElementById('sound_button').className="sound-button sound-button_on";
});

// Create a global variable to hold the tooltip div
let tooltipDiv = null;

// Click handler for the hotspot
function hotspot(hotSpotDiv, args) {
    // 1. Apply custom point style from CSS
    hotSpotDiv.classList.add('custom-hotspot');

    // 2. Add a tooltip on hover
    hotSpotDiv.addEventListener('mouseenter', (e) => showTooltip(e, args.text));
    hotSpotDiv.addEventListener('mouseleave', hideTooltip);

    // 3. Make the element clickable for navigation
    hotSpotDiv.addEventListener('click', function() {
        window.location.href = args.URL;
    });
}

// New version of showTooltip function with precise positioning
function showTooltip(event, text) {
    if (!tooltipDiv) {
        tooltipDiv = document.createElement('div');
        tooltipDiv.className = 'custom-tooltip';
        document.body.appendChild(tooltipDiv);
    }
    tooltipDiv.textContent = text;

    // Precise positioning relative to mouse coordinates
    const x = event.clientX + window.scrollX + 15;
    const y = event.clientY + window.scrollY + 15;

    tooltipDiv.style.left = ${x}px;
    tooltipDiv.style.top = ${y}px;
    tooltipDiv.style.display = 'block';
}

// Hide the tooltip
function hideTooltip() {
    if (tooltipDiv) {
        tooltipDiv.style.display = 'none';
    }
}
Key improvements in this implementation:
Global tooltip: Created once and reused, which is more efficient than constantly creating/removing DOM elements.
Precise positioning: Using event.clientX and event.clientY along with window.scrollX/Y ensures that the tooltip appears right next to the cursor, even if the page is scrolled.
Audio error handling: The method audio.play().catch() intercepts and logs errors (for example, if the browser policy prohibits autoplay), preventing silent failures.
Auto-reset sound: The ended event resets the sound button state after the track finishes.
4. Issues and their solutions
The transition to new technology was not smooth. Here are the main challenges and how we overcame them:
Problem 1: Custom elements are "falling" under the panorama.
Hot spots and buttons were not clickable.
Solution: Control over z-index and positioning context. We ensured that the container #pannelleum has position: relative, and our elements have position: absolute and a high z-index (as specified in our style.css).
Problem 2: The coordinates of the hot spots (pitch, yaw) are selected randomly.
Visually placing a point on the door in the panorama is painfully slow.
Solution: We created a "debug mode" by adding a click handler in the Pannellum configuration that outputs the current viewing angles to the browser console. This greatly accelerated the placement.
Problem 3: Audio autoplay is blocked by the browser.
Solution: We added error handling through .catch() in the sound_on_off() function. Now, if the browser prohibits autoplay, the error is logged to the console, and the interface does not break — the user can manually turn on the sound.
Problem 4: Initially, the size of each panoramic photo took up a huge amount of space, reaching up to 18 MB. To compress all photos, we go into Photoshop, File -> Scripts -> Image Processor.
In it, we select in steps:
1) Select Folder: we choose the folder for compression (All our photos should be there)
2) Select Folder: we choose the folder for future compressed photos
3) Save as JPEG and select quality on a scale from 1 to 10, I chose 4 and achieved a compression of the heaviest photo by 9 times, with virtually no noticeable decrease in quality. And, consequently, we increase the loading speed of each photo!
Conclusions
So, we have created a fully functional web tour, it's just left to upload it to the server - and it will be accessible via a link from any device - phone, tablet, or computer. The user can intuitively "walk" through the floor, and loading each new location happens almost instantly.
How we solved the initial problems:
Web version instead of .exe: Yes.
Ease of access: A link instead of a heavy file. Yes.
Loading speed: Quick loading of one panorama instead of all at once: Yes.
Cross-platform: Works on PCs, smartphones, tablets. Yes.
Technical advantages of the approach:
Full control over the interface and navigation.
Ease of maintenance and extension of the map.
Excellent performance thanks to the lightweight Pannellum.
Stable UX: Error handling and thoughtful states of elements.
Cons and development paths:
Multi-file management: With a large number of rooms, managing dozens of HTML files becomes inconvenient. Future improvement: transition to SPA (Single Page Application) using Vue.js/React, where the entire state of the map is managed by a single JavaScript application, and data about panoramas and connections are stored in a single JSON file.
Manual work: Selecting coordinates for points, although expedited, remains manual. Ideally, create a simple visual editor.
Improving responsiveness: A fixed height for the panorama (700px) is not always optimal for all mobile devices. Media queries can be added for dynamic height calculation.
Conclusion
In conclusion, by using the open library Pannellum and standard web technologies (HTML, CSS, JS), it is possible to create an interactive 3D map in a relatively short time that meets modern user expectations for accessibility and convenience.
Link to GitHub (Project completed in a test format)

Write comment