- DIY
- A
DIY AR monitor in industry
In my previous article, I mentioned the implementation of a device that was developed to facilitate the process of setting up sensors by the maintenance staff, and the attached survey showed that you are interested in the topic of implementing this device.
Well, I appreciate your opinion, so this article will be dedicated to the implementation of a simple and inexpensive AR solution for displaying the parameters of the data collection system. If you are interested, then welcome under the cut!
❯ Beginning
So, as I mentioned earlier, the device discussed in the article is part of the "ecosystem" of the software package that collects technological data of the enterprise. Below I will try to describe the design of the device and the software implementation of data exchange between the device and the mobile application.
❯ Device Body
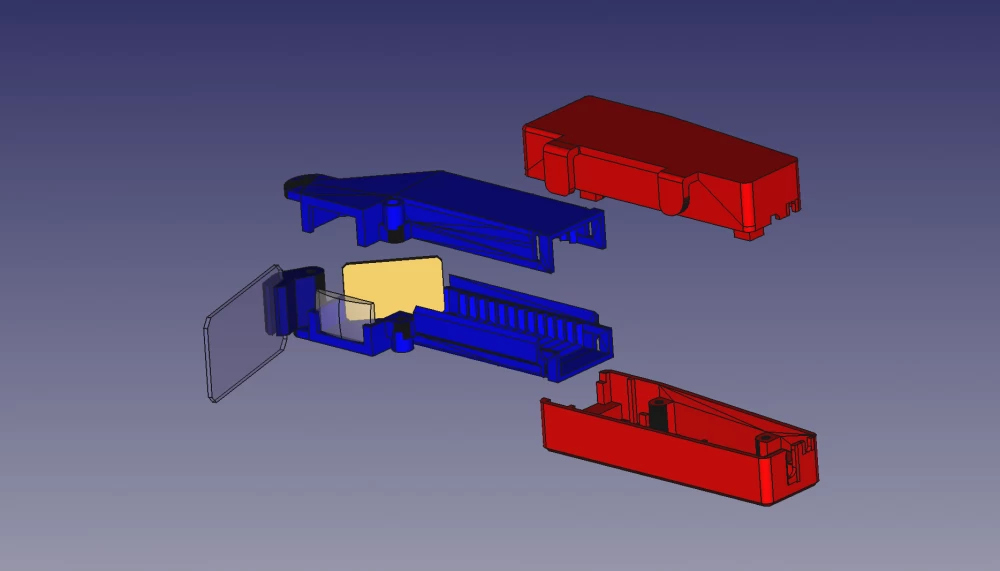
The body of the device does not have any complex design and looks as follows:
To save time and not struggle with fitting the optical system, I used an off-the-shelf solution as a base, to which I made my own modifications. Fortunately, after the presentation of the Google Glass headset in 2015, Indian colleagues "spawned" DIY versions of such cases. Below is a more detailed description of the device elements:
As you can see, the optical system consists of the following elements:
Projection glass;
Focusing lens;
Mirror.
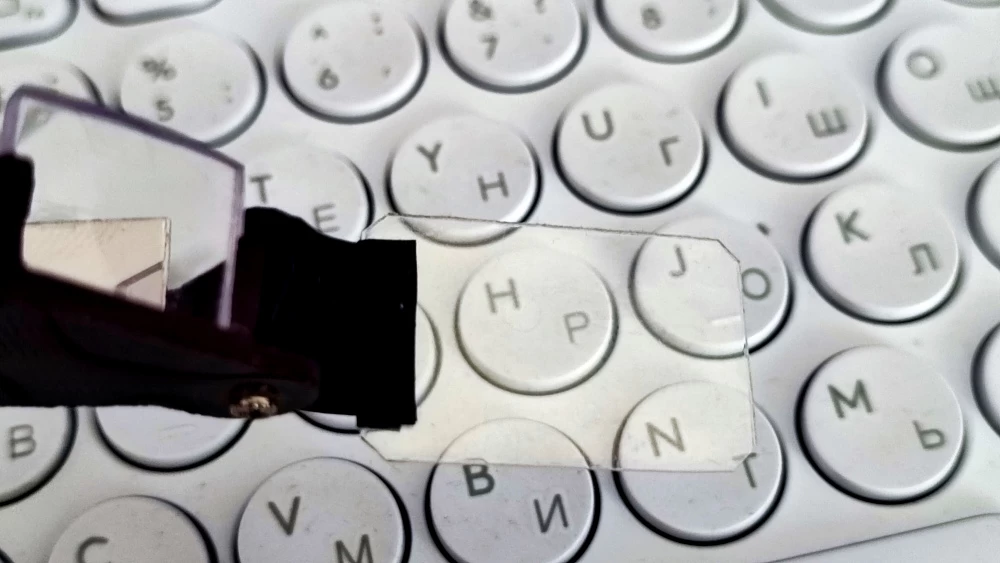
Projection glass — one of the important elements of the device, on which the quality of the projection depends. Below is a photo of the projection glass used:
As a projection glass, it is necessary to use specialized glasses with a metal coating to ensure effective reflection of the light of the projected image. To make such glass at home, it is enough to delaminate a DVD disc, as compact discs use a special coating for effective reflection of the laser beam from the reading surface. The presence of a coating on the glass can be determined by the metallic sheen when rotating the glass.
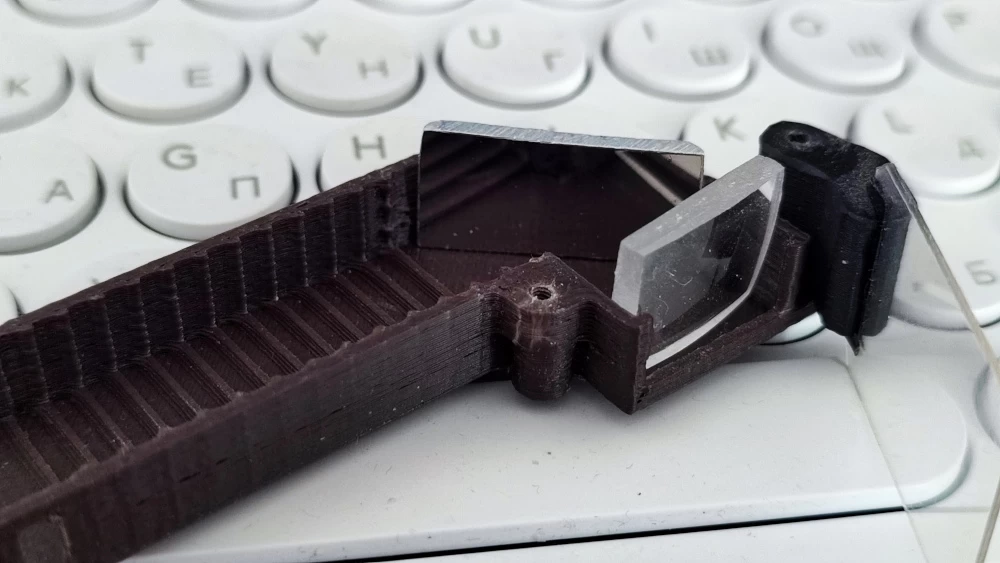
The focusing lens — here everything is simple, this lens is necessary to form the focal length of the projected image in order to correctly align the picture of reality and the projection. This lens was taken from a cheap VR box and was filed to the dimensions of the output "window".
The mirror — here things are not so simple, as practice has shown, an ordinary glass mirror cannot be used as a mirror (as the Indians used). When using an ordinary mirror, there is a large delamination of the projection due to double reflection. The best solution is to use a metal mirror, which is used in laser systems. These mirrors are often quite expensive, but for a DIY solution, a metal mirror made from an aluminum "pancake" HDD disk is quite suitable, which I used in practice.
As you can see above in the image, there are small shielding elements on the case that look like an "accordion". I included these elements in the design to combat the halo effect in the projection, as the light coming from the display was reflected from the walls of the case.
❯ Electronics
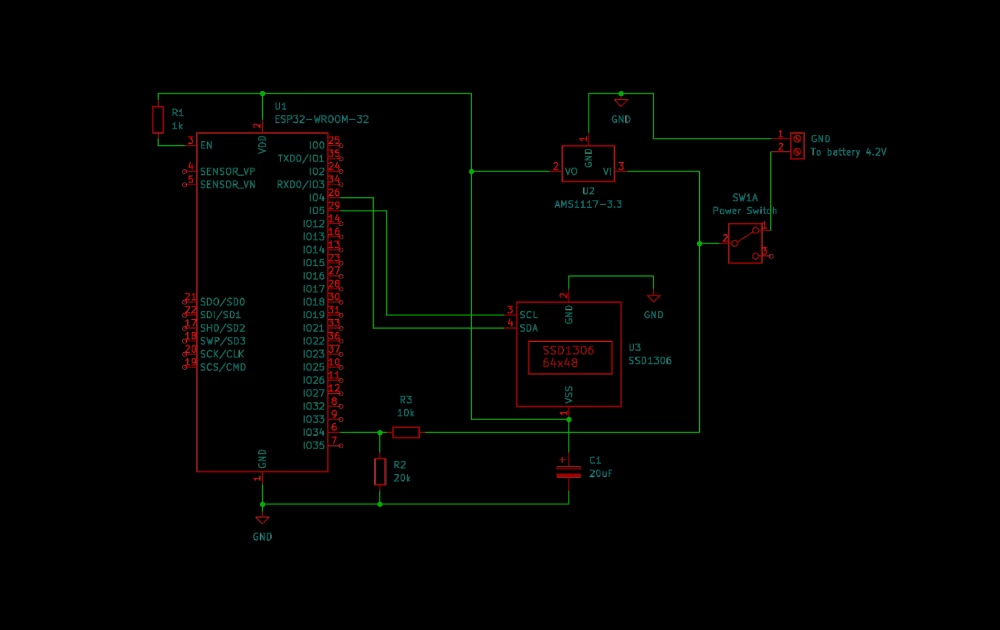
The schematic of the device is not complicated, as the "brains" I chose the ESP32 module, mostly due to the presence of a Bluetooth interface, and as a display, I chose an inexpensive 0.66-inch OLED module with a resolution of 64x48. Why exactly this module? — it is more compact than LCD and has a higher pixel brightness. Below is the schematic of the device:
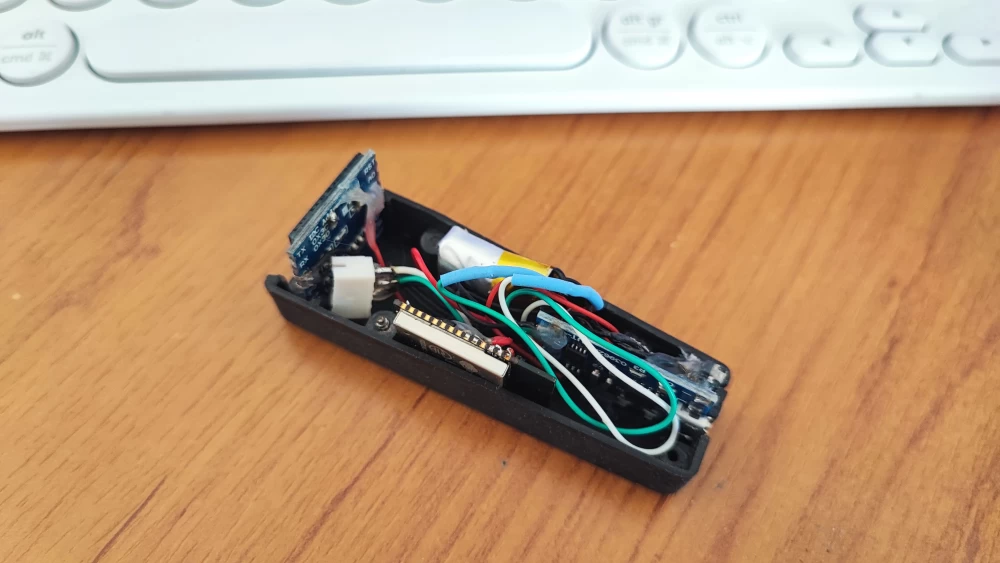
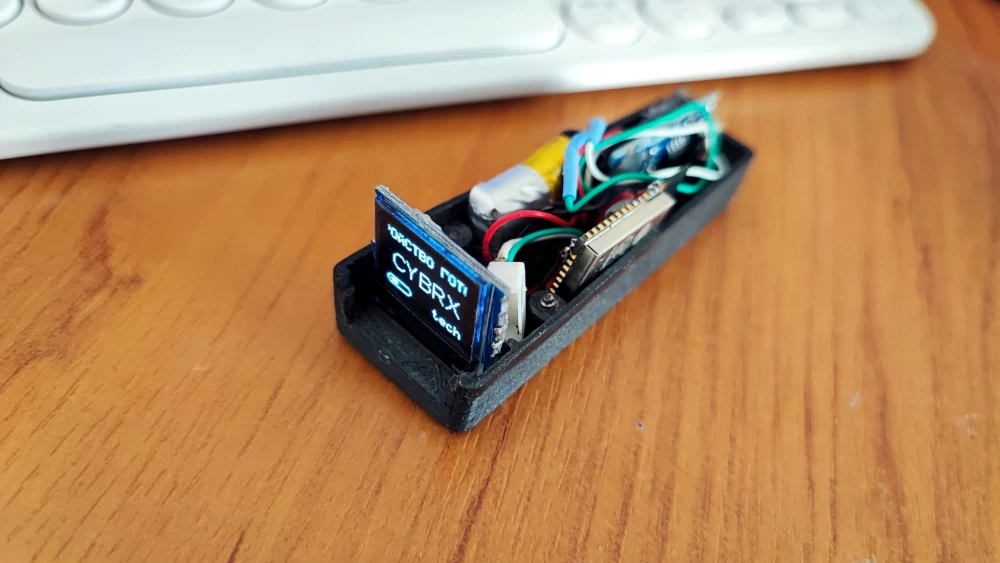
To provide power in this prototype, a 250 mAh Li-on battery was used, and a popular TP4056-based charging module was used as the charging module. Below you can see the layout of the electronic components in the device case:
Front view:
❯ Software
The software functionality ensures data exchange in JSON format between the setup smartphone and the AR monitor using the data collection system mobile application.
The micro software of the AR monitor was developed in the Arduino IDE environment and is not particularly complex. Below is the device code:
Main
#include
#include
#include
#include
#include
#include
#include "SSD1306Wire.h"              // Using a localized display library

SSD1306Wire  display(0x3c, 4, 5);
#define batPin 34
#define DURATION 10000

int battery = 0;
float bat   = 0;
int count   = 0;
float data  = 0;
char *unit  = "";
char *leg  = "";
long timeSinceLastModeSwitch = 0;

BLEServer *pServer = NULL;
BLECharacteristic *pCharacteristic = NULL;
bool deviceConnected = false;
uint8_t txValue = 0;

#define SERVICE_UUID        "4fafc201-1fb5-459e-8fcc-c5c9c331914b"
#define CHARACTERISTIC_UUID "beb5483e-36e1-4688-b7f5-ea07361b26a8"

void send_json(String json){
      dsjson(json);
}

class MyServerCallbacks : public BLEServerCallbacks {
    void onConnect(BLEServer* pServer) {
      deviceConnected = true;
    }

    void onDisconnect(BLEServer* pServer) {
      deviceConnected = false;
    }
};

class MyCharacteristicCallbacks : public BLECharacteristicCallbacks {
    void onWrite(BLECharacteristic *pCharacteristic) {
        std::string rxValue = pCharacteristic->getValue();
        if (!rxValue.empty()) {
            send_json(rxValue.c_str());              // Processing received data
        }
    }
};

void setup() {
  display.init();
  display.flipScreenVertically();
  display.setFont(ArialMT_Plain_10);
  BLEDevice::init("AR Monitor");
  pServer = BLEDevice::createServer();
  pServer->setCallbacks(new MyServerCallbacks());

  BLEService *pService = pServer->createService(BLEUUID(SERVICE_UUID));
  pCharacteristic = pService->createCharacteristic(
                      BLEUUID(CHARACTERISTIC_UUID),
                      BLECharacteristic::PROPERTY_NOTIFY | BLECharacteristic::PROPERTY_WRITE
                    );

  pCharacteristic->addDescriptor(new BLE2902());
  pCharacteristic->setCallbacks(new MyCharacteristicCallbacks());

  pService->start();

  BLEAdvertising *pAdvertising = pServer->getAdvertising();
  pAdvertising->start();
}

void loop() {
   process();
}
DataProcess
void process(){
     if (millis() - timeSinceLastModeSwitch > DURATION) {
     int anbat = map(analogRead(batPin), 0, 4095, 0, 420);
           bat = anbat*0.01;
     int bata  = bat*100;
       battery = map(bata, 257, 419, 0, 100);
    timeSinceLastModeSwitch = millis();
  }
   if (!deviceConnected) {
       display_text(18,"DEVICE READY TO CONNECT","CYBRX","tech", battery);
    }else{
       display_text(18, leg, String(data), unit, battery);
    }

delay(10);
}

void dsjson(String json){
  StaticJsonDocument<200> doc;
  deserializeJson(doc, json);

  leg       = doc["legend"];  // Displayed parameter name
  data      = doc["data"];    // Parameter value
  unit      = doc["unit"];    // Unit of measurement
}
DisplayProcess
void display_text(int posY, String texts, String data_bt, String unit_bt, int bat_2){
     int co = texts.length()*6;
     int point;
     int positionLine;
     if(co > 120){
        count++;
        point = co - count;
        positionLine = point;
     if(count > co+60){
        count = 0;
        }
     }else {
       positionLine = 64;
     }
    display.clear();
    display.setTextAlignment(TEXT_ALIGN_CENTER);
    display.setFont(Font5x7);
    display.drawString(positionLine, posY, texts);
    display.setFont(ArialMT_Plain_16);
    display.drawString(64, 32, data_bt);
    display.setFont(Font5x7);
    display.setTextAlignment(TEXT_ALIGN_RIGHT);
    display.drawString(96, 56, unit_bt);
    if(bat != 0){
    display.drawProgressBar(32, 56, 20, 6, bat_2);
       }
    display.display();
}
➤ Exchange in the mobile app
The following logic is implemented in the application: The user does not need to manually add the AR device to display data, the application implements search and automatic connection of the AR monitor. This function is implemented in the following class:
BLE Device Search Class
public class BleScanner {
    private BluetoothAdapter bluetoothAdapter;
    private BluetoothLeScanner bluetoothLeScanner;
    private boolean scanning;
    private ScanCallback scanCallback;
    private Handler handler;
    private ScanResultListener scanResultListener;

    public BleScanner() {
        bluetoothAdapter = BluetoothAdapter.getDefaultAdapter();
        bluetoothLeScanner = bluetoothAdapter.getBluetoothLeScanner();
        scanning = false;
        handler = new Handler(Looper.getMainLooper());
        setupScanCallback();
    }

    public void setScanResultListener(ScanResultListener listener) {
        this.scanResultListener = listener;
    }

    private void setupScanCallback() {
        scanCallback = new ScanCallback() {
            @SuppressLint("MissingPermission")
            @Override
            public void onScanResult(int callbackType, ScanResult result) {
                super.onScanResult(callbackType, result);
                BluetoothDevice device = result.getDevice();
                if (device.getName() != null) {                                                     // Skip sending to listener devices not named AR Monitor
                    String dev;
                    try {
                        dev = convert_to_utf_8(device.getName());                                   // Check for Cyrillic
                    } catch (UnsupportedEncodingException e) {
                        throw new RuntimeException(e);
                    }
                    if (dev.equals("AR Monitor")) {                                             // If we find our device, send it to the listener
                         scanResultListener.onDeviceFound(device);
                         stopScan();
                    }
                }
            }

            @Override
            public void onBatchScanResults(List results) {
                super.onBatchScanResults(results);
                // Handle batch scan results if needed
            }

            @Override
            public void onScanFailed(int errorCode) {
                super.onScanFailed(errorCode);
                // Handle scan failure
                scanResultListener.onScanFailed(errorCode);
            }
        };
    }

    @SuppressLint("MissingPermission")
    public void startScan() {
        if (!scanning && bluetoothLeScanner != null) {
            scanning = true;
            bluetoothLeScanner.startScan(scanCallback);
            handler.postDelayed(this::stopScan, 10000);                                    // Stop scanning after 10 seconds
        }
    }

    @SuppressLint("MissingPermission")
    public void stopScan() {
        if (scanning && bluetoothLeScanner != null) {
            scanning = false;
            bluetoothLeScanner.stopScan(scanCallback);
        }
    }

    public interface ScanResultListener {
        void onDeviceFound(BluetoothDevice device);

        void onScanFailed(int errorCode);
    }

    private  String convert_to_utf_8(String data) throws UnsupportedEncodingException {
        String return_data = "";
        if(data !=null) {
            byte[] ptext = data.getBytes(getEncoding(data));
            return_data =  new String(ptext, StandardCharsets.UTF_8);;
        }
        return return_data;
    }
    public static String getEncoding(String str) {
        String encode = "GB2312";
        try {
            if (str.equals(new String(str.getBytes(encode), encode))) {
                return encode;
            }
        } catch (Exception ignored) {}
        encode = "ISO-8859-1";
        try {
            if (str.equals(new String(str.getBytes(encode), encode))) {
                return encode;
            }
        } catch (Exception ignored) {}
        encode = "UTF-8";
        try {
            if (str.equals(new String(str.getBytes(encode), encode))) {
                return encode;
            }
        } catch (Exception ignored) {}
        encode = "GBK";
        try {
            if (str.equals(new String(str.getBytes(encode), encode))) {
                return encode;
            }
        } catch (Exception ignored) {}
        return "";
    }
}
The device search is started using the startScan() method and, if our AR monitor is nearby, returns the MAC address of our device for connection initialization. The obtained MAC address is then stored in the application's memory. The following class is implemented for working with the BLE connection:
BLE Connection Management Class
public class BLEManager {

    private static final UUID SERVICE_UUID = UUID.fromString("4fafc201-1fb5-459e-8fcc-c5c9c331914b");
    private static final UUID CHARACTERISTIC_UUID = UUID.fromString("beb5483e-36e1-4688-b7f5-ea07361b26a8");

    private final Context context;
    private BluetoothAdapter bluetoothAdapter;
    private BluetoothGatt bluetoothGatt;
    private BluetoothGattCharacteristic characteristic;
    private boolean connected;
    public BLEManager(Context context) {
        this.context = context;
        BluetoothManager bluetoothManager = (BluetoothManager) context.getSystemService(Context.BLUETOOTH_SERVICE);
        if (bluetoothManager != null) {
            bluetoothAdapter = bluetoothManager.getAdapter();
        }
    }

    @SuppressLint("MissingPermission")
    public void connectToDevice() {
        if (bluetoothAdapter == null || !bluetoothAdapter.isEnabled()) {
            return;
        }
        // ESP32 Address
        String DEVICE_ADDRESS = new MySharedPreferences(context).getString("VrMAC", "00:00:00:00:00");
        if(!Objects.equals(DEVICE_ADDRESS, "00:00:00:00:00")) {
            BluetoothDevice device = bluetoothAdapter.getRemoteDevice(DEVICE_ADDRESS);
            bluetoothGatt = device.connectGatt(context, false, gattCallback);
        }
    }

    private final BluetoothGattCallback gattCallback = new BluetoothGattCallback() {
        @SuppressLint("MissingPermission")
        @Override
        public void onConnectionStateChange(BluetoothGatt gatt, int status, int newState) {
            super.onConnectionStateChange(gatt, status, newState);
            if (newState == BluetoothGatt.STATE_CONNECTED) {
                connected = true;
                gatt.discoverServices();
            } else if (newState == BluetoothGatt.STATE_DISCONNECTED) {
                connected = false;
            }
        }

        @Override
        public void onServicesDiscovered(BluetoothGatt gatt, int status) {
            super.onServicesDiscovered(gatt, status);
            if (status == BluetoothGatt.GATT_SUCCESS) {
                BluetoothGattService service = gatt.getService(SERVICE_UUID);
                characteristic = service.getCharacteristic(CHARACTERISTIC_UUID);
            }
        }
        @Override
        public void onCharacteristicChanged(BluetoothGatt gatt, BluetoothGattCharacteristic characteristic) {
            super.onCharacteristicChanged(gatt, characteristic);
            if (CHARACTERISTIC_UUID.equals(characteristic.getUuid())) {
                byte[] data = characteristic.getValue();
                String dataStr = new String(data);                                                  // Here you can process the received data
            }
        }
    };

    @SuppressLint("MissingPermission")
    public void sendData(String data) {
        if (bluetoothGatt != null && characteristic != null) {
            characteristic.setValue(data.getBytes());
            bluetoothGatt.writeCharacteristic(characteristic);

        }
    }

    @SuppressLint("MissingPermission")
    public void disconnect() {
        if (bluetoothGatt != null) {
            bluetoothGatt.disconnect();
            bluetoothGatt.close();
        }
    }
    public boolean isConnected() {
        return connected;
    }
}
To connect to the device, use the connectToDevice() method, and to send data to the device, use the sendData() method, where a JSON-formatted string is passed as an argument. Below is the function for sending data to the device:
Data transfer function to AR monitor
private void sendToAr(String legend, float data, String unit){
    if(bleManager.isConnected) {
      JSONObject json = new JSONObject();
                 json.put("legend", legend);
                 json.put("data",     data);
                 json.put("unit",     unit);

      bleManager.sendData(json.toString()); // Sending JSON via BLE
    }
  }
This function is implemented in the Foreground Service where a cyclic request for the required parameter from the data collection system is performed, and the received data is transmitted to the device using the above-described function. Activation of the Foreground service in the application is performed using the "switch" element "Data transmission to AR device".
❯ Results
In this article, I tried to simply explain how this device and the software for its operation are implemented. As you can see, the device does not have any complex solutions and is quite accessible for implementation. Below is a list of costs for implementing the hardware part:
Microcontroller ESP-32S - $2.26;
Display module SSD1306 - $2.06;
Li-po 250mAh battery - $2.04;
TP4056 charging module - $1.12 (for 5 pcs);
Other components - $1;
Total cost of components: ~ $7.6.
Thank you to everyone who took the time to read this article, and if you have any questions, feel free to ask in the comments! Wishing you all the best, success, and interesting projects!
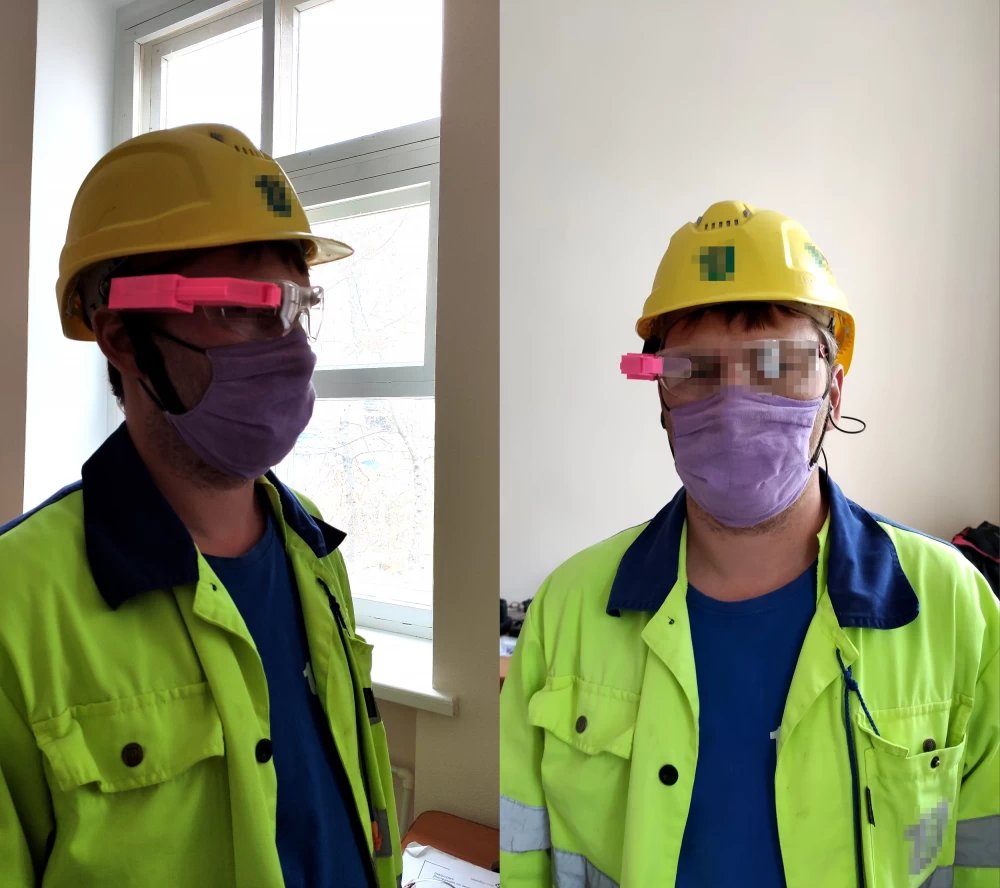
Testing the first prototype in 2020
PS: This solution did not bypass my hobby: I have been riding a unicycle for a long time and decided to use this AR monitor to display telemetry, after adding a couple of classes to the WheelLog application to work with the device, I really liked the result.



Write comment